To replace an adapter in the system, complete the steps in this
procedure.
Procedure
Ensure that you have the electrostatic discharge (ESD) wrist strap on
and that the ESD clip is plugged into a ground jack or connected to an unpainted metal surface. If
not, do so now.
Ensure that the target slot is empty.
If necessary, remove the adapter from the antistatic package.
Attention: Avoid touching the components and gold connectors on the
adapter.
Place the adapter, component-side up, on a flat, antistatic
surface.
Attention: A pin on the tailstock of the adapter resembles a removable screw. Do not
remove this pin. It is required for correct alignment and seating.
Choose from the following options:
To replace an adapter into a cassette that has adapter retainers and strips, continue with
step 6.
To replace an adapter into a cassette that does not have adapter retainers and strips,
continue with step 8.
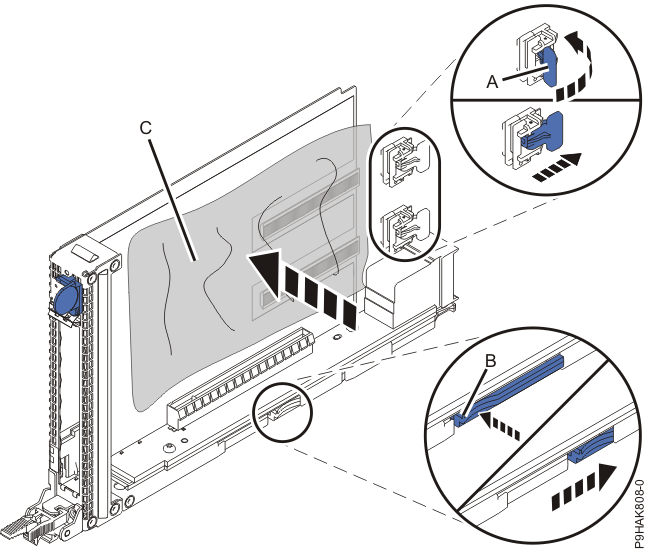
If your cassette has two adapter retainers with strips, complete the following steps to install
or replace an adapter into the cassette:
If the adapter retainers (A) haven't already been removed, remove the
adapter retainers (A) by putting them in the open position and moving them
all the way off the strips.
Press and slide the release bar (B) to open the cassette.
Place an ESD safety sheet (C) over the strips.
Note: You can use the ESD package that the new adapter was in. If necessary, cut it to size.
Figure 1. Placing an ESD safety sheet over the strips on the 9040-MR9 cassette
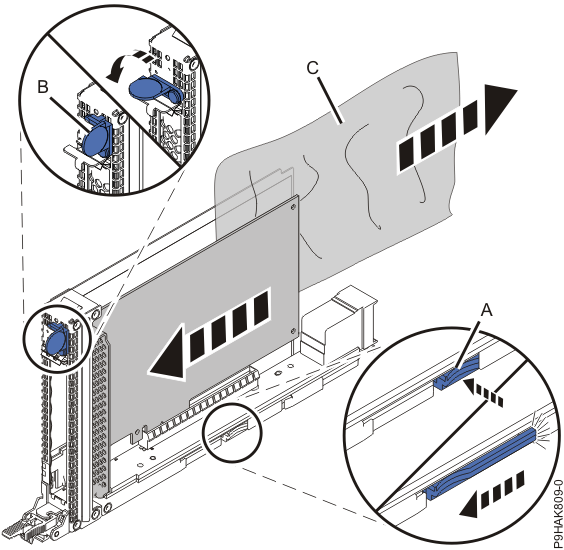
Insert the adapter into the cassette.
Press and slide the release bar (A) to close the cassette.
Close the tailstock clamp (B) by rotating the clamp in the direction
that is shown.
Pull the ESD safety film (C) out.
Figure 2. Installing an adapter in the cassette for the 9040-MR9 system
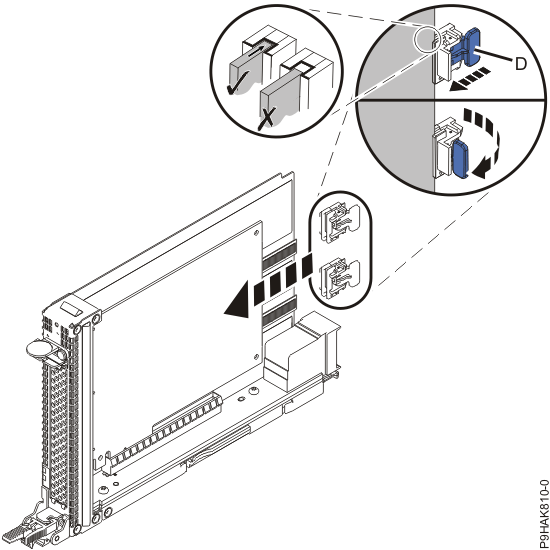
With the adapter retainers (D) in the open position, slide the retainers
onto the strips.
Position the adapter retainers (D) so that they support the adapter and
put them in the locked position by rotating them in the direction that is shown.
Note: Ensure that the adapter is secured in the adapter retainer channel.
Figure 3. Securing an adapter with the adapter retainers for the 9040-MR9 system