Use this procedure to replace the system backplane.
| The Advanced System Management Interface (ASMI) is the interface to the service processor that is required to perform general and administrator-level service tasks, such as reading service processor error logs, reading vital product data, setting up the service processor, and controlling the system power. The ASMI may also be referred to as the service processor menus. To access the ASMI, refer to Accessing the Advanced System Management Interface. When you have accessed the ASMI, continue with the next step. |
Prior to replacing this FRU, check and
record all server settings as you may need to update the system after
you update this FRU. This can be done through the Advanced System
Management Interface (ASMI) .
|
| This FRU cannot be serviced concurrently. Every
partition must be shut down and the system powered off to continue
the repair. Authorization must come from the customer to shut down all running partitions and power off the system. If the customer will not allow the partitions to be shut down or the system to be powered off, delay the service procedure. If the customer is using a secondary HMC to manage the system, make sure they are not powering on the system at this time. |
|
 |
| Note to Tower Users: The instructions in this procedure are written based on the Rack model. Tower users may still use this procedure. However, Tower users should ignore specific references to rack-only features such as rack doors, rack thumbscrews, and rack-specific FRU orientation, etc.
|
 |
|
 |
|
Notes:
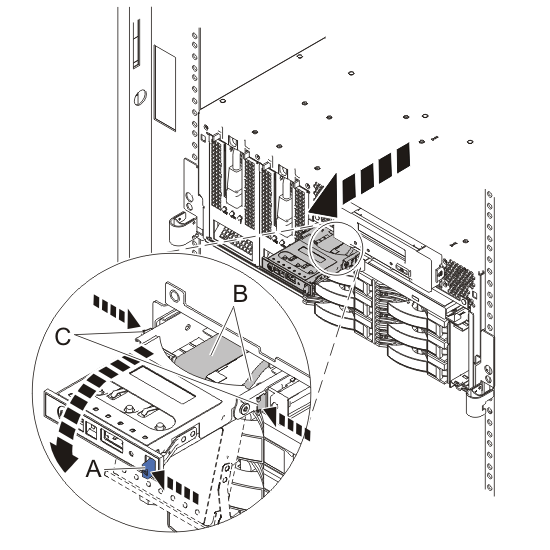
While holding the system unit release latches (A) down on both the left and right sides, pull the system unit (B) out from the rack until the rails are fully extended and locked. |
 |
|
 |
Attention: For proper cooling and air flow, re-install the cover before turning on the system. Operating the system without the cover for more than 30 minutes could damage the system components. |
 |
|
 |
|
 |
|
 |
|
 |
|
 |
| Grasp the GX adapter divider by its top edge, and slide it up and out of the system. |
 |
Note: Record the slot location of all
adapters that are going to be removed, so that they can be reinstalled
in exactly the same place after the repair.
|
 |
|
 |
Note: Record the slot location of all
adapters that are going to be removed, so that they can be reinstalled
in exactly the same place after the repair.
|
 |
| Note: When removing the auxiliary cache card, handle it by its edges, and not by the attached battery.
|
 |
|
 |
|
 |
| Gently pull the TPMD card (A) straight up and out of its slot on the system backplane. |  |
|
 |
|
 |
|
 |
|
 |
|
 |
|
 |
| Note: Take care when removing the system backplane. Do not lift the system backplane by any of the attached modules.
|
 |
| Note: Take care when installing the system backplane. Do not lift the system backplane by any of the attached modules.
|
 |
|
 |
Attention: Memory DIMMs are keyed to prevent a DIMM from being installed improperly. Note the locations of the key tabs within the DIMM connector before attempting to install the DIMM.
|
 |
|
 |
|
 |
|
 |
|
 |
| Gently push the TPMD card (A) straight into its slot on the system backplane. |  |
|
 |
|
 |
| Note: When installing the auxiliary cache card, handle it by its edges, and not by the attached battery.
|
 |
Note: Reinstall the cards in the same
slot locations as before the repair.
|
 |
|
 |
Note: Reinstall the cards in the same
slot locations as before the repair.
|
 |
|
 |
|
 |
|
 |
|
 |
|
 |
|
 |
|
 |
|
 |
Note: When placing the system into
operating position, ensure that the cables at the back of the system
do not catch or bind as you push the system unit back into the rack.
|
 |
|
 |
|
 |
|
Attention: To prevent damaging the FRU or the system, use the following precautions before plugging cables into a connector or adapter:
External cables were labeled before disconnection so that they can be reconnected in exactly the same place after the repair. Reconnect all external cables to the rear of the machine you are servicing. This can include cables on the following ports:
|
If you removed the power cords, perform the
following steps.
|
|
| The service processor must connect to the network to be accessible from the HMC. |
| How will the IP Address of the Service Processor be managed? | ||
|---|---|---|
| Obtain an IP Address automatically from a DHCP server | Configure a static IP Address | |
| ↓ | Go to step60. | |
| Enable network access to the service processor by proceeding as follows: If the network connection uses the Dynamic Host Configuration Protocol (DHCP) to establish an IP address, and uses the Hardware Management Console (HMC) as the DHCP server, no additional configuration is necessary to enable network access to the service processor. Perform the following steps:
|
|
The Advanced System Management Interface (ASMI) is the interface to the service processor that is required to perform general and administrator-level service tasks, such as reading service processor error logs, reading vital product data, setting up the service processor, controlling the system power, and setting service processor network ports. The ASMI may also be referred to as the service processor menus. The ASMI can be accessed through https. As the network connection uses static IP address assignments, perform the following:
|
| With the network connection now configured to use static IP address assignments, try to access the service processor network ports. |
| Do you have network access to the service processor? | ||
|---|---|---|
| Yes | No | |
| ↓ | Go to step 66 | |
|
If you are already connected to the ASMI, click Next to continue. Otherwise to access the ASMI through the Hardware Management Console (HMC), complete the following steps:
|
| The enclosure serial number is stored in the I/O backplane. When an I/O backplane is replaced, the seven digit serial number printed on a bar-coded label on the system unit, needs to be manually inputted and stored in the new I/O backplane using ASMI. Note: To perform this operation, your authority level
must be Authorized Service Provider (ID: celogin).
To input the enclosure serial number:
|
| Go to step 68. |
| If the network connection uses DHCP to establish an IP address, but does not use an HMC as the DHCP server, perform the following:
|
| Do you have network access to the service processor? | ||
|---|---|---|
| No | Yes | |
| ↓ | Go to step 62 | |
| You have indicated that you are still not able to access the service network. You will need to reset the service processor by pressing the pin-hole switch (E) on the operator panel. |
 |
| Go to step 58. |
| Change the password of the admin user ID when prompted by performing the following steps:
As a security measure, you are required to enter your current user password in the Current password for current user ID field. Note: Passwords can be any combination of up to 64 alphanumeric characters. The default password for the admin User ID is admin. After your initial login to the ASMI, the admin password must be changed. |
| Set the system name. The system name can be changed to any valid ASCII string. It does not have to follow the initialized machine type_model_serial number format. To change the system name, perform the following:
The new system name is displayed in the status frame, the area where the Log out button is located. If another method, such as the HMC, is used to change the system name, the status frame does not reflect the change. |
|
Set the time-of-day.
|
| Reenter any of the following settings that were previously changed through the ASMI, unless you want to use the default settings. Settings to be set include the following:
|
|
|
Profile data stored in the managed server has been cleared or corrupted. To recover profile data using the HMC, proceed as follows:
|
| If your system is running IBM® i and is not managed by the HMC, you must update the load source after replacing the system backplane. Note: To update the load source without using the HMC, do the following:
|
| Go to Verifying a repair. |