Learn about the features, specifications and installation notes
for the PCI-X double-wide, quad-channel Ultra320
SCSI RAID controller for IBM® System i® models.
The
PCI-X double-wide, quad-channel Ultra320
SCSI RAID controller is a high-performance SCSI adapter combined with
an auxiliary-write cache adapter to form a double-wide, adapter pair. The
two adapters are screwed together. This topic contains the following sections:
Features
- 3 external U320 SCSI ports
- 1 internal U320 SCSI port dedicated to connecting the controller to the
auxiliary-write cache adapter
- Up to 36 Direct Access Storage Devices (DASD) can be externally attached
per adapter
- 320 MB/s data rate per SCSI bus
- Supports low voltage differential (LVD) disk devices only
- Supports RAID 5 and 6 (3–18 drive sets)
- 390 MB/1.5 GB compressed write cache
- 415 MB/1.6 GB compressed read cache
- PCI-X DDR support (storage adapter side)
- IOP or IOPless (5739 requires an IOP. 5778 does not.)
Figure 1. Adapter 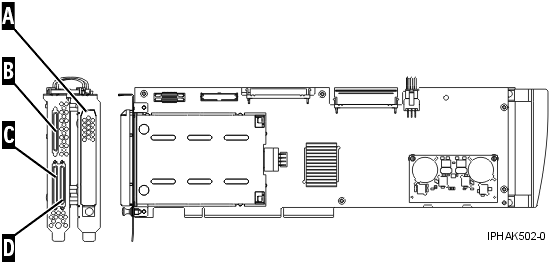
- A
- Battery cover
- B
- SCSI port 2
- C
- SCSI port 0
- D
- SCSI port 1
Specifications
| Item |
Description |
|---|
| Adapter FRU number |
42R6578 |
| Cache battery FRU number |
42R3965 |
| Series type |
IBM System i models |
| Unit description |
- 64 bit, 133 MHz, 3.3 V
- PCI-X 2.0 compliant
- Double-wide adapter, requires 2, adjacent, long slots. The SCSI controller
side of the adapter pair requires a 64-bit slot. (The controller side is the
side with the external SCSI connectors.)
- The auxiliary-write cache adapter contains a dual, concurrently maintainable,
cache-battery pack, which maintains cache memory on both adapters in the event
of an abnormal termination.
|
| Operating system or partition requirements |
- i5/OS® V5R3, V5R3m5,
and V5R4 with PTFs.
- AIX 5L™ Version 5.2 with
the 5200-10 Technology Level, or later
- AIX 5L Version 5.3 with
the 5300-06 Technology Level, or later
- Red Hat Enterprise Linux® version 4 U4 , or later
- SUSE Linux Enterprise Server 10, or later
Check the IBM Prerequisite Web site at http://www-912.ibm.com/e_dir/eServerPrereq.nsf for
further details and updates. for
further details and updates.
|
| Maximum number |
For
system-specific adapter placement information, see PCI placement in the system unit or expansion unit in
the PCI adapter topic. |
Logical partitioning (LPAR)
When used
in an logical partition (LPAR) environment, this double-wide adapter must
have both slots of the adapter assigned to the same logical partition. When
implementing dynamic logical partitioning (DLPAR), both slots of the adapter
must be managed together.
Replacing the light pipe
assembly
If you are replacing a double-wide adapter which contains
a light pipe assembly, you will need to move the light pipe assembly to the
replacement FRU. To replace the light pipe, follow these steps:
- If necessary, remove the adapter handle A from the back of the
card set.
Tip: If you misplace the light-pipe retaining screw C,
use either of the screws that secure the card handle B to the card.
- Slide the light pipe assembly D between the two halves of the adapter.
Ensure that the threaded screw hole located on the light pipe assembly is
aligned with the screw clearance hole located on the card .
Installing the adapter in a
cassette
To install this adapter in a cassette, first remove the
adapter handle (B), and the two plastic covers from
the SCSI jumper cable (A), as shown in the following
figure. Then follow the general procedures to Place an adapter in the PCI
adapter double-wide cassette.
Figure 2. Preparing the
adapter for placement in a cassette
Adapter dividers
If
you are installing this double-wide adapter in a system model that uses adapter
dividers, the adapter divider must be removed from between the two slots where
you are installing the adapter. For instructions, see Model 285, 52x, 550, and 720 PCI
adapter dividers
Power LED
For a double-wide adapter,
there is only one power LED visible for both slots.
Concurrent maintenance
procedure
Concurrent maintenance of this adapter is not supported
through the Hardware Management Console (HMC). Concurrent maintenance must
be done from the Hardware Service Manager (HSM) of the system or owning partition.
The HSM will automatically power off both PCI slots when either slot is selected.
Important: - Both PCI slots must be powered off when installing or removing this adapter
with the system power on.
- If this adapter is the load source IOA, or under the load source IOP,
or any other storage IOA/IOP with critical DASD attached for the system, this
concurrent maintenance procedure should be done by a qualified service provider.
At step 12, the HSM will direct you
to use control panel functions 68 and 69 to power off the domain.
Follow this procedure:
- Start an i5/OS session for the system or partition containing the adapter
and sign on to the system or partition.
- Type strsst on the command line of the Main Menu
and then press Enter.
- Type your service tools user ID and service tools password on the System
Service Tools (SST) Sign On display and press Enter.
- Select Start a service tool from the System Service
Tools (SST) display and press Enter.
- Select Hardware service manager from the Start
a Service Tools display and press Enter.
- Select Logical hardware resources (system, frames, cards) from
the Hardware Service Manager display and press Enter.
- Select System bus resources and press Enter. The
display changes to the Logical Hardware Resources on System Bus display.
- Page down and locate Combined Function IOP that
controls the IOA to be serviced.
- Enter 9 in the Opt field for the Combined Function IOP to
be serviced.
- Locate the Storage IOA resource for the adapter
to be serviced and enter 8 in the Opt field for that resource.
- Enter 3 for Concurrent maintenance in the Opt field
for the Storage IOA resource to be serviced. The display
changes to the Hardware Resource Concurrent Maintenance display.
- Press F9 to power off the domain.
- Press Enter to confirm start power off. The display changes to the Hardware
Resource Concurrent Maintenance Status display, which shows the status of
the power off.
When the power off is complete, the display returns to the
Hardware Resource Concurrent Maintenance display. The display will show that
the Power Status is off for Storage IOA.
Leave this display up on the HSM while you remove and replace the adapter.
- Check the slot power LED state for the slot in which the adapter resides
to verify that the adapter is powered off.
For a double-wide adapter,
there is only one power LED visible for both slots.
- Remove and replace the adapter. Removal and replacement procedures are
covered in the PCI
adapters topic.
- After the replacement is complete, return to the Hardware Resource Concurrent
Maintenance display on the HSM.
- If you were previously instructed to use operator panel function 69 to
power on the adapter, do so now. Then go to step 22,
otherwise continue with next step.
- Enter F10 to power the adapter on.
- Press Enter to begin power on.
- If the Work with Controlling Resource display appears, enter 7 in the
Opt field for the Combined function IOP to assign the
IOA to.
The Hardware Resource Concurrent Maintenance Status display shows
the status of the power on.
- When the power on is complete, the display returns to the Hardware Resource
Concurrent Maintenance display. The display will show that the Power
Status is on for the Storage IOA.
- Check the LED status to verify that the adapter is powered
on.
For a double-wide adapter, there is only one power LED visible for both
slots.
- Return to the procedure that sent you here.


