POWER7 information

Installing a PCI adapter contained in a cassette with the power off

You can install a PCI adapter.

If you are installing a new feature, ensure that you have the software that is required to support the new feature and that you determine whether there are any prerequisites. To check for the prerequisites, see IBM® Prerequisite website . If the required software is not installed, see the following websites to download it, and then install it before continuing:
Notes:
  • If the system is partitioned, you must determine the partition owning the I/O slot. Once the adapter is installed, the I/O slot must be powered on in the operating system.
  • If an I/O slot on a partitioned system is not owned by a partition, then the I/O slot cannot be powered on.
  • Adding an I/O slot to a partition using dynamic logical partitioning (DLPAR) will power on the I/O slot as part of the DLPAR add. For information about DLPAR, see Dynamic Logical Partitioning.
  • To learn more about working in a partitioned environment, see Logical partitioning.
  • If a PCI adapter with CCIN 577D is installed in location P1-C4 of a 5802 or 5877 expansion unit, do not complete the install procedure for the PCI adapter in location P1-C5 with the system power on. The install action with the power on might cause the PCI adapter in location P1-C4 to fail.
  • If a PCI adapter with CCIN 577D is installed in location P1-C4 of a 5802 or 5877 expansion unit, you can complete the remove and replace procedures for the PCI adapter in location P1-C5 with the system power on. The remove action and the replace action of the PCI adapter in location P1-C5 with the power on does not cause the PCI adapter in location P1-C4 to fail.

If you do not have an HMC, complete this procedure to install a PCI adapter, complete the following steps to install a PCI adapter with the system power off:
  1. Complete the prerequisite tasks that are described in Before you begin.
  2. Take appropriate precautions for avoiding electric shock and handling static-sensitive devices. For information, see Avoiding electric shock and Handling static-sensitive devices.
  3. To determine in which slot to place the PCI adapter, refer to the placement guide for information regarding slot restrictions for the adapters that can be used in this system.
  4. Stop the system or logical partition. For instructions, see Stopping a system or logical partition.
  5. Disconnect the power source from the system by unplugging the system.
  6. Determine the location of PCI adapter in the system.
  7. Remove the PCI adapter cassette by completing the following steps.
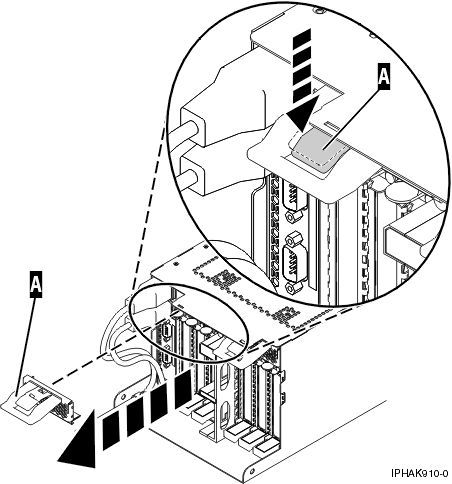
    1. Remove the PCI adapter EMC shield (A) as shown in Figure 1.
      Figure 1. Remove the EMC shield
      Remove the EMC shield
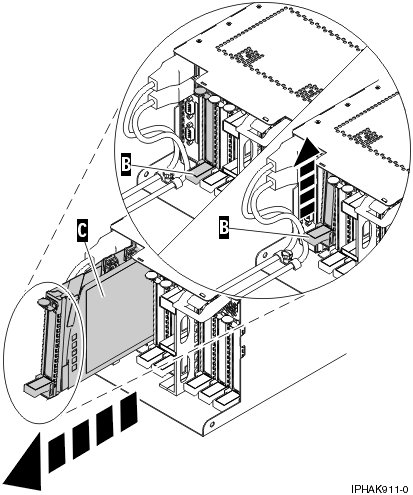
    2. Lift up the lower cassette handle (B) as shown in Figure 2. Pull the PCI cassette (C) out of the system.
      Figure 2. PCI adapter cassette removed from the system unit
      PCI adapter cassette removed from the system unit
  8. Install the adapter into the PCI adapter cassette. See the following topics:
  9. Ensure the lower cassette handle is pressed up toward the retainer clip. This places the adapter in the correct position to be locked in the system.
  10. Install the PCI adapter cassette by completing the following steps:
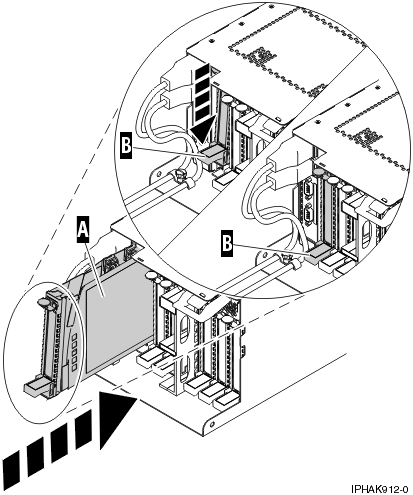
    1. Slide the cassette (B) into the cassette slot as shown in Figure 3. When the cassette is fully inserted into the system, firmly press downward on the lower cassette handle (B) to lock the adapter in its connector.
      Figure 3. PCI adapter cassette installed in the system unit
      PCI adapter cassette installed
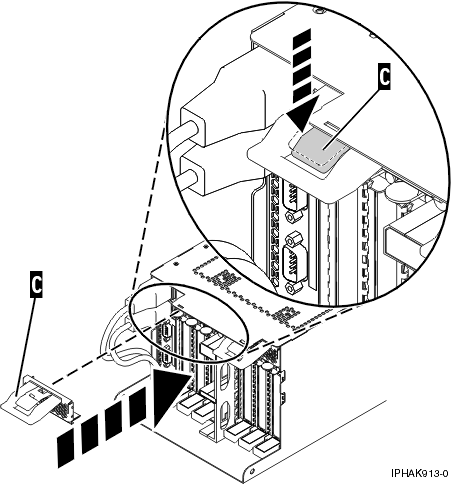
    2. Replace the EMC shield (C) as shown in Figure 4.
      Figure 4. PCI adapter EMC shield in the closed position
      PCI adapter EMC shield in the closed position
  11. Start the system or logical partition. For instructions, see Starting a system or logical partition.
  12. Verify the installed part.
    • If you replaced the part because of a service action, verify the installed part. For instructions, see Verifying a repair.
    • If you installed the part for any other reason, verify the installed part. For instructions, see Verifying the installed part.


Send feedback Rate this page

Last updated: Thu, January 10, 2019