Installing the rack security kit
You might need to install the rack security kit.
To install a rack security kit (feature 6580) that consists of the security lock and security slide bars, complete the following steps:
- Read the Rack safety notices.
- Verify the inventory in the rack security kit. Figure 1. Rack security kit inventory
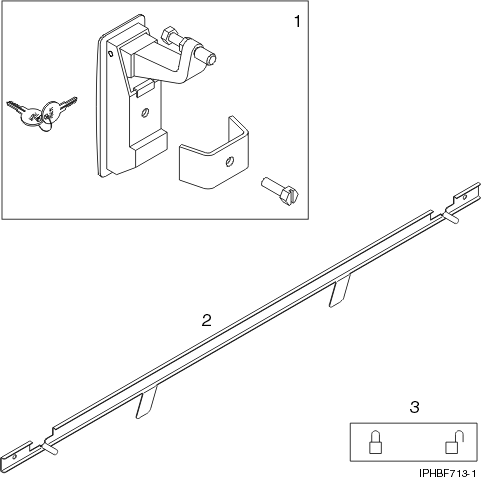
Item Description 1 Two lock hardware kits. Each kit contains: - Rack lock
- Bracket
- Screw
- Two keys
2 Two security slide bars 3 Two locked/unlocked stickers - Remove the existing door latch.
- Open the front rack door.
- On the inside of the door, remove the screw (4) in Figure 2 that secures the latch to the rack door. Figure 2. Removing the existing door latch
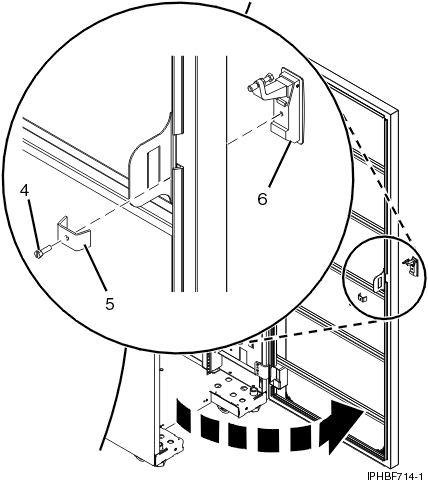
- Remove the bracket (5).
- From the outside of the door, remove the door latch (6).
Note: If the rack is equipped with the ruggedized kit, remove the jam nut (1) and hex nut (2) from the existing door latch and reinstall both nuts on the new door lock latch, as shown in the following figure.Figure 3. Ruggedized latch
Item Description 1 Jam nut 2 Hex nut 3 Hex nut 4 Screw - If the door latch has the ruggedized latch, continue with step 5. If you must install the standard latch, go to step 6. Figure 4. Standard latch

Item Description 1 End cap 2 Screw 3 Hex nut - Assemble the ruggedized latch. To assemble the ruggedized latch, perform the
following tasks: Note: Refer to the Standard latch figure 51 for steps 5a through 5d and the Ruggedized latch figure 50 for steps 5e through 5i.
- Remove the end cap (1) from the new latch and discard.
- Loosen the hex nut (3).
- Remove the screw (2) from the new latch.
- Remove the nut (3) from the screw.
- Insert the screw (4) into the new latch in the reverse orientation.
- Screw the hex nut (3) onto the screw (4).
- Screw the hex nut (2) onto the screw (4).
- Screw the jam nut (1) onto the screw (4). The jam nut (1) must be flush with the end of the screw (4).
- Tighten the hex nut (2) against the jam nut (1).
- Install the locking latch.
- Insert the keyed rack lock into the latch slot on the front of the door (6) in Figure 2.
- Secure the lock by attaching the lock bracket (5) with the screw (4), on the inside of the door.
- Repeat steps 3 and 6 to install the second lock on the rear rack door.
- Adjust the screw (4) in figure 50 to secure the door. The door rubber bumpers must be snug against the frame when the door is latched.
- Tighten the hex nut (3) in figure 50 against the latch to prevent the screw (4) from loosening.
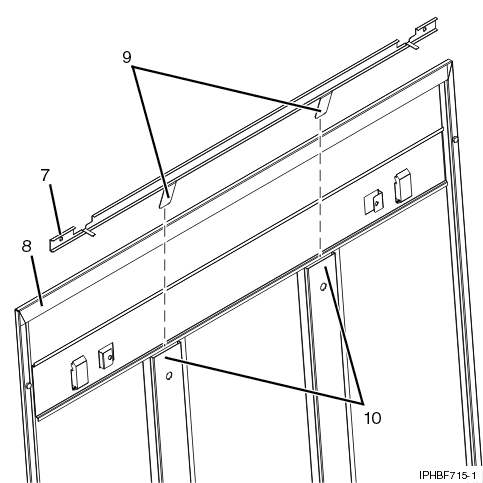
- Install a security slide bar on the right side of the rack. Note: Each slide bar rail has two long tabs on the bottom of the rail. The slide bar rails are identical and can be installed on either the right or left side cover panel.
- Unlatch right-side cover panel and lean the panel back so that you can access the top of the panel.
- Ensure that the flat side of the slide bar rail (7) in Figure 5, faces the inside of the cover panel
(8). Insert the two tabs (9) on the slide bar rail
into the two vertical support channels (10) on the side cover panel.
Note: When installed correctly, the slide rail moves from front to rear.Figure 5. Installing a security slide bar
- Reinstall the side panel cover on to the rack.
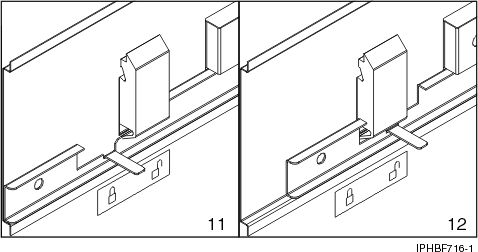
- Lock the side panel covers by sliding the bars to the front of the rack.
- Put a locked/unlocked sticker on the inside of the cover panel so that when the slide bar is in
the locked position, the tab is over the locked symbol (11), as shown in
Figure 6, and over the unlocked symbol
(12), when the slide bar is unlocked. Figure 6. Placing the locked/unlocked sticker on the cover panel
- Repeat the procedure for the left side of the rack.