Learn how to install the Peripheral Component Interconnect (PCI) Express (PCIe)
adapters in an AIX® system or an AIX
logical partition with the system power turned on.
To complete this procedure, you must
have prepared the system to install a PCIe adapter. For instructions, see Preparing the 5148-21L, 5148-22L, 8247-21L, 8247-22L, 8284-21A, or 8284-22A system to install a PCIe adapter with the power turned on in AIX.
To install a PCIe adapter in the system, complete
the following steps:
- Ensure
that you have the electrostatic discharge (ESD) wrist strap on and
that the ESD clip is connected to an unpainted metal surface. If not,
do so now.
- Ensure that the
target slot is empty.
Note: If you are installing the
PCIe3 Optical Cable Adapter (FC EJ05), it requires two empty PCI adapter
slots.
- If the target slot contains
a filler, remove the filler.
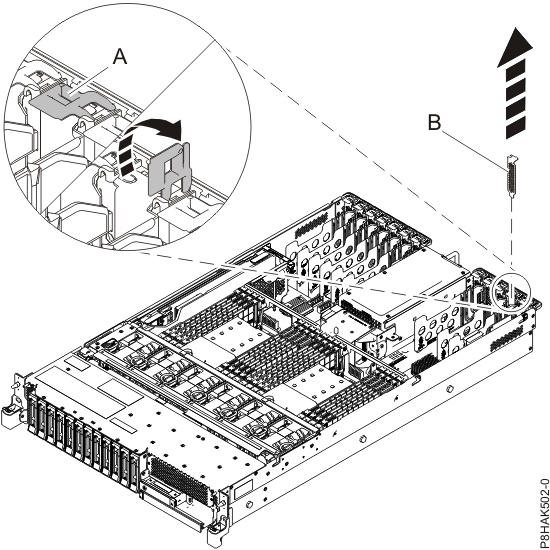
To remove the filler, carefully
grasp the filler
(B) by its top edge or tailstock,
and remove it from the system. See
Figure 1.
- You can store the filler in a safe place to use it later to install
in an empty slot.
- You can use the filler tailstock to attach it to a new adapter.
Figure 1. Removing a filler
from a PCIe adapter slot in a 5148-21L, 5148-22L,
8247-21L, 8247-22L, 8284-21A, or 8284-22A system
- If you are installing the
PCIe3 Optical Cable Adapter (FC EJ05), remove the PCI adapter divider
that is located between the two slots.
- Hold the top edge of the PCI adapter divider.
- Press down on the retaining latch at the back edge of
the divider. Pull the divider away from the system chassis, then lift
out to remove it from the system.
- If necessary, remove the adapter
from the antistatic package.
Attention: Avoid touching the components and gold connectors on
the adapter.
- Place
the adapter, component-side up, on a flat, antistatic surface.
Note: Some PCIe adapters are
shipped from the manufacturer with a blue handle or support bracket
along the back edge of the adapter. To use adapters of this type,
you must remove the blue handle or the support bracket from the adapter.
Attention: A pin on the tailstock of
the adapter resembles a removable screw. Do not remove this pin. It
is required for correct alignment and seating.
- If the new adapter has a
high-profile tailstock, then replace the high-profile tailstock with
the low-profile tailstock from the adapter that you removed. For
instructions, see Removing and replacing the tailstock on a PCIe adapter. Complete
exchanging of the tailstock, and then return here.
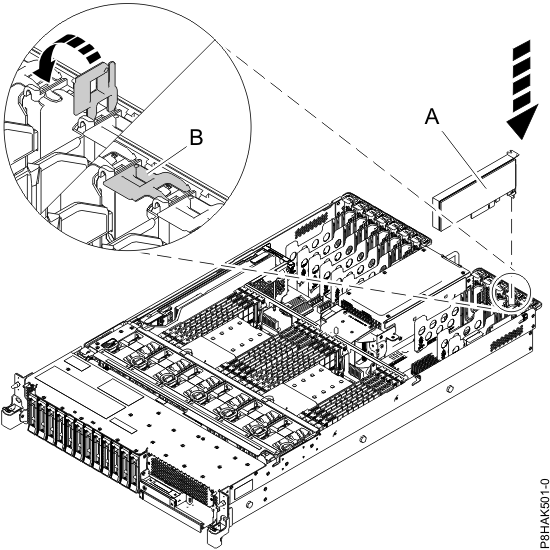
- If the adapter latch (B) at
the target slot is not already in the open position, pull the latch
into the open position by rotating the latch outwards from its clip
on the back of the system, as shown in Figure 2.
Attention: Before you insert the adapter in the PCIe
slot, ensure that the adapter has no cables, protective shields, or transceivers that are attached
to it. If the adapter has cables, protective shields, or transceivers that are attached, remove
them.
For instructions to remove protective shields or transceivers, see
Removing and replacing the tailstock on a PCIe adapter. The cables, protective shields, or transceivers must
be attached to the adapter after the adapter is inserted in the PCIe slot.
- Carefully
grasp the adapter by its top edge or tailstock, and align the adapter with the slot and its
connector on the system backplane (A), as shown in Figure 2.
- On the system, press the adapter firmly into its connector.
- To lock the adapter in
its slot, rotate the adapter latch (B) in the
direction that is shown in Figure 2.
Figure 2. Installing or replacing a PCIe adapter in the 5148-21L, 5148-22L,
8247-21L, 8247-22L, 8284-21A, or 8284-22A system