Removing the system processor module from the 5148-21L, 5148-22L, 8247-21L, 8247-22L, 8284-21A, or 8284-22A
Learn how to remove the system processor module.
To complete this procedure, you must have prepared the system to remove and replace the system processor module. For instructions, see Preparing the system to remove and replace the system processor module.
Complete the following steps to remove the system processor module:
- Open the packaging of the new system
processor module, and place the cover upside down next to the tray,
as shown in Figure 1.
The cover is used for the system processor module that you are replacing. Figure 1. Opening the system processor module packaging

- Remove the air baffle by grasping
the baffle and lifting it out of the system as shown in Figure 2. Figure 2. Removing the air baffle

- Remove the heat sink.
- Loosen the heat sink actuation screw by turning the supplied 5.5 mm nut driver (part number 43W3032) counterclockwise (A) until the screw becomes loose and moves freely as shown in Figure 3.
- Grip the heat sink (B) by the grooves on opposing sides and remove it by lifting straight up.
- Inspect the heat sink for any dust or debris on it. If you must remove dust or debris from the heat sink, it must be done in another room or greater than 25 feet (7.62 meters) away from work area.
- Place the heat sink upside down on an Electrostatic Discharge (ESD) surface.
Figure 3. Removing the heat sink
- Remove dust and debris from the system
processor module area.
- If dust or debris is present, use the supplied air pump (part number 45D2645) to clean the system processor module area. If your air pump is not assembled as shown in Figure 4, fasten the tip onto the bulb. Blow small bursts of air from the center toward the sides of the system processor module as shown in Figure 4.
Figure 4. Removing dust and debris from the system processor module area
- Prepare the system processor module for
removal.
- Lower the tool over the system processor module by ensuring
the two guide pins (C) are inserted into the
alignment holes (B) on each side of the tool. Figure 5. Lowering the removal tool onto the system processor module

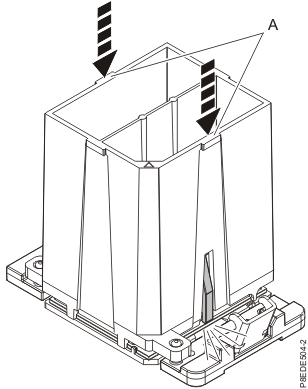
- With the removal tool (A) sitting
on top of the system processor module, push down on the tool to lock
the system processor module into the tool, as shown in Figure 6. Make
sure that both of the tool jaws are locked on the system processor
module. Do not press the blue release tabs until directed to do so
later. Note: The tool drops slightly when you push down so that the jaws can grab the bottom of the system processor module.Figure 6. Locking the system processor module into the tool
- Lower the tool over the system processor module by ensuring
the two guide pins (C) are inserted into the
alignment holes (B) on each side of the tool.
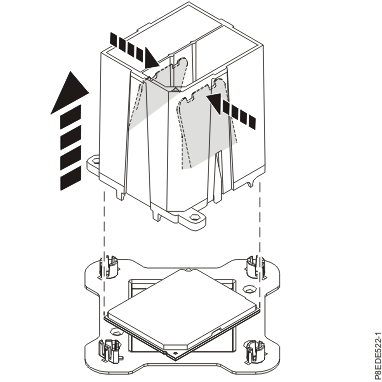
- Holding the outside of the tool, lift the
tool and system processor module from the socket. Place them at an
angle in the top cover of the system processor module packaging, as
shown in Figure 7. Note: Setting the tool and system processor module at an angle on the top cover of the system processor module packaging will make it easier to pick up and place in the packaging after you replace the system processor module.Figure 7. Placing the tool at an angle on the top cover of the packaging

- Squeeze the two blue tabs to release
the system processor module from the tool. See Figure 8. Note: To prevent the system processor module from falling, do not squeeze the two tabs before you place the tool on the top cover of the system processor module packaging.Figure 8. Releasing the system processor module from the tool