Preparation tasks
Before starting with the IBM Spectrum Accelerate deployment steps, the following pre-deployment preparation tasks are required.
Note: If this is the first time
you are deploying IBM
Spectrum Accelerate, it is recommended to simulate the deployment
in diagnostics mode. For more information, see the --diagnostic-only option
in Step 1: Copying the deployment utility to the deployment host, or see Simulating a deployment from the XIV GUI.
|
Confirming the ESXi host hardware
Follow the VMware guidance regarding certified system, storage, and I/O devices, as detailed in VMware KB article 1003916 (kb.vmware.com/kb/1003916).
Configuring advanced ESXi options
- VMKernel.boot.terminateVMOnPDL – PDL
conditions and High Availability (for more information, see the relevant topic on the VMware vSphere 5.5 Documentation
Center). By default, this parameter is set to disabled and
must remain disabled. However, if it is not already disabled, issue
the following ESXi CLI command to disable it:
esxcli system settings kernel set -s terminateVMOnPDL -v FALSE - Misc.APDHandlingEnable – Storage APD handling (for more information,
see the relevant topic on the VMware vSphere 5.5 Documentation Center). By default,
this parameter is enabled, and you must disable it by issuing the following ESXi CLI command (or see
the vSphere Web Client procedure in the VMware vSphere 5.5 Documentation Center
link):
esxcli system settings advanced set -o /Misc/APDHandlingEnable -i 0 - FailVMIOonAPD – Fast fail VM I/Os on APD Timeout. By default, this
parameter is disabled, and you must enable it by issuing the following ESXi CLI
command:
esxcli system settings advanced set -o /Scsi/FailVMIOonAPD -i 1
Updating the SAS driver
If you are using a SAS controller, make sure that the latest SAS driver is installed on the ESXi host. If the lsi_mr3 driver is currently installed, update it to megaraid_sas-6.603.55.00 or later.
- Download the SAS driver ZIP file from the VMWare website to /tmp/d on the ESXi host.
- Issue the following ESXi CLI commands (where megaraid_sas-6.603.55.00-*.zip stands
for the ZIP filename) :
esxcli system module set --enabled=false --module=lsi_mr3 esxcli software vib install -d /tmp/d/megaraid_sas-6.603.55.00-*.zip --no-sig-check - Reboot the ESXi host.
- Issue the following command and verify that the relevant HBA is
now reported using the megaraid-sas driver:
esxcfg-scsidevs -a
Updating the storage controller firmware
The firmware and driver version of the storage controller on the ESXi host must be up-to-date. Follow the VMware guidance as detailed in VMware KB article 1027206 (kb.vmware.com/kb/1027206).
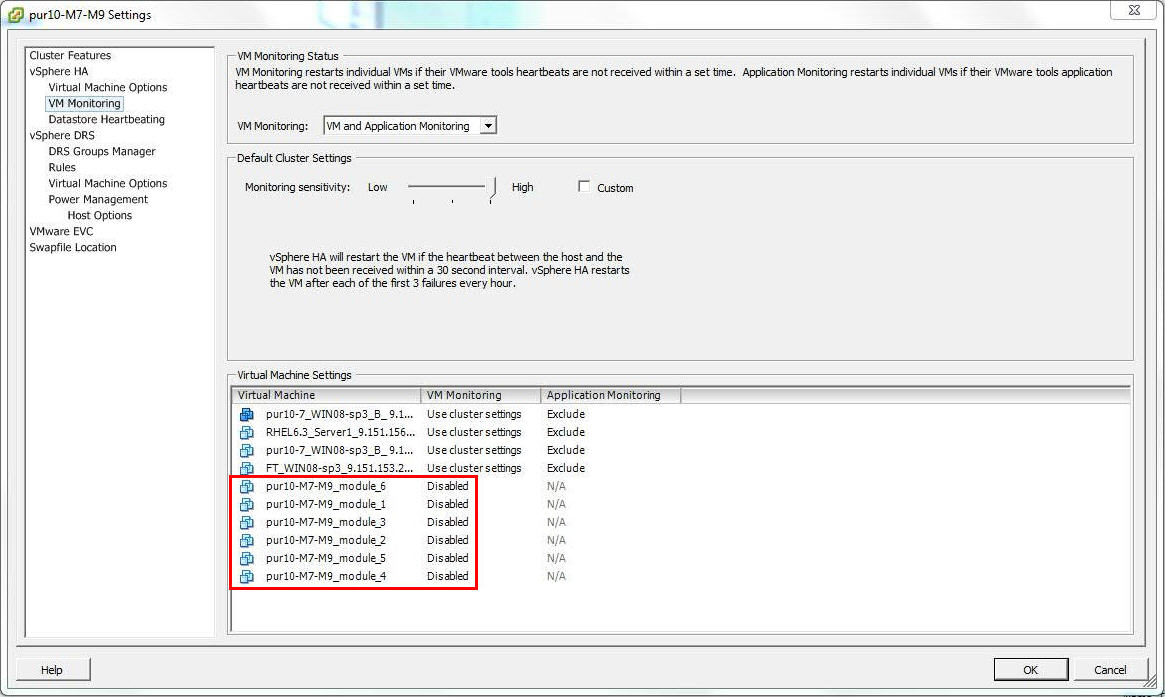
Disabling cluster virtual machine monitoring
Collecting individual disk IDs
If needed, you can configure IBM Spectrum Accelerate to use specific data and cache disks on each individual ESXi host machine, and identify those disks by their unique manufacturer ID or serial number. This provides you with flexibility in choosing which of the existing server disks should be dedicated to IBM Spectrum Accelerate, and helps you avoid disk misplacement when replacing disks (see Replacing a disk).
In addition, if any disk fails, the IBM Spectrum Accelerate system reports the ID of the failed disk. This helps replacing the specific disk without phasing out the whole module and then looking for the failed disk.
Accordingly, the unique IDs of all the disks that you intend to choose must be collected before the deployment, so that you could specify these disk IDs in the deployment steps.