Collecting data warehouse data with the Data Collection Component
Use the Data Collection Component to extract data from the data warehouse. Set up the data collection jobs to extract the data that you need.
About this task
Data Collection Component is designed to improve performance with easy setup, configuration, and deployment.
The goal of this task is to experiment and quickly set up for running data collection jobs with Data Collection Component. Many examples in this task use Derby as the data warehouse and WebSphere® Liberty server as the application server. Use only Derby as the database in a testing and development environment.
If you want to administer Data Collection Component in a production environment, you must use enterprise-level products, such as Db2® as the database, and IBM® WebSphere Liberty as the application server.
Procedure
-
Start the WebSphere Liberty server server, which hosts the Jazz® Team Server and
Data Collection Component.
For more information, see Deploying and starting the server.For the application server, you have the following options:
- WebSphere Liberty server
- You can quickly get started with running data collection jobs by running WebSphere Liberty server application server that is packaged with the Jazz Team Server. The
Data Collection Component by default occupies the same ports as the Jazz Team Server:
9080for HTTP and9443for HTTPS. If you need to change the ports, back up your server.xml file that is located in the<JTSInstallDir>\JazzTeamServer\server\liberty\servers\clmdirectory and edit the appropriate port numbers in the server.xml file. This server.xml file is created only after the first-time you start the Liberty server.Note:- To start the WebSphere Liberty server server that is packaged with the Jazz Team Server:
- In a command prompt, start the server from
[JTSInstallDir]\JazzTeamServer\server\server.startup.bat
Server clm started.Tip:The following example displays how the console output appears when the Liberty server is first created and started: On the Windows operating system, the Liberty server does not run in
a visible console window.
On the Windows operating system, the Liberty server does not run in
a visible console window.Server clm created. 4547 File(s) copied Starting server clm. Server clm started. - In a command prompt, start the server from
- If you want to later stop Liberty that is packaged with the Jazz Team Server:
- In a command prompt, stop the server from
[JTSInstallDir]\JazzTeamServer\server\server.shutdown.bat
Server clm stopped. - In a command prompt, stop the server from
- To start the WebSphere Liberty server server that is packaged with the Jazz Team Server:
-
When you are prompted, provide your user ID and password to authenticate the Data Collection Component
application setup on the Jazz Team Server.
The user ID must be a member in the JazzAdmins group.
Example:- Default user ID (case-sensitive):
ADMIN - Default password (case-sensitive):
ADMIN - Click Log In.
Tip: If Data Collection Component is not registered with a Jazz Team Server, one of the following error messages is displayed in the web browser:Error! Data Collection Component could not be loaded due to a syntax error or missing dependency. Page ID: com.ibm.rational.datacollection.web.ui.internal.pages.DataCollectionManagementPage
HTTP Status 503 - CRJAZ1173W The com.ibm.rational.datacollection.service.internal.web.IWebRedirector service is not available.
For details on how to register Data Collection Component with the Jazz Team Server, see Running the setup by using Custom setup in the setup wizard.If Data Collection Component is not registered to the same Jazz Team Server as the other Engineering Lifecycle Management applications such as Engineering Test Management (QM) and Change and Configuration Management (CCM), the authentication does not work. In addition, the user must be available in the Administration - Data Collection Component (/dcc)> Active Users page (
https://server:port/jts/admin#action=jazz.viewPage&id=com.ibm.team.repository.users). You can click the Administration icon from the product banner of the Administration - Data Collection Component
(/dcc) page and select Manage Users to view the Active
Users page.
from the product banner of the Administration - Data Collection Component
(/dcc) page and select Manage Users to view the Active
Users page. - Default user ID (case-sensitive):
- If this is the first time you are opening the Data Collection Component application,
you might get the following error message:
Failed to load Licenses Data Collection resource.
Error 500: CRRCD9002E The Data Collection Component is still initializing. Refresh the page a few minutes later.
Wait a few minutes as the application is initializing and goes into a loading state. You can determine the initialization is complete when you refresh the web browser and the pages in the Data Collection Component are populated. For example, in the Data Collection Configuration page, wait for the sections under Data Warehouse Properties and Data Collection Properties to populate. Learn more about Data Collection Configuration and Administration pages:
The Data Collection Configuration page displays the essential settings for managing the Data Collection Component.
Advanced settings that are common settings among the administration pages for the Engineering Lifecycle Management applications are available for the Data Collection Component. To go to the administration page for Data Collection Component, select one of the following options:- When the Data Collection Component page
(
https://localhost:9443/dcc/web) is open in your web browser, you can click the Administration icon from the product banner and select Manage Application. The
administration page for Data Collection Component page opens in the web browser with the page
title: Administration - Data Collection Component (/dcc) - Alternatively, open a web browser to
https://<server>:<port>/dcc/admin. For example,https://localhost:9443/dcc/admin
- When the Data Collection Component page
(
-
Decide which data collection jobs you want to run by loading, selecting, or removing any
predefined or custom jobs.
Custom jobs are jobs that you developed from a new or existing ETL (Extract, Transform, and Load) .ttl file. For details on creating custom jobs, see Wiki page.
Predefined jobs, also referred to as out-of-box jobs, are jobs that are packaged with the product. You can use these predefined jobs as samples when you develop your own custom jobs. The predefined jobs are located inside the com.ibm.rational.datacollection.service.jar file in the following directory:-
<installation directory>/server/conf/dcc/sites/dcc-updatesite/plugins/
For example:
C:\Program Files\ibm\JazzTeamServer\server\conf\dcc\sites\dcc-updatesite\plugins\com.ibm.rational.datacollection.service_<version>.jar
If you want to view the predefined jobs, copy the com.ibm.rational.datacollection.service.jar to a temporary location outside of the product, and use an extraction tool to decompress the .jar file. You can find the predefined jobs in the /mapping directory inside the .jar file.
Loading jobs:To load all the predefined (out-of-box) jobs and any jobs in the Data Collection Component mapping directory:- If you want to run a job that you developed (custom job), you must add the custom .ttl job files in the Data Collection Component mapping directory. This directory is at <installation directory>/server/conf/dcc/mapping. For example, place your custom .ttl job files into the following directory: C:\Program Files\ibm\JazzTeamServer\server\conf\dcc\mapping.
- In the Data Collection Jobs page, click Load Jobs.
- Wait a few minutes for the jobs to load. You can refresh the web browser multiple times until all your jobs display in the Data Collection Jobs page.
Remember: Each time Load Jobs is clicked, by default all the predefined jobs gets loaded with its default settings. In addition, any jobs in the Data Collection Component mapping directory also gets loaded.Removing jobs:To remove jobs that you do not want to run in the next data collection session:- In the Data Collection Jobs page, locate the job that you want to remove.
- Under the Schedule column, hover and click the Delete data
collection job icon (
 ).
).
Remember: If you click Load Jobs, your job removal selection might not persist. The Load Jobs action causes by default all the predefined jobs to get loaded with its default settings. In addition, any jobs in the Data Collection Component mapping directory are also loaded. The mapping directory is located in the <installation directory>/server/conf/dcc/mapping directory, for example: C:\Program Files\ibm\JazzTeamServer\server\conf\dcc\mapping.Selecting jobs:To select jobs that you want to run:- In the Data Collection Jobs page, select the checkbox for each data collection job that you want to run.
- If you select a checkbox for a data collection job that is by default clear, a window pops up confirming if you are sure that you want to enable the job. The reason for the confirmation is because running this job can impact the performance of the corresponding applications and the overall time to collect data.
Remember: If you click Load Jobs, your job selection might not persist. The Load Jobs action causes by default all the predefined jobs to get loaded with its default settings. In addition, any jobs in the Data Collection Component mapping directory are also loaded. The mapping directory is located in the <installation directory>/server/conf/dcc/mapping directory, for example: C:\Program Files\ibm\JazzTeamServer\server\conf\dcc\mapping. -
-
Run the data collection jobs.
You can choose to run all the data collection jobs, run a specific data collection, or run a specific data collection job.
On the Data Collection Jobs page, you can see that Data Collection Component categorizes the jobs into data collections, such as Operational Data Store (ODS), Data-Mart, and Licenses.
You no longer need to worry about running the jobs in a strict and proper sequence. The Data Collection Component offering is designed to improve performance by using parallel and concurrent processing. Jobs in a data collection, for example in an ODS data collection run in parallel concurrent process. But before the jobs in the Data-Mart data collection can start it needs to wait for the jobs in the ODS data collection to complete. The reason is because the Data-Mart data collection extracts data from the ODS data collection, transforms it using a set of rules, then loads it into the metrics tables as sets of point-in-time information and relationships. This process is cumulative, meaning that a new set of information is added each time the Data-Mart data collection job is run, resulting in a collection of many sets of point-in-time metrics and relationships. This type of data can be used for reports that show metrics, trends, aggregations, and other relationships among the data.Select your scope for running data collection jobs:
Running all the data collection jobs:You can trigger the data collection jobs for all the registered applications at once. The jobs within an Operational Data Store data collection run in parallel concurrent process. However, before the jobs in the Data-Mart data collection can start it needs to wait for the jobs in the Operational Data Store data collection to complete.
- On the Data Collection Jobs page, click the Run all data warehouse collection jobs link.
Running a specific data collection:You can trigger all the jobs in a data collection. The data collection groups are Operational Data Store (ODS), Data-Mart, and Licenses.
- On the Data Collection Jobs page, choose a data collection that you want to run:
- ODS Data Collection
- Data-Mart Data Collection
- Licenses Data Collection
- Click the corresponding Run link available in the section heading of the data collection that you chose in the previous step.
Running a specific data collection job:The status of each data collection job can change to one of these states:You can trigger a particular data collection job to run.
- On the Data Collection Jobs page, locate the job that you want to run.
- Under the Schedule column, hover and click the Run data
collection job icon (
 ).
).
- Idle
- The data collection job is inactive.
- Running
- The data collection job is in progress.
- Stopping
- The data collection job is terminating.
-
Monitoring the data collection jobs.
On the Data Collection Jobs Status page, you can view your collection status. You can check what jobs are complete or currently running, and find the job logs.
Example:- Open the Data Collection Jobs Status page by going to the left-pane of the Data Collection Component application, under the Data Collection section, and click the Data Collection Jobs Status link.
- To refresh and see what jobs are still running or completed, click the
Refresh button (
 ) next to the Data Collection Jobs Status link. The Data
Collection Jobs Status link is available on the left-pane of the Data Collection Component
application, under the Data Collection section.
) next to the Data Collection Jobs Status link. The Data
Collection Jobs Status link is available on the left-pane of the Data Collection Component
application, under the Data Collection section.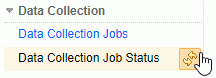
- You can view the list of jobs that are running under the Currently Running Jobs section, which
displays the following details:
- Job Name
- Displays the name of the data collection job that is running.
- Start Time
- Displays a
Waiting to startstatus when a job is issued but not started. Displays the date and 24-hour clock timestamp when a job is started, for example:2014-04-23 15:53:56 - Running Time
- Displays the length of time the job is running, since you last refreshed the Data
Collection Jobs Status page. For example,
0 hours, 0 minutes, 12
seconds
.
- You can view the list of jobs that are completed under the Job History section, which displays
the following details:
- Job Name
- Displays the name of the data collection job that is completed.
- Status
- Displays if the job completed is
Success,Failed, orCancelled. - Start Time
- Display the date and 24-hour clock timestamp when a job is started, for example:
2014-04-23 16:02:53 - End time
- Display the date and 24-hour clock timestamp when a job is completed, for example:
2014-04-23 16:02:55 - Time Taken
- Displays the total length of time to complete the job, for example
 0 hours, 0 minutes,
2 seconds
- When you expand a job under the Job History section, you get the following details:
- Resource Group
- Displays the registered application that the job is collecting data from.
- Status
- Displays if the job completed is
Success,Failed, orCancelled. - Start Time
- Displays the date and 24-hour clock timestamp when a job is started, for example:
2014-04-23 16:02:53 - End Time
- Displays the date and 24-hour clock timestamp when a job is completed, for example:
2014-04-23 16:02:55 - Running Time
- Displays the total length of time to complete the job, for example
0 hours, 0 minutes, 2 seconds - Processed Resources
- Displays the number of records processed.
- Delivered Rows
- Displays the number of records that were delivered to the data warehouse.
- Failed Resources
- Displays the number of records that failed to deliver to the data warehouse.
- Log
- A Log link that you can click to download and view the log file.
- You can limit the number of records display in the job history. Under the Job History section, in the Number of previous jobs to display data for field, type the number of records you want to display in the job history, for example 20 and then click Run.
- You can delete the job history. Click the Delete History link for the
following drop-down options:
- Delete All
- A Delete Job History window opens. Click OK to delete all job history. Or click Cancel.
- Delete Before
- You can select a date to delete all job history on or before the selected date.
- Delete After
- You can select a date to delete all job history on or after the selected date.
- Delete Between
- You can select two dates to delete all job history inclusively between the two selected dates.
-
Schedule data collection jobs.
After you are satisfied with the initial run of your data collection job, you have the option to schedule your data collection jobs to run in multiple intervals or times throughout the day. You can trigger to run a data collection job by using either of the two schedule options:
- Interval schedule
- Runs a data collection job at every X number of minutes of the day.
- Daily schedule
- Runs a data collection job at particular times of the day.
Example:- Open the Data Collection Jobs page by going to the left-pane of the Data Collection Component application, under the Data Collection section, and click the Data Collection Jobs link.
- On the Data Collection Jobs page, choose a data collection group that you
want to schedule the jobs:
- ODS Data Collection
- Data-Mart Data Collection
- Licenses Data Collection
- Click the Schedule link available on the right-side of your selected data collection group.
- In the Edit schedule window, use the drop-down menu on the upper right to
select one of the following schedule options:
- Interval Schedule
-
- By default the Enabled checkbox is selected to turn on the schedule. However, if you need to temporarily turn off the schedule, clear the Enabled checkbox, such as when performing a server rename. For more information, see Impact of server rename on the Data Collection Component.
- Under the Interval group, you can specify to collect data every X number of minutes, by typing a number in the Current time interval field. The minimum number of minutes is 5.
- Under the Week Days group, you can specify to collect data on certain
days.
- To select the multiple days of the week, press and hold down the Ctrl key and click the days of the week you want to collect data. For example, Monday, Wednesday, and Friday.
- To select all the days of the week to collect data, click All.
- After you specify the interval schedule, click OK in the Edit
schedule window.

- Daily Schedule
-
- By default the Enabled checkbox is selected to turn on the schedule. However, if you need to temporarily turn off the schedule, clear the Enabled checkbox, such as when performing a server rename. For more information, see Impact of server rename on the Data Collection Component.
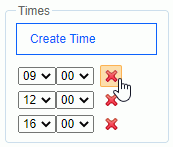
- Under the Times group, you can specify more than one particular time of
the day that you want to collect data. For example, run a 9:00 AM, noon, and before end of day 4:00
PM data collection job throughout the day.
- Click Create Time each time you want to add a time of the day entry.
- In the first drop-down menu, specify the hour of the day in a 24-hour clock.
- In the second drop-down menu, specify the minutes of the selected hour.
- To remove a time, click the Remove time icon that is next to the time
entry that you want to remove.
- Under the Week Days group, you can specify to collect data on certain
days at the previously specified times of the day.
- To select the multiple days of the week, press and hold down the Ctrl key and click the days of the week you want to collect data. For example, Monday, through Friday.
- To select all the days of the week to collect data, click All.
- After you specify the daily schedule, click OK in the Edit
schedule window.

- To apply schedule settings, you must click Save in the Data Collection Jobs page.
- To remove a schedule setting:
- On the Data Collection Jobs page, choose a data collection group that you
want to remove the schedule setting:
- ODS Data Collection
- Data-Mart Data Collection
- Licenses Data Collection
- Click the Unschedule link available on the right-side of your selected data collection group.
- To apply the removal of the schedule settings, you must click Save available in the Data Collection Jobs page.
- On the Data Collection Jobs page, choose a data collection group that you
want to remove the schedule setting:
For example, if you have a web client in Coordinated Universal Time (UTC) - X. The server (SaaS) at UTC time (here, X is 6) and when you schedule a job to run on:- Friday at 17:30, the actual job runs at Friday 23:30 (17:30 + 6 = 23:30)
- Friday at 22:00, the actual job runs at Friday 4:00 [(22:00 + 6 = 28:00)-(24, since it crossed 24, 24 is subtracted from 28) = 4:00]