IBM Security Verify Privilege Vault

Quick Start Guide

This guide describes a quick way to get started with the product.

Note:

IBM® Security Verify Privilege Vault Licensed Materials - Property of IBM. © Copyright IBM Corporation and others 2020. U.S. Government Users Restricted Rights - Use, duplication or disclosure restricted by GSA ADP Schedule Contract with IBM Corp.

IBM, the IBM logo, and ibm.com® are trademarks or registered trademarks of International Business Machines Corp., registered in many jurisdictions worldwide. Other product and service names might be trademarks of IBM or other companies. A current list of IBM trademarks is available on the Web at Copyright and trademark information (www.ibm.com/legal/copytrade.shtml).

About this task

Product overview

IBM Security Verify Privilege Vault helps organizations manage, automate, and track the use of shared privileged identities from a scalable, multi-tenant cloud platform.

Procedure

  1. Evaluate the hardware and system configuration
    Evaluate the detailed system requirements.
    Note: Alternatively, start the Software Product Compatibility Reports tool. Search for the product name, for example, by entering Verify Privilege, and follow the instructions.

  2. Initial setup

    On the Setup page, choose your Cloud Environment location. Click Continue.

    You are directed to the Thycotic One portal to create the password for your first user account with Administrator credentials. The account is assigned to the email address that you entered to request the trial. After you confirm the password, click Set Password and Login.

    Note: This account is the backup admin account that you might need in a 'break the glass' or unlimited admin scenario. It is suggested that you store the password in a secure physical location such as a safe or locked cabinet. You can reset the password by using an email reset, but if this password is forgotten or you no longer have access to the email account, IBM cannot reset the password.

    On the login page, click the button that corresponds to your new Cloud Thycotic One location.

    On the Setup page, enter the name for your subdomain. Do not use special characters or spaces.

    Read the license agreement and to proceed, accept the agreement.

    After a few minutes, the IBM Security Verify Privilege Vault setup completes. Click Go to your Privilege Vault and Login with Thycotic One.

  3. Install the Distributed Engine
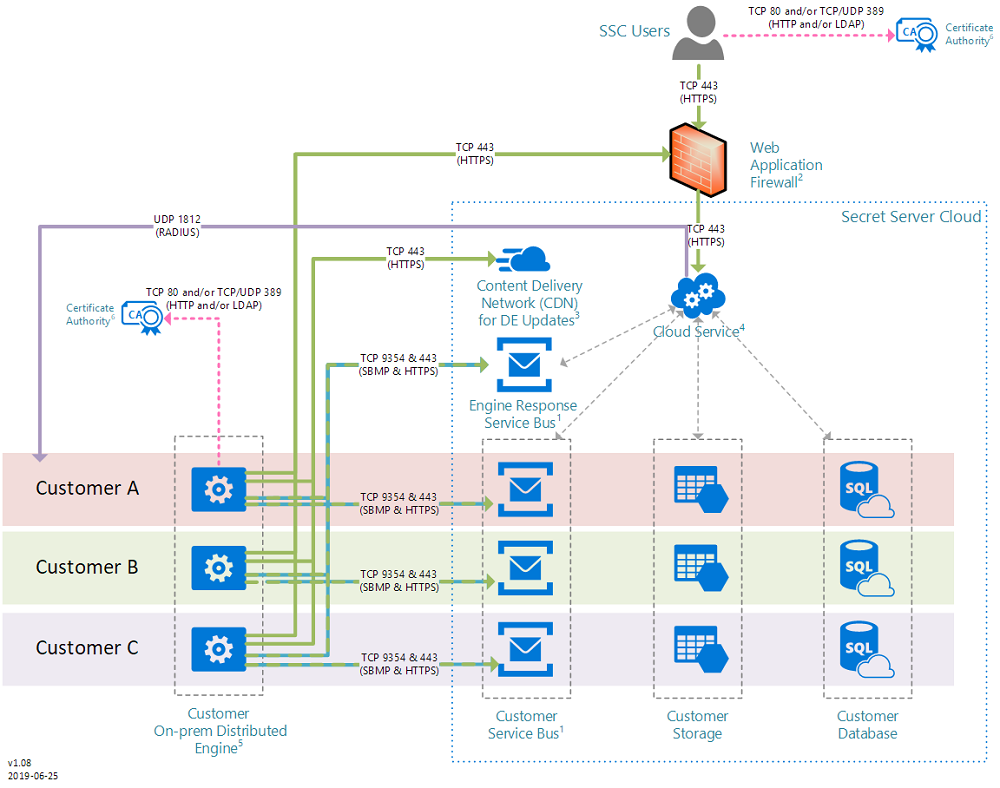
    Interaction with Privilege Vault tenant and your on-premises network uses the Distributed Engine service to communicate. The Distributed Engine, performs Active Directory authentication, password change, and heartbeats. The computer where the engine is installed must have outbound communication on port 443 and port 9354.
    1. Browse to ADMIN > Distributed Engine.
    2. Click Download Engine Installer.
      Note: You can install Distributed Engine on either your workstation or laptop for test if needed. However for production installs, the Distributed Engine Server must be installed on a server. Secret Server use the Distributed Engine to communicate with your domain,. So, if your computer is turned off, user might not be able to log in with their domain accounts and heartbeat and password changing will fail.
    3. Run setup.exe as an administrator to install the engine service.

      The engine service is installed in the following location: Thycotic Software Ltd\Distributed Engine.

    4. Go to Admin > Distributed Engine, click Manage Sites and then Manage New Engines.

      A new engine is now available.

    5. Assign the engine to the Default site and approve it.
    6. Validate the engine connectivity.

      Go to ADMIN > Distributed Engine > Manage Sites and click the Default site. Click Validate Connectivity to test the communication between the engine and Privilege Vault. It takes several minutes for the Engine to register. It does not immediately validate. You might need to wait for a few minutes before you try again.

  4. Configure Active Directory integration.
    Active Directory integration lets users log in with their domain credentials. The Distributed Engine service that is running in your network, routes connections to your domain.

    Watch video: Configure Active Directory integration in Privilege Vault to let users log in with their domain credentials.

    1. On the dashboard, from the Create Secret widget,create a new Active Directory Secret.

      The domain account that is used must be able to read the users and groups from the domain that you want to sync.

    2. In the Create Secret page, enter the domain, username, and password and then save the secret.
    3. Browse to ADMIN > Active Directory.
    4. Click Edit. Select Enable Active Directory Integration and Enable Synchronization of Active Directory.
    5. Click Save.
    6. Click Edit Domains and then click Create New.
    7. Enter a fully qualified domain name and a friendly domain name that users will see on the login page.
    8. For the Sync Secret select the secret that you created in step 4.a.

      The Domain Site is set to Default. The Active Directory authentication and synchronization runs through the Distributed Engine service that is installed on your network.

    9. Click Save and then click Back
    10. Click Edit Synchronization and choose the domain groups that you want to be able to log in on the Privilege Vault SaaS instance.
    11. Save the selected groups.
    12. Click Synchronize Now. This action starts the user and group synchronization immediately. The synchronization process runs automatically. For immediate results you can start the process manually.
  5. Test heartbeat and password changing
    Heartbeats validate the secrets that you have stored are using the correct password and that password changing can change passwords on demand or a schedule.
    1. Browse to Admin > Remote Password Changing.
    2. Click Edit.
    3. Select Enable Remote Password Changing and Enable Heartbeat and then click Save.
    4. Under the Remote Password Changing and Heartbeat Log, click Run Now.

      The Heartbeat and Remote Password Changing processes start so that you do not have to wait.

      After you create a secret, the Last Heartbeat status shows Pending or Processing.After heartbeat completes, one of the following status is displayed:
      1. Unable to Connect: Privilege Vault cannot reach the target computer. Some possible cause for this message is a firewall issue or the computer or IP address is wrong.
      2. Failed: Privilege Vault can connect but cannot authenticate. This might mean that the password for the secret is incorrect.
      3. Success: Privilege Vault is able to successfully connect with the specified user name and password.
    5. Test the password change by viewing a secret and clicking Change Password Remotely.
      Note: You will change the actual password on the target system.

    You can view the status of password changes and heartbeats in the log under Admin > Remote Password Changing.

  6. Next steps and other actions you can take.
    • Add another user to the administrator role in Privilege Vault.
    • Add a folder and share it with the group you are synchronized from Active Directory.
    • Create a secret in that folder for other users to see. When you create a secret, you can click the folder and save it to another folder.
    • Get other users to log in. Any users that are synchronized to Privilege Vault through the domain synchronization will be able to log in with their domain credentials.
    • Enable Google two factor authentication. You can turn on two factor for auser by going to Admin > Users, editing the user, and specifying the Two Factor option.

What to do next

More information

Product documentation: http://www.ibm.com/support/knowledgecenter/SSWHLP_cloud.

Product support: http://www.ibm.com/support