Define a data source to monitor an application or system by using a command return code.
About this task
A command return code is a user created script, executable file, query, or system command. A command return code is an application-specific mechanism for determining whether the application or monitored system is available. The agent runs the specified command and determines the state of the application or monitored system by examining the return code.
The command must present a unique return code for each descriptive state. The command must also define a message to be used by the agent for each of these return codes. The command can use environment and configuration variables within the user created script, executable file, query, or system command. The command must not use environment or configuration variables on the command-line invocation of the command, with only the following exceptions available: AGENT_BIN_DIR, AGENT_ETC_DIR, AGENT_LIB_DIR, CANDLE_HOME, and CANDLEHOME.
Procedure
- On the Agent Initial Data Source page
or the Data Source Location page, select Command or script in the Monitoring Data Categories area. Figure 1. Adding data from a command

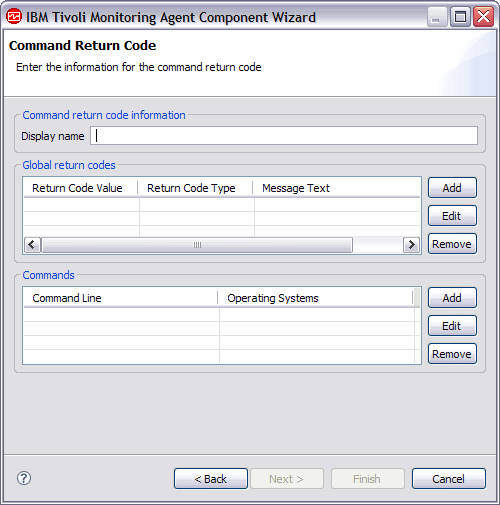
- On the Command Return Code page, Command return code information area, type the display
name. Figure 2. Command Return Code page
- Use the following substeps to define and describe command
lines that you want your command return code to use. Note: Define a command for each operating system that is supported by the agent. Commands can be shared, but the total set of operating systems for all of the commands must equal the set of agent supported operating systems.
- Click Add in the Commands area of the Command Return Code window to open
the Command Information window. Figure 3. Command Information window

- Select a return code type from the list that is shown
in the Return Code Definition window
You can assign the following states to the test return codes:
- ALREADY_RUNNING
- DEPENDENT_NOT_RUNNING
- GENERAL_ERROR
- NOT_RUNNING
- OK
- PREREQ_NOT_RUNNING
- WARNING
Figure 4. Return Code Definition window: Return code type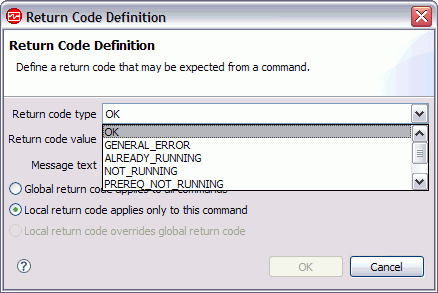
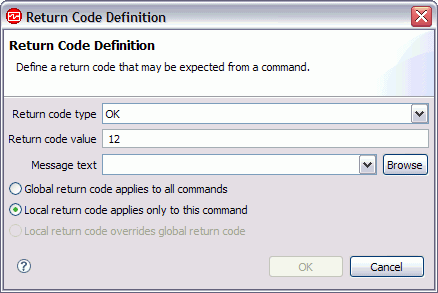
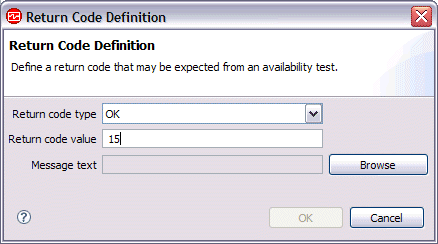
- Type a numeric value for the return code type that you
selected. The return code value is an integer that specifies
a defined return code for the command return code. For portability
between operating systems, use a return code value of 0
- 255. For a command that runs only on Windows, the return code value can be -2147483648 - 2147483647. Figure 5. Return Code Definition window: Return code value
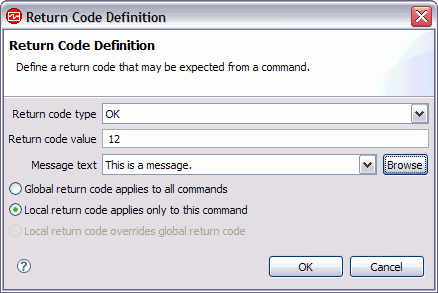
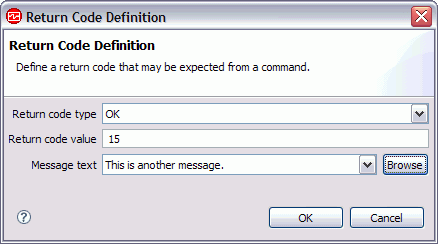
- Define a message for each return code so that the message
and code can be shown together. Click Browse to set up the message text. The message window lists messages that are defined in the agent. The Messages (list) window opens.Note:
- You can select text that was entered previously by selecting it in the Message text menu instead of clicking Browse. Then, continue to Step 5k.
- Until you define messages, the list remains blank. You can use Edit to alter a defined message and Remove to delete one or more messages that you defined.
Figure 6. Messages window
- In the Messages (list) window,
click Add The Message
Definition window opens.Figure 7. Message Definition window
 Note: The message identifier is automatically generated for you.
 - If you want this return code to be available
to other commands on other operating systems for this command return
code, select Global return code applies to all commands. If you want this return code to be available only to this command,
leave Local return code applies only to this command selected. Figure 8. Return Code Definition window completed
- Click OK in the Command
Information window. Figure 9. Command Information window completed
 Note: The command files table is where you define any external files that you want to include in the agent package. These files are copied into the project directory and packaged with the agent for distribution.
- Click Add in the Commands area of the Command Return Code window to open
the Command Information window.
- If you have other return codes that are not already defined,
define and describe global return codes that your command return code
can use.
- Type a numeric value for the return code type that you
selected (Figure 10). The
return code value is an integer that specifies a defined return code
for the command return code. Figure 10. Return Code Definition window: Message text
- Click Browse to set up the message
text and its associated meaning. You must define a message for each
return code so that the message and code are shown together.
The Messages window lists messages that are defined in the agent. The Messages (list) window opens(Figure 11).
Note:- Until you define messages, the list remains blank. You can use Edit to alter a defined message and Remove to delete one or more messages you defined.
- You can select text that was entered previously by selecting it in the Message text list instead of clicking Browse. Then, continue to Step 6h.
Figure 11. Messages window - When the new text, type, and value
are shown in the Return Code Definition window,
(Figure 12), click OK. Figure 12. Return Code Definition window
- On the Command Return code page, when you finish defining
the return codes and commands for all supported operating systems,
do one of the following steps:
- If you are using the New Agent wizard, click Next or click Finish to save the data source and open the Agent Editor.
- If you are using the New Agent Component wizard, click Finish to return to the Agent Editor.
Figure 13. Command Return Code page completed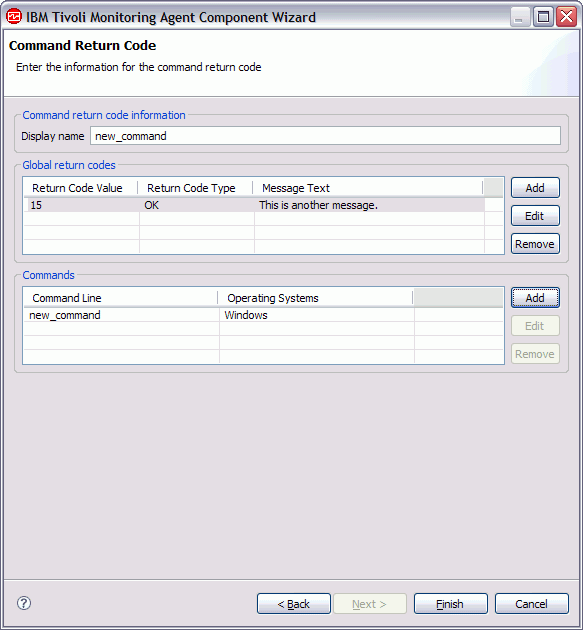
- Type a numeric value for the return code type that you
selected (Figure 10). The
return code value is an integer that specifies a defined return code
for the command return code.