Example: validating coach data in a heritage human service in the web Process Designer
This example shows you how to validate coach data in a heritage human service by using a validation script in the web Process Designer. The script-based validation is the simpler, typical implementation for coach data validation in the web Process Designer.
About this task
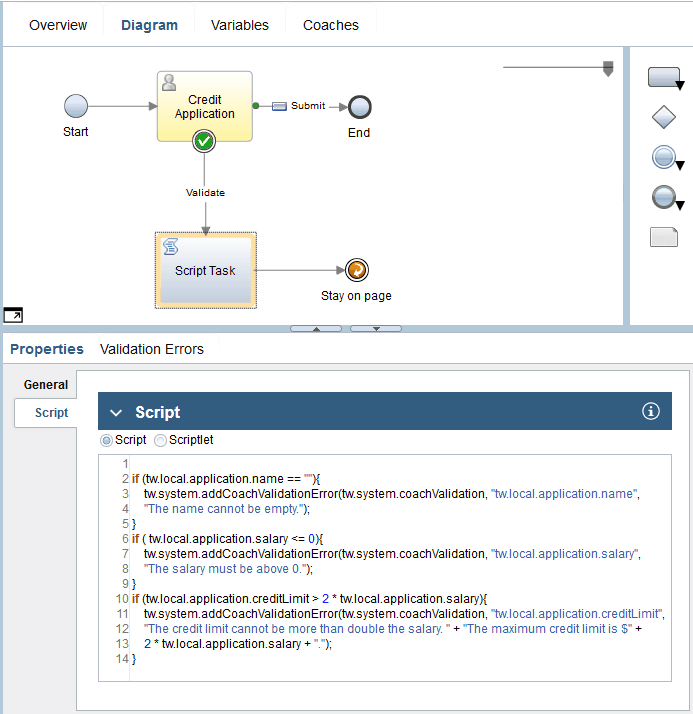
The example contains a Credit Application coach that gathers information for a credit card application. To simplify the example, the coach has only a Name field, a Salary field, a Credit Limit field, and a Submit button. The Name and Salary fields must contain values, and the Credit Limit maximum is double the Salary field value.
The example uses a server script to validate the coach data. It uses a CreditCardApplication business object that contains the validation information that is returned to the coach as output. This sample uses the addCoachValidationError API to construct the business object.
For information on how to validate a coach in a heritage human service in the desktop Process Designer, see Example: validating coach data in a heritage human service in the desktop Process Designer (deprecated). For more information about validating a coach in a client-side human service, see Validating coach data without exiting a coach.
Procedure
- In the Variables tab of the heritage human service, add
application(CreditCardApplication) as a private variable.

- From the Variables section of the palette, drop the
name, salary, and creditLimit parameters onto the
coach. Relabel the default OK button to Submit.

- Select the connection between the Credit Application coach and the end
node. Set Fire Validation to Before. The connection has now a green dot at its start, which indicates that validation is enabled
for the Submit button. A boundary event
 is automatically attached to the coach, indicating that you can connect the coach to the
validation script.
is automatically attached to the coach, indicating that you can connect the coach to the
validation script.
The validation construct ensures that at run time, when the user clicks the Submit button, the flow first goes to the validation script to do the coach data validation. If the data is valid, the flow then goes to the end node. If you leave the default setting for Fire Validation at Never, data validation does not occur, and the flow goes directly to the end node. - Create the server script to validate the coach data:
- From the palette, under Activity, use the Server
Script activity tool
 to add a script node to the human service diagram, and then select the node.
 - Wire the script node in the CreateCreditApplication diagram as shown.
Add a stay-on-page node to the diagram and connect the script node to the stay-on-page node.The stay-on-page node loops the flow back to the coach if the data in the coach is not valid. The system passes error information back to the coach and users see an indicator beside the coach view with the problematic data. If the validation service provides error messages, users see the appropriate message when they hover over an indicator. If the data is valid, the system processes the boundary event to move to the next step.
- From the palette, under Activity, use the Server
Script activity tool
- Run the heritage human service by clicking Run
 .
.