Example: creating a tabbed coach (deprecated)
This example shows how to create a coach that contains
three tabbed pages.
In this example, you have a Customer business object that contains many
properties. To capture or display all of these properties within a single coach, the Tab view is a
good choice.
The first tabbed page of the coach contains three text fields that have some general information
about a customer. In this example, you add the fields directly to the coach using sections to set
the page layout.
The second page contains a set of phone numbers. You use a view to add the fields to the
page.
The third page contains a table of addresses. In this case, the view you add to the page is a
list, which results in a table.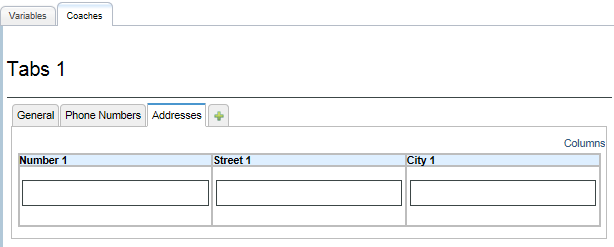
To create the tabbed coach, complete the following steps:
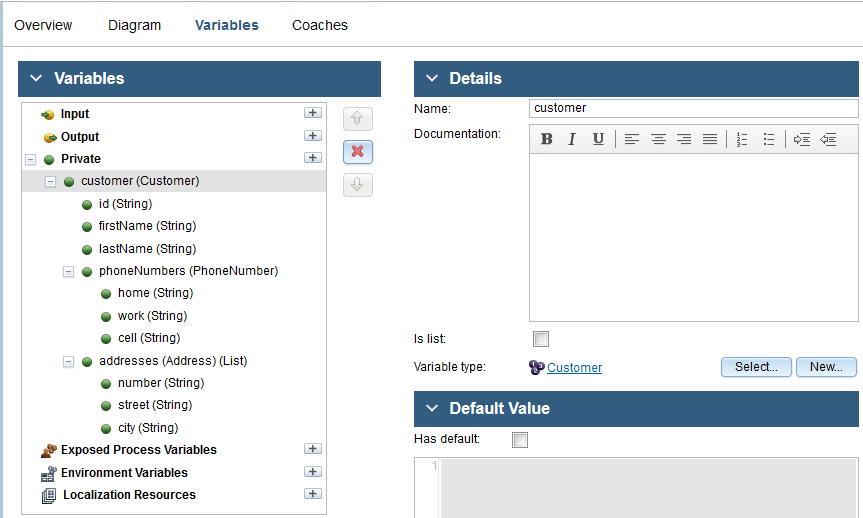
- Create the
Customerbusiness object.Customerhasid(String),firstName(String), andlastName(String)parameters. It also has two complex parameters:phoneNumbers(PhoneNumber)andaddresses(Address).PhoneNumberis a business object that hashome(String),work(String), andcell(String)parameters.Addressis a business object that hasnumber(String),street(String), andcity(String)parameters.
With the
Customerbusiness object,addressesis an array of theAddresstype, so ensure that you select List for it.For information about creating business objects, see Creating business objects.
- Create the view for the
PhoneNumberbusiness object:- Create the PhoneNumberView view.
- In its Variables page, add a variable named
phoneNumber and set its type to the
PhoneNumberbusiness object. - In the Layout page, add the
home,work, andcellparameter variables onto the layout. A Text view is added to the layout for each variable because it is the view associated with theStringtype.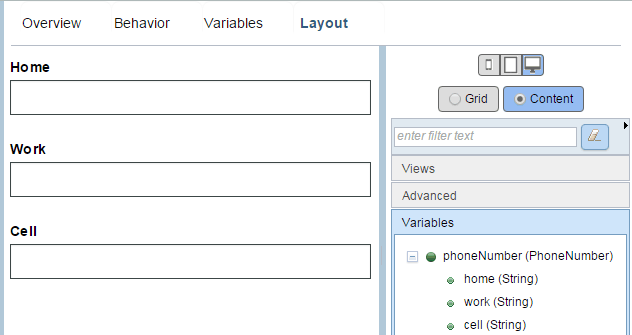
- Create a client-side human service named Customer Human Service.
- In the human service diagram, rename the coach to Customer Coach.
- In the Variables page, add the Customer business object as a private
variable.
- Go to the Coaches page and start with a default coach.
- In the Coaches page, delete the default OK button
and add a Tabs view to the Customer Coach layout.

- Create the General page:
- Add a section to the Tabs view. A tabbed page can contain only one element directly. By adding the section, you can then add as many elements as you want into that section.
- Rename the section to General. The name that you see on the tab comes from the label of the section.
- Drag the
idvariable onto the section. Theidvariable is a parameter of theCustomerbusiness object. - Drag another section into the first section below the id text view. In the configuration options of the second section, change its layout to Horizontal.
- Drag the
firstNameandlastNamevariables onto the horizontal section.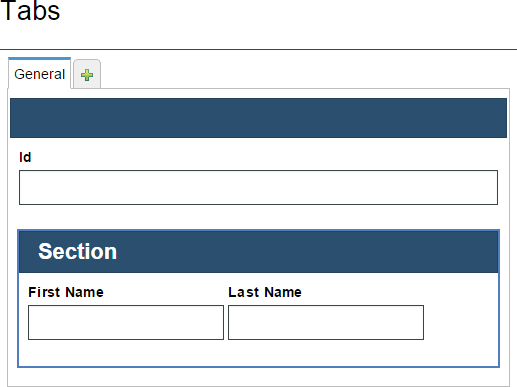
The
Id,firstName, andlastNamevariables are parameters of theCustomervariable.
- Create the Phone Numbers page:
- Drag the
PhoneNumberViewview onto the + part of the tab view. If you did not add a tag to the view, you can find it in the NoTags category on the palette. You can see a PhoneNumberView tab in the tab view. - Bind the
PhoneNumberViewview to thecustomer.phoneNumbersvariable. This action means that any data users enter into the fields gets set in the variable for the heritage human service. - Select the tab.
- In the General properties, change the label of the
PhoneNumberViewinstance to Phone Numbers.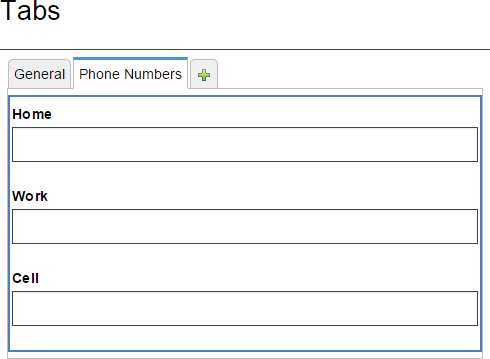
- Drag the
- Create the Addresses page:
- Drag the
addressesvariable onto the tab view. You can see an Addresses tab in the tab view. If you select the tab, can now see a table with a column for each property defined in theAddressbusiness object. - In the Configuration properties, select Show Add Button and Show Delete Button. By doing this step, you can add and subtract address rows when you run the heritage human service later in this example.
- Drag the
- Add a button view below the tab section and relabel it to OK, The button broadcasts a boundary event and you can use it to wire the coach in the heritage human service flow.
- In the diagram, connect the start node to Customer Coach and then connect Customer Coach to the
end node.

- Click Save or Finish Editing.
- Test the client-side human service by clicking the
 button.