1. Configure Talent Suite Service Provider (SP) Inbound SSO
This page describes configuring the Talent Suite Service Provider inbound SSO.
- Configure Talent Suite (SP) inbound SSO
- Configuring Inbound SSO involves telling the Talent Suite about required details of your
organization's Identity Provider (IdP) system and the exchange of XML metadata and security
certificates. There are two steps to this process:
- Your organization has SAML metadata files, and certificates that must be added to Talent Suite.
- You must add the IBM Talent Suite metadata files to your SSO Identity Provider.
If any edits are made to the Edit Inbound SSO configuration page are made, the Login URL must be regenerated on the Identity source page.
- Relevant eLearning
- Configure Single Sign-On (Interactive Tutorial)
- Setting up Single Sign-On
-
- It is recommended to contact your IT department to obtain the following information. After you
have these details, the Talent Suite SSO can be configured.
- your organization's SAML metadata files.
- If needed, the SSO certificates. your organization's security and Encryption certificates might be included in the metadata files.
- The Identity Provider’s Entity Identifier.
- The Identity Provider’s Single-Sign on Service Location URL.
- The Identity Provider’s Single Logout Service Location URL.
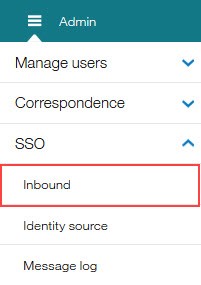
- To configure the Talent Suite Service Provider inbound SSO, log in to Talent Suite as the SSO
Administrator and select the .
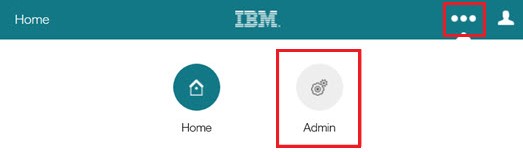
- Select
.
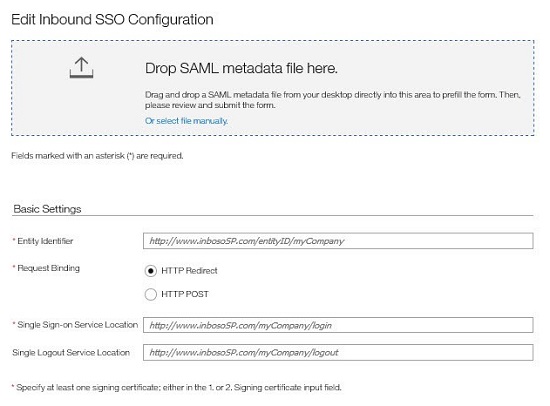
- The Edit Inbound SSO configuration page opens. Drop your organization’s
SAML metadata file into the section provided, or select Or select file
manually, select the file from your computer, and select
Upload. If your organization does not have a metadata file, these settings
can be manually entered into the Basic Settings section.
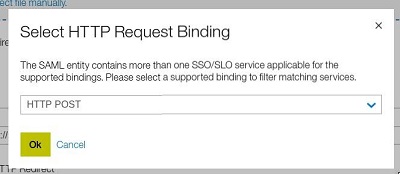
- A notification opens to select HTTP Request Binding. Select either
HTTP POST or HTTP REDIRECT for Request
Binding. This setting applies to both single sign-on and logout service location. Talent
Suite supports both HTTP Redirect and HTTP Post. The option to select depends on your organization's
IdP system’s capabilities and how it is configured by administrators.
- The Basic Settings section populates with the details from the metadata
file. Verify these details against the details collected from your IT department, and if needed,
edit the values.
- Entity Identifier is the identifier of your organization's IdP system.
- Single Sign-on Service Location is the URL of your organization's IdP system.
- Single Logout Service Location is the URL of the SSO logout end point that is provided by your organization's IdP system.
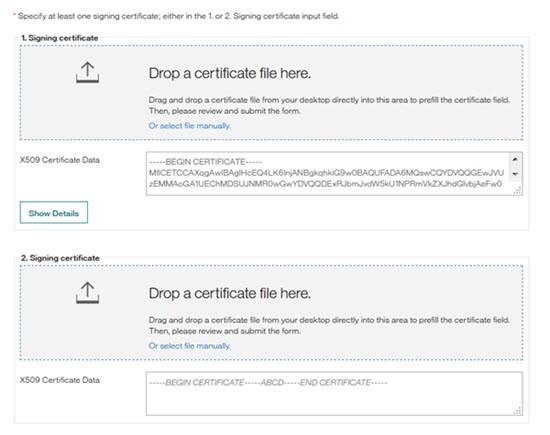
- If your organization's Signing certificate is not included in the SAML metadata file, the
certificate must be uploaded manually. Drop the signing certificate file into the section provided,
or select Or select file manually, select the file from your
computer, and select Upload.
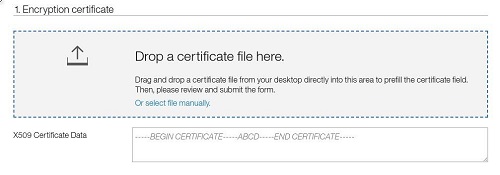
- If your organization's Encryption certificate is not included in the SAML metadata file, the
certificate can be uploaded manually. The use of an Encryption certificate is optional and used for
encrypting the SAML Assertion. It can be obtained from your organization’s IdP system admins. Drop
the Encryption certificate file into the section provided, or select Or select file
manually, select the file from your computer, and select
Upload.
- A notification opens to select HTTP Request Binding. Select either
HTTP POST or HTTP REDIRECT for Request
Binding. This setting applies to both single sign-on and logout service location. Talent
Suite supports both HTTP Redirect and HTTP Post. The option to select depends on your organization's
IdP system’s capabilities and how it is configured by administrators.
- Complete the Advanced Settings section.
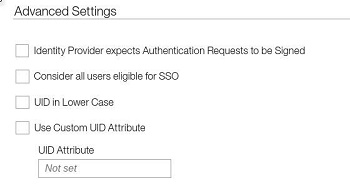
- Select Identity Provider expects Authentication Requests to be Signed if your organization's identity provider system requires the authentication request from Talent Suite to be signed.
- Select Consider all users eligible for SSO.
- Users can be set up as SSO enabled during user creation or a user import. If users were set up before SSO was enabled, these users are not SSO enabled. Selecting this option enables all users to log in by using SSO regardless of the enable SSO attribute on their user profile.
- If this option is not selected, and a user does not have the SSO attribute, the user cannot log into and be authenticated by Talent Suite with SSO.
- Select UID in Lower Case if the User Identifier (UID) is sent by the identity provider in uppercase, but the user’s username is in lowercase in Talent Suite. If this option is not selected, the user’s, username in the Identity Provider or Talent Suite must be edited to match the case used. For example, select this option if a user’s identity is BSMITH in the identity provider, and bsmith in Talent Suite, or update the user’s identity to bsmith in the identity provider.
- Contact your organization's IBM Representative before configuring a Custom UID Attribute to
confirm the settings are correct before configuration. Select Use Custom UID
Attribute to include a custom attribute.
- Insert the UID Attribute into the section provided. A custom UID property might be specified if the username is not being passed in the NameID field of the incoming SAML request. The Custom UID property can be used to specify the property name that is being used.
- Select Submit.
- It is recommended to contact your IT department to obtain the following information. After you
have these details, the Talent Suite SSO can be configured.
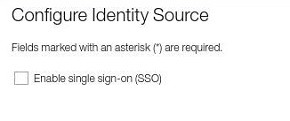
- Configure the Identity source
- Configuring the Identity Source requires the configuration of the Login URL. Optional configurations include configuring a Remember login page option, an authentication option, and configuring a custom Logout landing URL.
- Process
-
- To configure the identity source, log in to Talent Suite as Administrator and select the .
- Select .
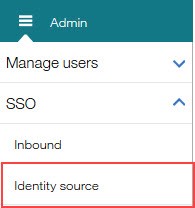
- The Configure Identity Source page opens.
- Select Enable single sign-on (SSO).
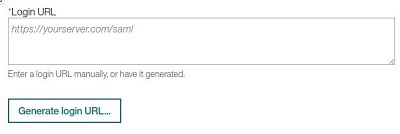
- Select Generate Login URL. Do not enter the URL manually.
- A notification window opens. Select the name identifier format from the
options provided. The default options that are selected are set with the SAML metadata.
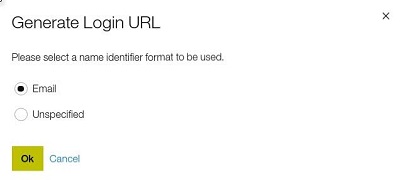
- Select OK.
- The Login URL generates based on the information entered in the Inbound SSO page. If any settings on the Inbound SSO page are updated, the URL should be regenerated.
- A notification window opens. Select the name identifier format from the
options provided. The default options that are selected are set with the SAML metadata.
- If needed, select Remember login page to automatically direct users to
the same login page as they used before. For example, users can be directed to either the IBM Talent
Suite login page, or the Identity Providers login page when they log out of Talent Suite.
- If this field is not selected, users are always directed to the IBM Talent Suite login page at their next login, after they log out of the IBM Talent Suite or close the browser window.
- Enabling Remember login page is not recommended when users log in to IBM Talent Suite from publicly accessible or shared devices.
- If needed, insert a Limit to the number of days to remember the login
page.
- A value of 0 means that after each login, the login page last used is not remembered by the browser.
- A value of 1 or greater defines the number of days the login page is remembered by the browser.
- In the Authentication section, if needed, select Authentication
by identity provider only if the only authentication is completed by the identity
provider. If Authentication by identify provider only is not enabled, users
authenticate with Talent Suite, or a combination of both the identity provider and Talent Suite.
- It is recommended that this option is not selected before completing the testing of the IdP settings. This option bypasses the Talent Suite login page and if selected, might create difficulties logging back into Talent Suite to configure Single Sign-On.
- After the testing is completed and the SSO is working return to this page to enable this function if needed.
- In the Logout section, insert a URL in the Custom logout landing page field to open when the user logs out of IBM Talent Suite. If no custom logout landing page is configured, the IBM Talent Suite logout page opens.
- Select Enable single sign-on (SSO).
- Select Submit.