Troubleshooting Transfers
The article contains tips and procedures to troubleshoot failed or incomplete Aspera on Cloud transfers.
About this task
IBM Aspera Connect Required for Transfers
About this task
For troubleshooting the installation of IBM Aspera Connect, see Troubleshooting: Overview and related topics.
You must install IBM Aspera Connect to transfer files and folders to and from your desktop or any remote server. IBM Aspera Connect is a free, lightweight, install-on-demand software program that powers high-speed transfers between desktops and Aspera servers. Once installed, Connect runs automatically runs in the background for each upload and download you initiate using Aspera on Cloud.
When you first log in to Aspera on Cloud, the app prompts you to download and install Aspera Connect. The installation is an easy, three-step process in most browsers; Aspera on Cloud guides you through the process. The first guidance dialog looks something like this:

Install the Connect App Once; Install the Connect Extension for Each Browser
- The Connect application, which you install once on any computer you use to access Aspera on Cloud.
- The Connect browser extension, which you install on each browser you use to access Aspera on Cloud.
Allow the Connection for Each Transfer Server
When you start a transfer that requires Connect, Connect displays a dialog requesting permission to connect with the relevant Aspera transfer server.
Connect displays this dialog for the transfer server relevant to each transfer you initiate. Depending on the location of your content, your recipients, and those who send to you, your transfers may involve multiple transfer servers. Connect requests your permission to connect with each server. You must grant permission to allow the transfer to proceed.
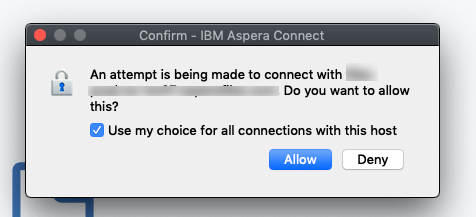
The exact wording of this dialog may vary depending on your browser. But in any case, IBM Aspera highly recommends that you check the option to allow all connections with the host, or always allow. Otherwise you must manually allow each transfer to initiate. If this dialog displays behind another application window, blocked from your immediate view, you may not realize that Connect is requesting your permission; without your permission the transfer cannot start.
Already Installed Connect, But Still Being Prompted?
- There is a new version of Connect available, and the app prompts you to install the upgrade.
In this case, you must download and install the Connect app ugrade. You may or may not need to update your browser extension; the installation process will guide you.
- You have not installed the Connect extension in your current browser.
You may have installed the extension in a different browser, but the extension is required for each browser. In this case, there is no need to reinstall the Connect app, but you must install the browser extension.
Notifications
About this task
- A transient ("toast") message that appears for several seconds in the upper right corner of the
AoC app.

- An error description (that may include a recommended action) in a transfer recordt in the in-app
transfer monitor. Display the transfer monitor by clicking this icon in the top banner of the app:
 .
.
- The in-app transfer monitor icon displays red.

Retry the Transfer
About this task
You may be able to address a failed transfer by fixing a simple issue and then retrying the transfer.
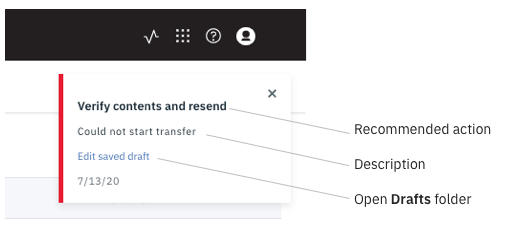
When you see the blue Retry link in the transfer record, address the issue described. For example, consider the following transfer record. Verify that the directory you are trying to transfer to (the "target" directory) exists; if it does not, create it at the expected path. Then click Retry in the transfer record to attempt the transfer again. This same strategy applies for some session and network anomalies. Perform the recommended action, then click Retry.

"Draft" Packages
About this task
When a package you send fails to start the transfer, AoC displays a toast message and moves the package to the Drafts folder in your Packages app. You can click Edit saved draft to open the Drafts folder. You can also open the Drafts folder from the left panel of the Packages app.
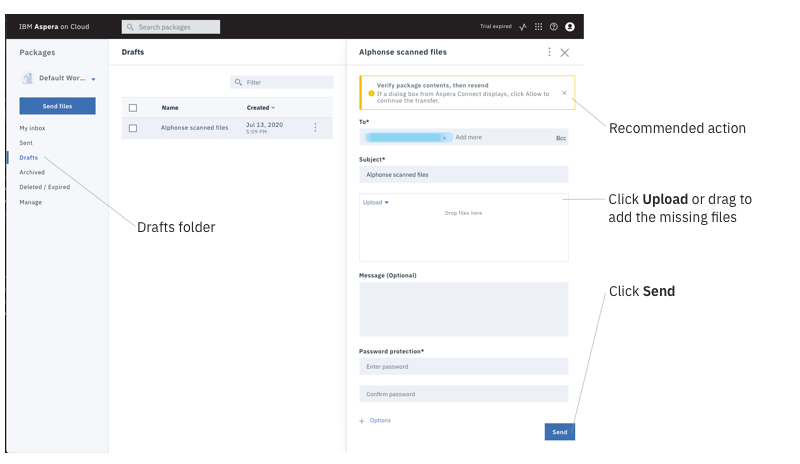
In your Packages app Drafts folder, click the package row to view the package details. Any files and folders listed have been transferred successfully. Files and folders that you sent but are not listed did not transfer.
As described in What is a Transfer?, there are two transfer categories: those that require IBM Aspera Connect, and those that do not. Depending on the contents of any given package, sending a single package may require both transfer types. In a case like this, a package in the Drafts folder may contain some of the files in your package but not all the files. The files present in the Draft package were transferred successfully. Add the missing files to the package, then click Send. The files that were transferred successfully in the first attempt will not be transferred again since they already exist at your intended destination; this means you do not incur more transfer and storage charges. Yet the final package contents are intact in your Sent folder after the transfer succeeds.
In the example below, you see a recommended action in the yellow warning message at the top of the package details panel. No files are listed, meaning none of the files you included in the package transferred successfully.
To add the missing content, click Upload or drag to add the missing items to the package. Then click Send.
Node-to-Node Transfer Issues
About this task
A node-to-node transfer (also called a share-to-share transfer) moves files from one transfer node or cloud storage location to another. This is as opposed to uploading files from a user desktop or remote storage to a transfer node or cloud storage (or downloading files from the cloud to a user desktop or remote storage).
Folders in a user's Files app may be in any number of storage locations, including in different buckets or different cloud providers. When a user moves files from one folder in the Files app to another, a node-to-node transfer occurs.
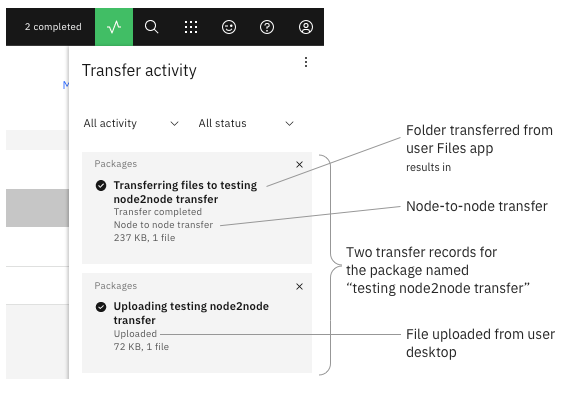
Likewise, in the Packages app, sending a digital package that includes files or folders from the Files app ("Upload from Files" in the Send files panel) also results in a node-to-node transfer. And if a digital package includes files or folders already in cloud storage along with files and folders from the user desktop or remote storage, the AoC transfer monitor displays the package transfer on two separate transfer records: one transfer for the upload and a separate transfer for the node-to-node transfer.
For example, the screenshot below shows two transfer reports for a single transfer. The package contains one file ("byok_architecture copy.png") on the user's desktop and one folder ("AoC Self-Packed Onboarding") in the user's Files app.
There may be times when the error message "Unable to start node-to-node transfer" displays.
If you are the user attempting the transfer, try the transfer again because the issue may be ephemeral.
- The security token may have expired. Check configurations in Organization > Security. See Configuring Organization Security Settings.
- If the transfer is to or from a tethered node, check the transfer logs on the node; see Where are the IBM Aspera client and server logs?
- Work with the user to collect web browser network traces; see How to collect network traces for troubleshooting.
- Contact IBM Support; provide the package name and ID, the user name and ID, the network traces, and transfer logs (if applicable).
More Transfer Troubleshooting Resources
About this task
Troubleshooting Specific Transfer Failures
About this task
This section describes troubleshooting options for some specific transfer failures.
Aspera Connect is unavailable
- Recommended action: Download and install IBM Aspera Connect. See Installing Aspera Connect.
- More information: See "IBM Aspera Connect Required for Transfers" above in this article.
Session data transfer timeout
- Recommended action: Verify network connectivity, then retry the transfer.
- More information: This error typically indicates a UDP timeout. The most likely cause is a network interruption for more than 60 seconds.
Session shutdown failed
- Recommended action: Verify network connectivity, then retry the transfer.
- More information: The session did not shut down properly, and the channel data could not be sent. The most likely cause is a network timeout.
Destination path directory does not exist
- Recommended action: Verify that the destination folder exists, then retry the transfer.
- More information: The target folder cannot be found. Verify that the folder name is accurate and that the folder exists at the expected path. If it does not, create the destination folder at the expected path, then try the transfer again.
Network down
- Recommended action: Verify network connectivity, then retry the transfer.
- More information: The network layer of the operating system may return this error when the Aspera tries to send to a destination that can't be reached because of a disabled or disconnected network interface or router.
Server aborted session: Could not validate bearer token
- Recommended action: Create a new transfer and try again. A simple retry of the same transfer usually does not succeed.
- More information: The security token may have expired. The AoC admin should check configurations in Organization > Security. See Configuring Organization Security Settings.