Lesson 5: Putting it together
In this tutorial, you learned how permissions, roles, and teams are connected to create a secure release environment. Permissions are the base that roles and teams are built upon.
-
Edit the team. Click the edit icon (
 ) on the right side
of the team name.
What users or groups are assigned to the team? Note the users and their assigned roles.Answer: Your answer can vary depending on changes that have been made to your installation. In an unchanged environment, you should see the following users:
) on the right side
of the team name.
What users or groups are assigned to the team? Note the users and their assigned roles.Answer: Your answer can vary depending on changes that have been made to your installation. In an unchanged environment, you should see the following users:- Assigned to the administrator role is admin.
- Assigned to the observer role is user.
- Assigned to the release manager role is the releaser user ID.
-
Click Manage Security.
Note the items on the dashboard. Notice that some of tasks that are associated with the dashboard items are missing.Which items are missing?Answer: Manage Users and Licenses, Manage Authentication Realms, Manage Authorization Realms, and Manage Groups.
-
Click the edit icon () on the right of the Release
Manager role.
Look at the permissions for the Release Manager role. Under System, you can see that release manager has permissions for Manage Roles & Permissions and Manage Teams & Membership, but not Manage Users & Groups. This gives the release manager the ability to assign users to roles and create new roles, but not the ability to add, modify, or delete users.
-
Click the edit icon (
You now have the understanding of how role-based permissions are used to secure an environment. The hard part is planning the best role structure for your environment. Once the planning is complete and verified, implementing roles, teams, and permissions is not as difficult as it might first seem.
Hints and tips
| Issue | Consider |
|---|---|
| Resetting passwords | A user account is locked out of the user interface after five failed login attempts. The action to reset a password must be done by a user with the Manage Users permission. |
| Expected page is not visible | A user logs into the user interface and is missing expected tasks. This issue is most likely because the user does not have the expected permissions to access the action or the object for which the action is to be performed. |
Summary
By using permissions, roles, and teams in IBM® UrbanCode™ Release, you can take a multiple-tier, flexible approach to creating a secure release process environment. After users are defined, there are few tasks they can performed until assigned to a team. Security is more than defining users and ensuring they have authentication credentials. Security also involves ensuring that the right users have access to perform their assigned tasks. The interaction of permissions, roles, and teams ensures that the appropriate user has access to the release process.
- Create authentication realm
- Create authorization realm
- Import users and groups
- Create roles and defined permissions for the roles
- Create a team
Roles are then defined based on your environment. There are several predefined roles that can be used or modified. Roles group permissions needed for a specific type of job. For example, a developer needs access to applications but doesn't need access to system settings. After the needed roles are defined, they are assigned to a team.
- Provides the mechanism to assign users roles.
- Secures product resources, which allow team members to interact only with resources for which they have permission.
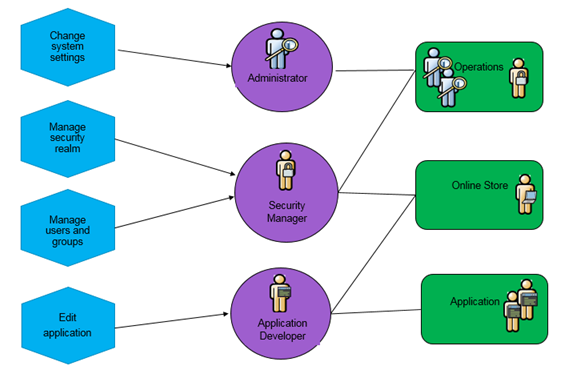
- A role can be assigned to one or more permissions. For example, both the Change system settings and Manage users and groups permissions are assigned to Security Manager role.
- You can have a one-to-one relationship between permission, role, and team. For example, the Edit application permission is assigned to the Application Developer role, which is the only role assigned to the Application team.
- All roles are available to all teams. Roles that are not assigned a user on a team essentially means that the role does not exist on the team. For example, the Security Manager and Administrator role are not part of the Application team.
- One role can be associated with more than one team. For example, the Security Manager role is associated with both the Foundation and Online Store teams.
- One or more roles can be associated with a team. For example, Both the Security Manager and Administrator roles are associated with the Online Store team.