Lesson 1: Creating a release

You create a release by identifying a team to manage it and selecting the lifecycle that defines the release's phases. The phases represent the release pipeline.

The tutorial assumes that you are doing each lesson in the order it is presented. Before you start this lesson, make sure that you complete the prerequisites.

The tutorial also assumes that you are using one of the user accounts described in the prerequisites, or that you configured an optional account as explained in the prerequisites.

The release is the central element of the delivery pipeline. A release combines a lifecycle, which defines the release's phases, with applications and release environments. Typically, when you complete a release, you run a deployment for each phase in the release's lifecycle. You can add IBM™ UrbanCode™ Deploy applications to your releases, and join enterprise-wide events.

In this lesson, you create a release by using the default lifecycle and by assigning a team to manage it.

  1. From the IBM® UrbanCode Release dashboard, click Releases and Deployments.
    The Releases page displays the existing releases. Initially, the Sample Release is available. In this tutorial, you create a release based on the default lifecycle that is also used by the Sample Release.
  2. Click Add New.
  3. In the Name field, type Demo Release.
  4. From the Lifecycle list, select Default Lifecycle.
    The lifecycle defines the phases and approval gates. Later in this tutorial, you add an approval to one of the lifecycle's phases.
  5. In the Team list, ensure that the default Team for Sample Release is selected.
    In a later tutorial, you create a new team and add members to it.
    Note: If you created your own team, you can assign it to the release. The user that completes the tutorial must be a member of this team and be in a role with the expected permissions. For information about creating a role with the necessary permissions, see the prerequisites.
  6. In the Target Date list, accept the default date.
    The target date is the planned release date. You can change your selection later. The default date is today's date.
  7. Click Save.
  8. On the Releases page, click the name of your new release, Demo Release.
    The Release Detail page for the Demo Release is displayed.

Lesson checkpoint

In this lesson, you created a release by assigning a lifecycle to it and a team to manage it.

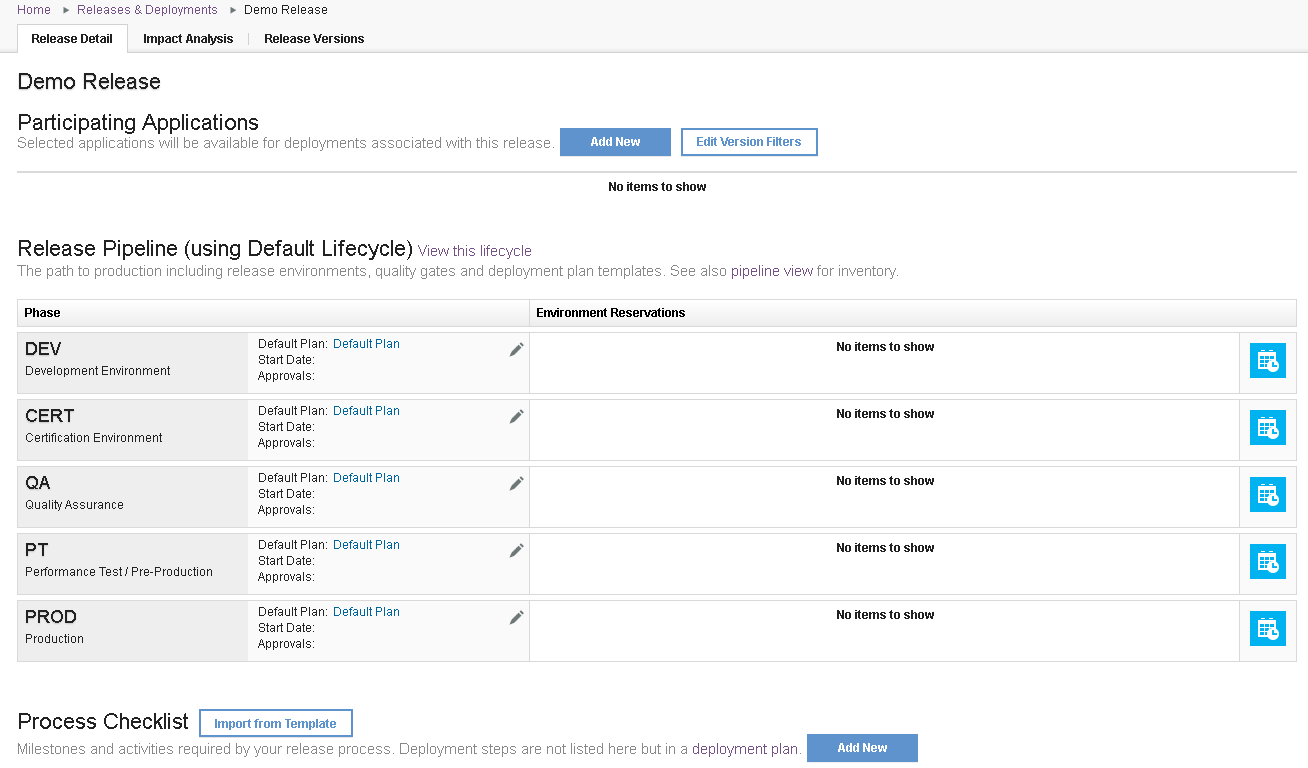
You use the Release Detail page to manage a release. The Release Pipeline area displays the release's phases, which are derived from the lifecycle you selected when you created the release. The Default Lifecycle has the five phases shown in the following figure. In this case, a typical release might consist of five deployments, one for each phase, beginning with the DEV phase and ending with the PROD, or production, phase. Generally, each succeeding deployment represents a level of higher criticality in the release.


The Demo Release with five phases

To learn more about releases, see Managing releases.