About this task
Before installing or configuring any ITM components in a Microsoft Cluster environment, all other ITM components which are already added to resource groups on this cluster should be offline. This precautionary measure prevents conflicts between the cluster management tool and the ITM MTEMS tool. Also, you should shut down clusternode2 to prevent the Microsoft Cluster Server moving the resource to clusternode2 during ITM installation. Ensure that basic cluster resources are online while installing ITM components.
- Start the installation using setup.exe.
- See Setting up basic cluster resources for specifying the installation drive and location.
- Start the setup and make sure that the installation directory is on the shared disk R.
- Select the required Application Support.
- Configure the virtual host name as the host name of the portal server.
- Assuming the hub monitoring server is clustered, specify the virtual host name of the hub monitoring server as the monitoring server host name.
- For the portal server database access, specify the DSN (TEPS2) and the user (ITMUser) just created.
- The installation now uses the existing database and user ID to continue.
- Finish the installation as usual.
- Make sure Tivoli Enterprise Portal Server and Tivoli Enterprise Portal Server Extensions are stopped.
- Back up your configuration data %CANDLE_HOME%\CNPSJ\profiles directory.
- Run the cmd shell.
- Change the current directory to %CANDLE_HOME%\CNPSJ\scripts
- Run updateTEPSEHostname.bat <old_hostname> <new_hostname>.
Under <old_hostname> substitute the current host name, do not include domain name.
Under <new_hostname> substitute the valid virtual host name for your Tivoli Enterprise Portal Server cluster.
- If the operation is successful, 'BUILD SUCCESSFUL' is displayed.
- Configure the portal server interface and URL such that the portal
clients can connect to the portal server on its the virtual host name
. On the Manage Tivoli® Enterprise
Monitoring Services GUI, select portal server and then:
- Advanced->Configure TEPS Interfaces
- Click Edit on CNPS and type in the portal server virtual host name. in this case IVTCS020.
Figure 1. Editing the portal server virtual host name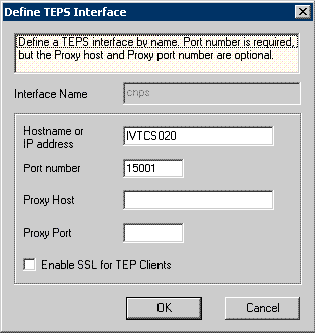
- The second configuration is for the communication between the
portal server and the rest of the Tivoli Monitoring
infrastructure, including the monitoring server.
- Right-click the portal server, select Advanced, and then Set Network Interface. Set the network interface also to the virtual host name, (IVTCS020).
- This setting creates an environment variable for the portal server, so it does not take effect until the computer is restarted. Also, this setting affects every IBM Tivoli Monitoring component that is installed on the same computer (node).
- Start the portal server.
- Configure a Tivoli Enterprise Portal Console to connect to this portal server virtual host name.
- Start the Console and make sure the Console to portal server communication is working.
- As a last step of the portal server configuration on the cluster, set the portal server service to manual startup.
- Check this key:
HKEY_LOCAL_MACHINE\SOFTWARE\Candle\KFW\CNPS\KFWSRV\
Environ ment\KFW_AUTHORIZATION_KEY
It might reflect: @Authorizationkey@
But it should be: AABA-AAAA-ACDI-AFgANote: The registry replication entries might not be identical to the ones in this document. - Also check this key:
HKEY_LOCAL_MACHINE\SOFTWARE\Candle\KFW\CNPS\KFWSRV\
Environ ment\KFW_DSN
It might be: @ODBCDSN@
But it should be: TEPS2Note: The registry replication entries might not be identical to the ones in this document. - Correct the keys, start the tool Manage Tivoli Enterprise Services, right-click the
TEPS, and select:
Advanced-> Utilities-> Build TEPS Database
Then select DB2® and follow the few steps to configure the parameters again as you did during the installation.
- Start the portal server.
- Open a command prompt and change the directory to R:\IBM\ITM\CNPS on
the shared disk.
- Run the Buildpresentation.bat command.
- Restart the portal server.