Learn how to cable your server
to a console, terminal, or interface, such as the Advanced System
Management Interface (ASMI), to an expansion unit, or to other adapters
and peripheral equipment.
DANGER
When working on or around the system,
observe the following precautions:
Electrical voltage and current
from power, telephone, and communication cables are hazardous. To
avoid a shock hazard:
- Connect power to this unit only with the IBM provided
power cord. Do not use the IBM provided power
cord for any other product.
- Do not open or service any power supply assembly.
- Do not connect or disconnect any cables or perform installation,
maintenance, or reconfiguration of this product during an electrical
storm.
- The product might be equipped with multiple power cords. To remove
all hazardous voltages, disconnect all power cords.
- Connect all power cords to a properly wired and grounded electrical
outlet. Ensure that the outlet supplies proper voltage and phase
rotation according to the system rating plate.
- Connect any equipment that will be attached to this product to
properly wired outlets.
- When possible, use one hand only to connect or disconnect signal
cables.
- Never turn on any equipment when there is evidence of fire, water,
or structural damage.
- Disconnect the attached power cords, telecommunications systems,
networks, and modems before you open the device covers, unless instructed
otherwise in the installation and configuration procedures.
- Connect and disconnect cables as described in the following procedures
when installing, moving, or opening covers on this product or attached
devices.
DANGER
To Disconnect:
- Turn off everything (unless instructed otherwise).
- Remove the power cords from the outlets.
- Remove the signal cables from the connectors.
- Remove all cables from the devices
(D005)
DANGER
To Connect:
- Turn off everything (unless instructed otherwise).
- Attach all cables to the devices.
- Attach the signal cables to the connectors.
- Attach the power cords to the outlets.
- Turn on the devices.
(D005)
To cable your server:
- Connect a console or interface to
your server.
- Optional: Cable the expansion
units, if applicable, to your server.
- Optional: Connect all
external cables to the appropriate adapter connectors on the rear
of your server. For information about specific
connectors and adapters, see Connectors and adapters.
Note: You must provide the cable if it was not provided with
your server.
- Optional: If you
are attaching devices by using a system serial port, be aware
of the following conditions and follow these instructions:
- If you are connecting the server to an uninterruptible power supply,
see the documentation that is included with your uninterruptible power
supply. You might need additional hardware.
- Each system serial port on the rear
of the server is disabled when your server is connected to the HMC.
- If you want to access the ASMI when the system is in standby mode,
attach an ASCII terminal to a system serial port on the rear
of the server.
- If you want to access the ASMI remotely when the system is in
standby mode, attach a modem to a system serial port on the
rear of the server.
To view locations of system serial ports, see Locations .
Notes: - Use a system serial port for a local teletypewriter (tty)
console, such as the ASCII terminal, or for support of the call home
feature.
- The attachment of IBM® High-Availability
Cluster Multiprocessing (HACMP™)
cables to a system serial port on the rear of the server
is not supported.
- Optional: If
you have a PCI Cryptographic Coprocessor card to install, install
it now. For instructions, see Model
8203-E4A, 9407-M15, and 9408-M25 PCI adapters .
- After you connect other devices
to your server, route the server power cord through the retention
bracket or through the retention ring as follows:
- If your server is equipped with a retention bracket, route the
power cord through the bracket before you plug it into the rear of
the server.
- If your server is mounted in a rack, route the power cord through
the retention bracket, as shown in the following figure.
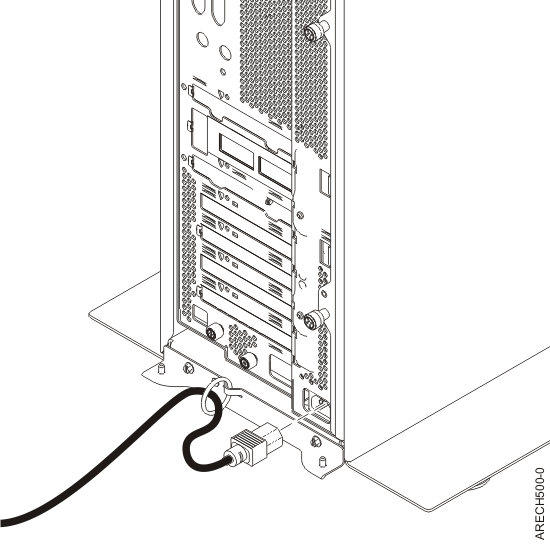
- If you are installing your server desk-side, route the power cord
through the retention ring, as shown in the following figure.
- Optional: If your server
is installed in a rack, route the cables through the cable-management
arm. Follow these steps:
- Place the rack-mounted system in the service position.
For instructions, see Place
the rack-mounted model 8204-E8A, 8203-E4A, 9407-M15, 9408-M25, or
9409-M50 in the service position.
- Route the cables through the hooks that are located
along the cable-management arm, and secure them with the straps that
are provided, as shown in the following figure.
- After you attach the cables to the cable-management
arm, go to the front of the rack and move the system drawer in and
out. Observe the cables and cable-management-arm movement to verify
that the cables are not binding.
- Optional: If you have
a cable hook for your rack, slide the cable hook into the slots, which
are located on the rear of the rack. See the following figure.
The cable hook can help manage the server cables
in the rear of the rack.