subscribe iconSubscribe to this information

Install model 55x, 720, or attached expansion-unit, PCI adapter with system power on in Linux

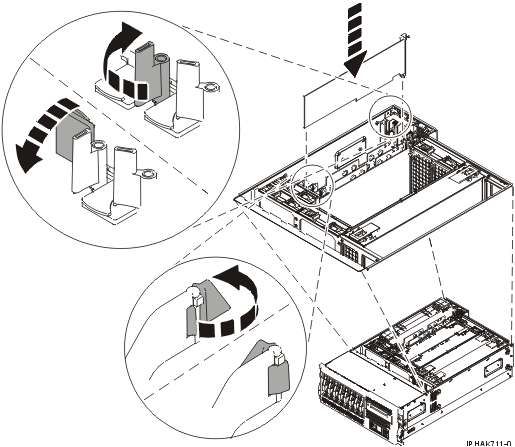
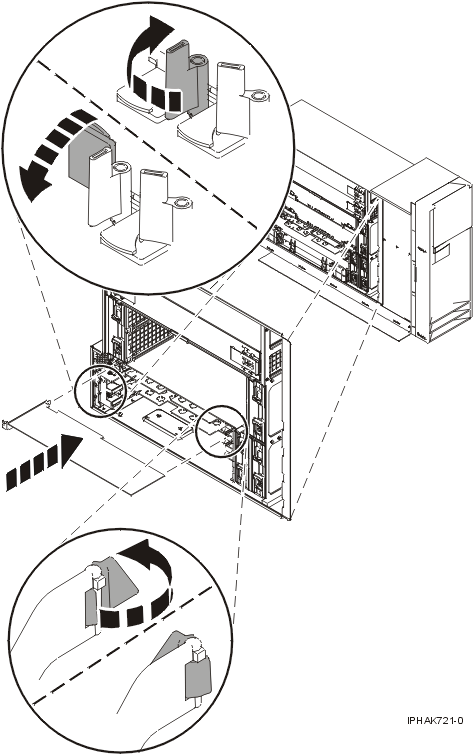
You might need to install a PCI adapter. Use the procedure in this section to perform this task.

If the system is partitioned, see Partitioning for Linux® to learn more about working in partitions, then return here to continue the procedure.

If your system is managed by the Hardware Management Console (HMC), use the HMC to complete the steps for installing a PCI adapter. For instructions, see Install a feature using the Hardware Management Console.

To install a PCI adapter with the system power on in Linux, do the following:

  1. Ensure that the system meets the Prerequisites for hot-plugging PCI adapters in Linux.
  2. Verify that the Linux, hot-plug PCI tools are installed.
  3. Determine in which slot to place the PCI adapter by doing the following:
    • Refer to PCI adapter placement in the system unit or expansion unit for information regarding slot restrictions for adapters used in this system.
    • Determine if the adapter will be placed in the base system unit or an expansion unit.
      • If the adapter is to be placed into the base system unit, continue with this procedure by going to the next numbered step.
      • If the adapter is to be placed into an expansion unit that does not contain PCI adapter cassettes, continue with this procedure by going to the next numbered step.
      • If the adapter is to be placed into an expansion unit that contains PCI adapter cassettes, go to the procedures for adapters in adapter cassettes. See Model 560Q, 570, 590, 595 , and attached expansion units, PCI adapters and cassettes.
  4. Perform the prerequisite tasks described in Before you begin.
  5. Take appropriate precautions for avoiding electric shock and handling static-sensitive devices. For information, see Avoiding electric shock and Handling static-sensitive devices.
  6. If you are installing a PCI adapter in a rack-mounted system or expansion unit, follow these steps. If you are servicing a stand-alone system, go to the next step.
  7. If you are installing a PCI adapter in a stand-alone system or expansion unit, follow these steps:
  8. If necessary, remove the adapter expansion slot shield.
  9. If necessary, remove the adapter from the antistatic package.
    Attention: Avoid touching the components and gold-edge connectors on the adapter.
  10. Place the adapter, component-side up, on a flat, antistatic surface.
  11. Log in to the system console as the root user.
  12. Run the lsslot tool to list the hot-plug PCI slots that are available in the server or partition:

    lsslot -c pci -a

    The following is an example of the information displayed by this command:
    # Slot          Description             Device(s) 
    U7879.001.DQD014E-P1-C1 PCI-X capable, 64 bit, 133MHz slot Empty
    U7879.001.DQD014E-P1-C4 PCI-X capable, 64 bit, 133MHz slot Empty
    U7879.001.DQD014E-P1-C5 PCI-X capable, 64 bit, 133MHz slot Empty
    Select the appropriate empty PCI slot from the ones listed by the command.
  13. Rotate the adapter locking latch A counterclockwise as shown in Figure 1 or Figure 2.
  14. Lift the black tab B attached to the adapter retainer assembly, and keep the black tab in a vertical position.
  15. Ensure the slot is empty. Remove the adapter filler plate if one is present.
    Figure 1. PCI adapter or filler plate removed from the rack-mounted system unit
    Adapter or filler plate removed from the system unit.
    Figure 2. PCI adapter or filler plate removed from the stand-alone system unit
    Adapter or filler plate removed from the system unit.
  16. Run the drslot_chrp_pci command to enable an adapter to be installed. For example, to install an adapter into PCI slot U7879.001.DQD014E-P1-C3, enter the following command:

    drslot_chrp_pci -a -s U7879.001.DQD014E-P1-C3

    The following displays:

    The visual indicator for the specified PCI slot has been set to the 
    identify state. Press Enter to continue or enter x to exit.
  17. Press Enter.

    The following displays:

    The visual indicator for the specified PCI slot has been set to the 
    action state. Insert the PCI card into the identified slot, connect any 
    devices to be configured and press Enter to continue. Enter x to exit. 
  18. When you are instructed to install the adapter in the adapter slot, carefully grasp the adapter by its top edge, and align the adapter with the expansion slot and its connector on the system backplane.
  19. Press the adapter firmly into its connector.
    Attention: When you install an adapter into the system, be sure that it is completely and correctly seated in its connector.
  20. Secure the adapter. Lower the tab onto the PCI adapter faceplate. Rotate the adapter locking latches clockwise as shown in Figure 3 or Figure 4.
  21. Connect any adapter cables.
  22. Run the lsslot command to verify that the slot is occupied.

    For example, enter lsslot -c pci -s U7879.001.DQD014E-P1-C3

    The following is an example of the information displayed by this command:
    # Slot          Description             Device(s)
    U7879.001.DQD014E-P1-C3 PCI-X capable, 64 bit, 133MHz slot 0001:40:01.0 
  23. If you are servicing a rack-mounted system, route the cables through the cable-management arm.
  24. Replace or close the covers.
  25. On a rack-mounted system, close the rear rack door.
  26. Place the rack-mounted system or expansion unit in the operating position if you are servicing a rack-mounted system. If you are servicing a stand-alone system, continue to the next step.
Figure 3. PCI adapter replaced in the rack-mounted system unit
Adapter or filler plate replaced in the system unit.
Figure 4. PCI adapter replaced in the stand-alone system unit
Adapter or filler plate replaced in the system unit.


Send feedback | Rate this page

Last updated: Fri, Oct 30, 2009