General diagnostic information
Use the general diagnostic information to view logs, to run tests, and to use diagnostic service utilities that can help a service provider.
For more information about working with the Linux® operating system, see the Linux Knowledge Center.
AIX operating system message files
English is the default language that is displayed when you run the diagnostic programs from the disk. If you want to run the diagnostic programs in a language other than English, you must install the AIX® message locale file to the system for the language.
Firmware and microcode
- Power subsystem firmware (if applicable)
- Service power control network (SPCN) firmware (if applicable)
- Service processor firmware (if applicable)
- System firmware
- Adapter microcode
- Device microcode
If a management console is attached to the server, the management console must be used to manage the firmware and microcode levels on the server.
If a management console is not attached to the server, diagnostic tasks can be used to display device and adapter microcode levels. The tasks can also be used to update device and adapter microcode. Diagnostic tasks also provide the capability to update firmware.
To determine the level of server firmware, and device and adapter microcode, use the Display Microcode Level task in diagnostic service aids. This task provides a list of resources that are currently installed and supported by this task. Select the resource to check the microcode level of that resource. If you are using the AIX operating system and if you are using online diagnostics, the lsmcode command and the diag command can also be used to display the firmware and microcode levels of individual entities in the system from the command line. For more information, see Display Microcode Level. For adapters and devices that are not supported by this task, refer to the instructions provided by the manufacturer to determine the microcode levels.
Use the Update and Manage System Flash task to update firmware on the server. When the flash update is complete, the server automatically restarts. See Updates for detailed scenarios that explain how to use the Update and Manage System Flash task.
Use the Download Microcode service aid on systems that are running AIX 5.2.0.30, or later to update the microcode on adapters and devices. For details about updating adapter and device microcode, see Updates.
If your system is running the Linux operating system, you can use the service aids that are available in the AIX Standalone Diagnostics CD to update most system flash, adapter, and device microcode.
CE login
- Run the diagnostics including the service aids, such as hot plug tasks, certify, and format.
- Run all the operating system commands that are run by system group users.
- Configure and unconfigure devices that are not busy.
- Use of the Update System Microcode service aid.
- Use of shutdown and restart operations.
To use CE login, ask the customer to create a unique user name and configure these characteristics for that name. After the user name is set up, you will need to obtain the user name and password from the customer to log in with these capabilities. The recommended CE login user name is qserv.
Automatic diagnostic tests
All automatic diagnostic tests that are run after the system unit is turned on and before the AIX operating system is loaded.
The automatic diagnostic tests display progress indicators (or checkpoints) to track test progress. If a test stops or hangs, the checkpoint for that test remains in the display to identify the unsuccessful test. The descriptions of these tests are contained in Reference code finder.
Power-on self-test
Power-On Self-Test (POST) programs check the devices that are needed to accomplish an initial program load. The POST also checks the memory, and portions of the central electronics complex, common interrupt handler, and the direct memory access (DMA) handler.
Configuration program
The configuration program determines which features, adapters, and devices are present on the system. The configuration program, which is part of the AIX operating system, builds a configuration list that is used by the diagnostic programs. This list is used to control which tests are run during system check-out.
On systems that are running the AIX operating system,
the configuration program displays numbers between 2E6 through 9FF
and 2300 through 27FF in the operator panel display (if present).
See Reference code finder for a listing of program actions that
are associated with displayed numbers. On systems that are running logical partitions,
LPAR is displayed in the operator panel (if present) after the hypervisor (the
system firmware that controls the allocation of resources) is loaded. When a partition that is
running the AIX operating system is then booted, the
configuration codes is displayed in the Reference code column in the Contents area of the management console.
Devices that are attached to serial and parallel ports are not configured. The Dials and Lighted Program Function Keys (LPFKs) can be tested from online diagnostics after they are manually configured. No other device that is attached to the serial and parallel ports is supported by the diagnostics.
CPU, memory testing, and error log analysis
Except for the floating-point tests, all CPU, and memory testing on the system units are performed by POST and BIST. Memory is tested entirely by the POST. The POST provides an error-free memory MAP. If POST cannot find enough good memory to boot, it halts and displays an error message. If POST finds enough good memory, the memory problems are logged and the system continues to boot.
If any memory errors were logged, they are reported by the base system or memory diagnostics, which must be run to analyze the POST results.
The CPU and memory cannot be tested after the diagnostics are loaded; however, they are monitored for correct operation by various checkers such as processor runtime diagnostics.
Single-bit memory errors are corrected by ECC (Error Checking and Correction) on systems that are equipped with ECC memory.
Diagnostic programs
This section provides overview of the various diagnostic programs.
Diagnostic controller
- Displays diagnostic menus
- Checks availability of needed resources
- Checks error log entries under certain conditions
- Loads diagnostic application programs
- Loads task and service aid programs
- Displays test results
To test an adapter or device, select the device or adapter from the diagnostic selection menu. The diagnostic controller then loads the diagnostic application program for the selected device or adapter.
The diagnostic application program loads and runs test units to check the functions of the device or adapter.
The diagnostic controller checks the results of the tests that are performed by the diagnostic application and determines the action that is needed to continue the testing.
The amount of testing that the diagnostic application performs depends on the mode (service, maintenance, or power on) under which the diagnostic programs are running.
Error log analysis
If you are running the stand-alone diagnostics, error log analysis occurs on errors that are logged while booting the stand-alone diagnostics CD or DVD, or while running the stand-alone diagnostics.
When you select the diagnostics or advanced diagnostics option, the diagnostic selection menu is displayed (other menus might be shown before this menu). You can select the purpose for running diagnostics by using this menu.
If the error log contains recent errors (approximately the last seven days), the diagnostic programs automatically select the diagnostic application program to test the adapter or device that the error was logged against.
If there are no recent errors logged or the diagnostic application program runs without detecting an error, the diagnostic selection menu is displayed. You can select a resource for testing by using this menu.
If an error is detected while the diagnostic application program is running, the A PROBLEM WAS DETECTED screen displays a service request number (SRN).
Enhanced FRU isolation
The diagnostics provide enhanced field replaceable unit (FRU) isolation by automatically selecting associated resources. Typically, diagnostics select a resource to present a list of system resources, and you can then select a resource. Diagnostics begin with that same type of selection.
If the diagnostic application for the selected resource detects a problem with that resource, the diagnostic controller checks for an associated resource. For example, if the test of a disk drive detects a problem, the diagnostic controller tests a sibling device on the same controller. This test determines whether the drive or the controller is failing. This extra FRU isolation is apparent when you test a resource and notice that the diagnostic controller continues to test another resource that you did not select.
Advanced diagnostics function
The advanced diagnostics function is typically used by a service representative. These diagnostics might need you to disconnect a cable and install a wrap plug.
- Use wrap plugs for testing.
- Loop on a test (not available in power on mode) and display the results of the testing.
Task and service aid functions
If a device does not show in the test list, or a diagnostic package is not loaded for a device, check it by using the display configuration and resource list task. If the device you want to test has a plus (+) sign or a minus (-) sign that precedes its name, the diagnostic package is loaded. If the device has an asterisk (*) preceding its name, the diagnostic package for the device is not loaded or is not available.
Tasks and service aids provide a means to display data, check media, and check functions without being directed by the hardware problem determination procedure. For more information about tasks and service aids, see Tasks and service aids.
System check-out
The system check-out program uses the configuration list that is generated by the configuration procedure to determine which devices and features to test. These tests run without interaction. To use system check-out, select All Resources in the resource selection menu.
Missing resource description
In diagnostics version earlier than 5.2.0, missing devices are displayed in a missing resource screen. This is the result of running diag -a command or by booting online diagnostics in service mode.
In diagnostics version 5.2.0 and later, missing devices are identified in the diagnostic
selection screen by an uppercase M preceding the name of the device that is
missing. The diagnostic selection menu is displayed anytime you run the diagnostic routines or the
advanced diagnostics routines. The diagnostic selection menu can also be entered by running the
diag -a command when missing devices exists or missing paths exists to a
device.
When a missing device is selected for processing, the missing resource menu checks several items. It checks whether the device is turned off, removed from the system, moved to a different physical location, or if it is still present.
When a single device is missing, the device is faulty. When multiple devices with a common parent are missing, the fault is most likely related to a problem with the parent device.
The diagnostic procedure might include testing the parent of the device, analyzing which devices are missing, and any manual procedures that are required to isolate the problem.
Missing path resolution for MPIO resources
Diagnostics also identifies
a multipath I/O device that has multiple configured paths, all of which are missing as a missing
device. If some, but not all, paths to a multipath I/O device are missing, then diagnostics
identifies those paths as missing. In such an instance, an uppercase P is displayed
in front of the multipath I/O device.
- If the Path Has Been Removed option is selected, diagnostics removes the path from the database.
- If the Path Has Not Been Removed option is selected, diagnostics determines why the path is missing.
- If the Run Diagnostics on the Selected Device option is selected, diagnostics runs on the device and does not change the system configuration.
Automatic error log analysis (diagela)
The diagela program determines whether the error must be analyzed by diagnostics. If the error must be analyzed, a diagnostic application is started and the error is analyzed. No testing is performed if the diagnostics determine that the error requires a service action. Instead, it sends a message to your console, and either to the Service Management applications for systems with a management console, or to all system groups. The message contains the SRN.
Running diagnostics in this mode is similar to using the diag -c -e -d Device command.
Notification can also be customized by adding a stanza to the PDiagAtt object class. The following example illustrates how a program can be started instead of the normal mail message. The example also shows that you can send the message to the Service Management application when there is no HMC.
PDiagAtt:
     DClass = " "
     DSClass = " "
     DType = " "
     attribute = "diag_notify"
     value = "/usr/bin/customer_notify_ program $1 $2 $3 $4 $5"
     rep = "s"
If the DClass, DSClass, and DType fields are blank, then the
customer_notify_program applies for all devices. If you enter details in the
DClass, DSClass, and DType fields, the customer_notify_program is started only for
that device type.
diag_notify
predefined attribute is started. The following keyword is expanded automatically as arguments to the
notify program: - $1 the keyword
diag_notify - $2 the resource name that reported the problem
- $3 the Service Request Number
- $4 the device type
- $5 the error label from the error log entry
If no diagnostic program is found to analyze the error log entry, or analysis is performed but no error was reported, you can specify a separate program that will be started. This is accomplished by adding a stanza to the PDiagAtt object class with an attribute = diag_analyze. The following example illustrates how a customer's program can be started for this scenario:
PDiagAtt:
     DClass = " "
     DSClass = " "
     DType= " "
     attribute = "diag_anaylze"
     value = "/usr/bin/customer_analyzer_program $1 $2 $3 $4 $5"
     rep = "s"
If the DClass, DSClass, and DType fields are blank, then the
customer_analyzer_program applies for all devices. Specifying the DClass, DSClass,
and DType fields with details causes the customer_analyzer_program to be started
only for that device type.
- $1 the keyword diag_analyze
- $2 the resource name that reported the problem
- $3 the error label from the error log entry if from ELA, the keyword PERIODIC if from Periodic Diagnostics, or the keyword REMINDER if from a Diagnostic Reminder.
- $4 the device type
- $5 the keywords:
- no_trouble_found if the analyzer was run, but no issue was detected.
- no_analyzer if the analyzer is not available.
/usr/lpp/diagnostics/bin/diagela ENABLE/usr/lpp/diagnostics/bin/diagela DISABLEThe diagela program can also be enabled and disabled by using the periodic diagnostic service aid.
Log repair action
The diagnostics perform error log analysis on most resources. The default time for error log analysis is seven days; however, this time can be changed from 1 - 60 days by using the display or change diagnostic run time options task. To prevent false problems from being reported when error log analysis is run, repair actions need to be logged whenever a FRU is replaced. A repair action can be logged by using the log repair action task or by running advanced diagnostics in system verification mode.
The log repair action task lists all resources. Replaced resources can be selected from the list, and when commit (F7 key) is selected, a repair action is logged for each selected resource.
Updates
Learn about obtaining machine code updates for your management console, server firmware, I/O adapter and device, and operating system updates.
Updates provide changes to your software, Licensed Internal Code, or machine code that fix known problems, add new function, and keep your server or management console operating efficiently. For example, you might install updates for your operating system in the form of a program temporary fix (PTF). Or, you might install a server firmware update with code changes that are needed to support new hardware or new functions of the existing hardware.
A good update strategy is an important part of maintaining and managing your server. If you have a dynamic environment that changes frequently, install updates regularly. If you have a stable environment, you do not have to install updates as frequently. However, you should consider installing updates whenever you make any major software or hardware changes in your environment.
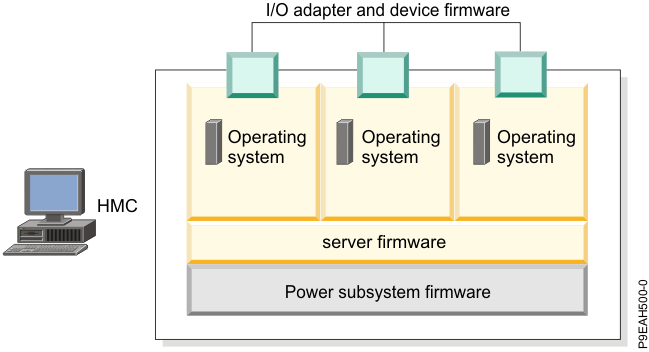
You can get updates by using various methods, depending on your service environment. For example, if you use an HMC to manage your server, you can use the HMC interface to download, install, and manage your HMC and firmware updates. If you do not use an HMC to manage your server, you can use the functions specific to your operating system to get your updates. In addition, you can download or order many updates through Internet websites.
You must manage several types of updates to maintain your hardware. The following figure shows the different types of hardware and software that might require updates.
HMC user interface
Learn about the Hardware Management Console (HMC) graphical user interface.
The HMC provides a menu (also called the context menu) for quick access to menu choices. The menu lists the actions that are found in the Selected and Object menus for the current object or objects.
The user interface that is provided with the Hardware Management Console (HMC) uses navigation that provides hierarchical views of system resources and tasks. This user interface is made up of several major components: the banner, the navigation pane, the work pane, the taskbar, and the status bar.
Array bit steering
An advanced feature of many systems is array bit steering. The processors in these systems have internal cache arrays with extra memory capacity that can be configured to correct certain types of array faults.
This reconfiguration can be used to correct arrays for faults that are detected at IPL or run time. If a fault is detected during run time, the recoverable fault is reported with a Repair Disposition Pending Reboot indicator set. This setting allows diagnostics to callout a service request number that identifies the array and directs the service representative to a MAP for problem resolution that uses array bit steering. If the array bit steering cannot be used for the reported fault, the FRU with that array is replaced.
Enhanced I/O error handling
Enhanced I/O Error Handling (EEH) is an error recovery strategy for errors that can occur during I/O operations on the PCI bus. Not all systems support EEH. If you get an SRN involving an EEH error, follow the action that is listed.
Diagnostics for systems that have only Power IFL processor cores
Power® Integrated Facility for Linux (Power IFL) is an optional lower-cost per processor core activation feature for IFL-compliant workloads. For more information about Power IFL, see Power Integrated Facility for Linux (Power IFL). IFL processor cores can run only the Linux operating system and Linux workloads. General-purpose processor cores can run any supported operating system. You can activate only IFL processor cores without activating any general-purpose processor cores. However, a system that does not have any general-purpose processor cores cannot run standard diagnostic utilities such as the AIX diagnostics, which require at least one general-purpose processor core. To determine whether your system has only IFL processor cores, see Determining whether the system has only IFL processor cores.
Running diagnostics on systems that have only IFL processor coresSystems with only IFL processor cores cannot load and run diagnostics by default. One of the IFL processor cores must be converted to a general-purpose processor core, which can load and run AIX diagnostics. After you convert an IFL processor core to a general-purpose processor core, diagnostics can be run on the system or partition that contains the general-purpose processor core.
If your system has a system firmware level earlier than FW920.20, contact the Power Systems Capacity on Demand (CoD) project office to obtain an activation key sequence to convert an IFL processor core to a general-purpose processor core. After a general-purpose processor core is available, you can load and run the diagnostics.
If your system has system firmware level FW920.20 or later, you can use the Advanced System Management Interface (ASMI) to convert an IFL processor core to a general-purpose processor core. For instructions, see Converting an IFL processor core to a general-purpose processor core by using the ASMI. After an IFL processor core is converted to a general-purpose processor core, you must copy the partition profile, and then modify the duplicate profile to load and run AIX diagnostics. For instructions, see Copying and modifying the partition profile to load AIX diagnostics.
Determining whether the system has only IFL processor cores
- In the Hardware Management Console navigation pane, click the Resources
 icon.
icon. - Click All Systems. The All Systems page is displayed.
- In the work pane, select a system and click .
- In the menu pod, click . Information about the processor cores is located in the Configurable area of the Processors tab. If all of the processor cores are configurable as Linux only or Linux or VIOS only, and none of the processor cores are configurable as Any, the system has only IFL processor cores.
Converting an IFL processor core to a general-purpose processor core by using the ASMI
- In the Hardware Management Console navigation pane, select .
- In the content pane, select the server on which you want to work.
- Select .
- Verify the information that appears and click OK. The ASMI Welcome page is displayed.
- On the ASMI Welcome page, specify your celogin user ID and password. Then, click Log In.
- In the navigation area, expand .
- In the CoD Command field, type
cfcuod –diagproc -setand click Continue.If the operation to convert the IFL processor core to a general-purpose processor core is successful, the following message is displayed:
System server firmware response:DIAG PROC AVA.If the operation to convert the IFL processor core to a general-purpose processor core is not successful, the following message is displayed:
System server firmware response:Unrecognized command.
Copying and modifying the partition profile to load AIX diagnostics
- Create a copy of the existing partition profile. For instructions, see Copying a partition profile.
- From the updated list of profiles, select the profile that you created, and then click .
- Click the Processors tab.
- If the processors are in dedicated mode, in the Minimum dedicated processors, Desired dedicated processors, and Maximum dedicated processors fields, specify the number of dedicated processors as 1.
- If the processors are in shared mode, from the Processing mode list, change the processors to dedicated mode. In the Minimum dedicated processors, Desired dedicated processors, and Maximum dedicated processors fields, specify the number of dedicated processors as 1.
- Click the Memory tab.
- If the memory is in dedicated mode, no changes are required.
- If the memory is in shared mode, from the Memory mode list, change the memory to dedicated mode.
- Click OK to save the profile changes. Any change that you make to the partition profile takes effect only after you shut down and reactivate the logical partition by using the modified profile.
- Shut down the logical partition. For instructions, see Shutting down and restarting logical partitions.
- Activate the new partition profile. Also, ensure that the Open a terminal window or console session box is selected. For instructions, see Activating a partition profile.
- In the console session that is displayed, continue to select the SMS menu options for stand-alone diagnostics procedure. For instructions, see Running the stand-alone hardware diagnostics.
- After you complete the stand-alone diagnostic procedure, shut down the logical partition. For instructions, see Shutting down and restarting logical partitions.
- Activate the original partition profile. For instructions, see Activating a partition profile.