This section describes how to install the 7042-CR5, 7042-CR6,
7042-CR7, or 7042-CR8 HMC into a rack.
Complete a parts inventory. The following illustration
shows the items that you need to install the server in the rack cabinet.
If any items are missing or damaged, contact your place of purchase.
Figure 1. Parts inventory
Note: Screws can be used for
shipping, or for additional stabilization in high-vibration areas.
To install a 7042-CR5, 7042-CR6, 7042-CR7, or 7042-CR8 HMC
into a rack, complete the following steps:
- Each slide rail is marked with either an R (right) or an
L (left). Select one of the slide rails and push up on the front movable
tab (1); then, pull out the front latch (2) to
slide out the front side rail. If a thumbscrew is installed in the
slide rail (3), remove it.
Figure 2. Slide rail and movable tab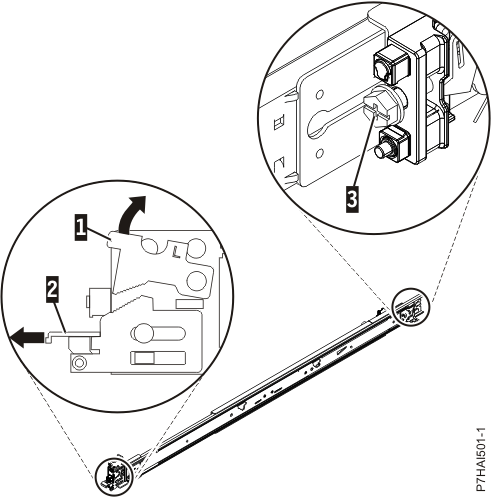
Note: Make
sure that the movable tab remains extended and does not click back
into place.
- Align the three pins on the rear of the slide rail with
the three holes in the selected U on the rear of the rack. Push the
rails so that the pins go into the holes (1),
and drop the slide rail down (2) until it latches
into place.
Figure 3. Align the pins with the holes in
the rear of the rack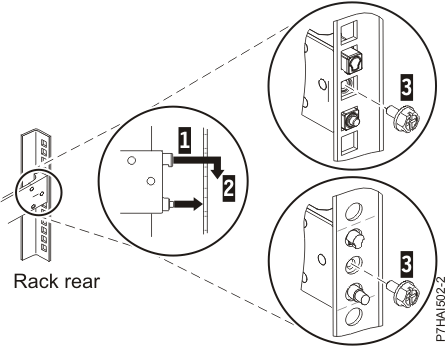
- Pull the slide rail forward and insert the two pins (1) on
the front of the rail into the two lower holes in the U on the front
of the rack. Drop the rail into place until it clicks into place.
Push the front latch (2) in all the way. Repeat
steps 1 through 3 to install the other rail into the rack. Make sure
that each front latch is fully seated.
Figure 4. Rack
front rail and pins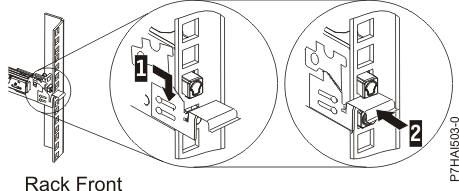
- Pull the slide rails forward (1) until
they click, twice, into place. Carefully lift the server and tilt
it into position over the slide rails so that the rear nail heads (2) on
the server line up with the rear slots (3) on
the slide rails. Slide the server down until the rear nail heads slip
into the two rear slots, and then slowly lower the front of the server (4) until
the other nail heads slip into the other slots on the slide rails.
Make sure that the front latch (5) slides over
the nail heads.
Figure 5. Slide rails extended, server
nail heads aligned with slots in rail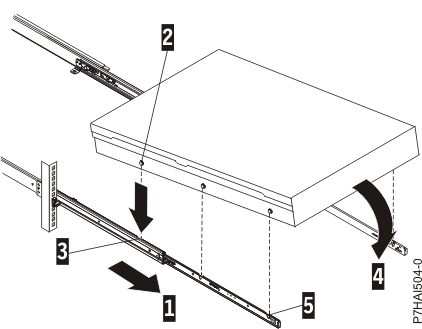
- Lift the blue release latches (1) on
the slide rails and push the server (2) all
the way into the rack until it clicks into place.
Figure 6. Release latches and server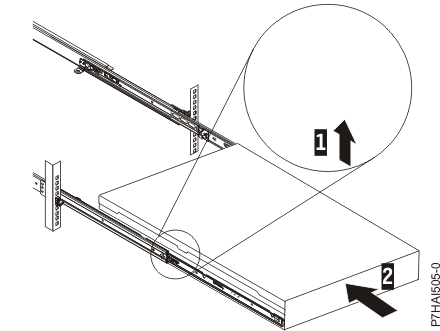
- The cable-management arm can be installed on either side
of the server. The following figure shows it being installed on the
left side. To install the cable-management arm on the right side,
follow the instructions and install the hardware on the opposite side.
Connect one end of the support arm (1) to the
same slide rail to which you plan to attach the cable-management arm
so that you can swing the other end of the support arm (2) toward
the rack.
Figure 7. Support arm connection
- Install the L-shaped cable-management stop bracket (1) on
the unattached end of the support arm. Turn the bracket (2) to
secure it to the support arm.
Figure 8. Cable-management
stop bracket secured to the support arm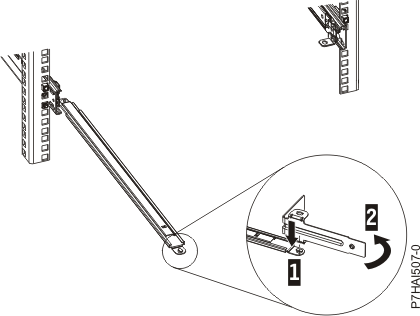
- To attach the other side of the support arm to the backside
of the slide rail, pull the pin out (1), and
then slide the bracket (2) into the slide rail.
Figure 9. Pin extended, bracket installed into slide rail
- Pull out the mounting bracket pin (1) and
slide the mounting bracket (2) into the slide
rail onto which you are installing the cable-management arm. Push
the bracket into the slide rail until the spring-loaded pin snaps
into place.
Figure 10. Mounting bracket pin extended and
mounting bracket installed into slide rail
- Place the cable-management arm on the support arm. Pull
out the cable-management arm pin (1), and then
slide the cable-management arm tab (2) into
the slot on the inside of the slide rail. Push the tab until it snaps
into place. Pull out the other cable-management arm pin (3),
and then slide that cable management arm tab into the slot (4) on
the outside of the slide rail. Push the tab until it snaps into place.
Figure 11. Cable-management arm connection
- Attach the power cords and other cables to the rear of
the server (including keyboard, monitor, and mouse cables, if required).
Route the cables and power cords on the cable-management arm (1) and
secure them with cable ties or hook-and-loop fasteners.
Note: Allow
slack in all cables to avoid tension in the cables as the cable-management
arm moves.
Figure 12. Power cord attachment and routing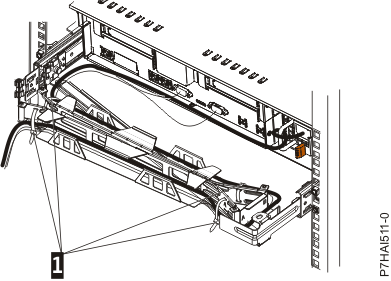
- Slide the server into the rack until it snaps into place.