POWER7 information

Installing a PCI adapter contained in a cassette with the power on in the AIX environment

You can install a PCI adapter with the power on in the AIX® environment.

If you are installing a new feature, ensure that you have the software that is required to support the new feature and that you determine whether there are any prerequisites. To check for the prerequisites, see IBM® Prerequisite website . If the required software is not installed, see the following websites to download it, and then install it before continuing:
Notes:
  • If the system is partitioned, you must determine the partition owning the I/O slot. Once the adapter is installed, the I/O slot must be powered on in the operating system.
  • If an I/O slot on a partitioned system is not owned by a partition, then the I/O slot cannot be powered on.
  • Adding an I/O slot to a partition using Dynamic Logical Partitioning (DLPAR) will power on the I/O slot as part of the DLPAR add. For information about DLPAR, see Dynamic Logical Partitioning.
  • To learn more about working in a partitioned environment, see Logical partitioning.

If you do not have an HMC, complete the following steps to install a PCI adapter with the system power on in the AIX environment:

  1. Complete the prerequisite tasks that are described in Before you begin.
  2. Take appropriate precautions for avoiding electric shock and handling static-sensitive devices. For information, see Avoiding electric shock and Handling static-sensitive devices.
  3. To determine in which slot to place the PCI adapter, refer to the placement information regarding slot restrictions for the adapters that can be used in this system. See the PCI adapter placement.
  4. Refer to PCI hot-plug manager access for AIX, and follow the steps in the access procedure to select PCI Hot Plug Manager. Then, return here to continue.
  5. From the PCI Hot-Plug Manager menu, select Add a PCI Hot-Plug Adapter and press Enter. The Add a Hot-Plug adapter window displays.
  6. Select the appropriate PCI slot from the ones that are listed on the screen, and press Enter.
  7. Locate the PCI adapter slot and cassette you want to use.
  8. If the cassette you want to use does not contain a PCI adapter, continue to the next step. If the cassette you want to use does contain an active PCI adapter, see Removing a PCI adapter contained in a cassette from the system with the power on in the AIX environment.
  9. Attach the wrist strap.
    Attention:
    • Attach a wrist strap to an unpainted metal surface of your hardware to prevent electrostatic discharge (ESD) from damaging your hardware.
    • When using a wrist strap, follow all electrical safety procedures. A wrist strap is for static control. It does not increase or decrease your risk of receiving electric shock when using or working on electrical equipment.
    • If you do not have a wrist strap, just before removing the product from ESD packaging and installing or replacing hardware, touch an unpainted metal surface of the system for a minimum of 5 seconds.
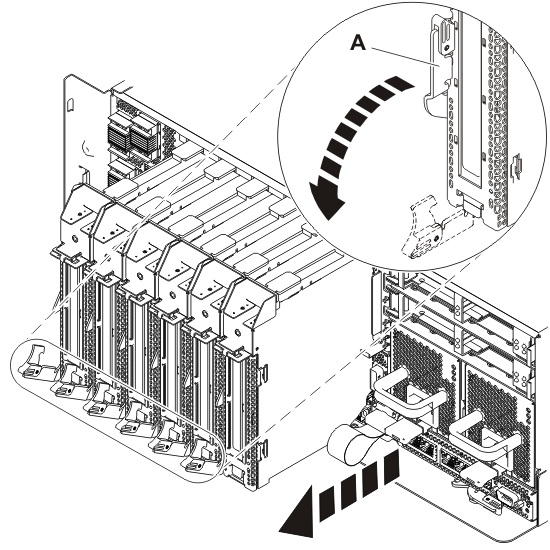
  10. Remove the cassette. Press downward on the lower cassette handle (A) as shown in the following figure. Pull the PCI cassette out of the system.
    Figure 1. Removing the PCI adapter cassette from the system
    Removing the PCI adapter cassette from the system.
  11. Install the adapter into the PCI adapter cassette, see PCI adapter single-width, fourth generation cassette.
  12. Ensure the lower cassette handle is slightly angled up toward the retainer clip, as shown in the following figure. This places the adapter in the correct position to be docked in the system.
  13. Slide the cassette into the cassette slot as shown in the following figure.
    Attention: Ensure proper alignment when you insert a PCI adapter cassette into the system.
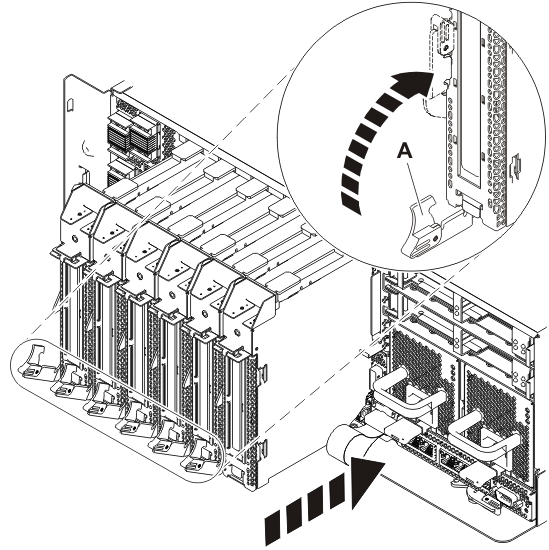
  14. When the cassette is fully inserted into the system, firmly press cassette handle (A) to lock the adapter in its connector.
    Figure 2. Installing the PCI adapter cassette in the system
    Installing the PCI adapter cassette in the system.
  15. Enter cfgmgr to configure the adapter.
  16. Verify the installed part.
    • If you replaced the part because of a service action, verify the installed part. For instructions, see Verifying a repair.
    • If you installed the part for any other reason, verify the installed part. For instructions, see Verifying the installed part.


Send feedback Rate this page

Last updated: Thu, January 10, 2019