Use this procedure to remove the bracket that is used to
brace the 5888 PCIe
storage enclosure, insert the service card, and install the solid-state
drive (SSD) EMC bezels.
When the 5888 PCIe storage
enclosure is shipped in a rack, the enclosure is stabilized using
a bracket that is attached to the rear of the enclosure and the rear
rack flanges.
Prerequisite: A medium
size screwdriver is required to complete this task.
To remove
the bracing bracket, follow these steps:
- At the rear of the rack, find the rear
panel of the 5888 PCIe
storage enclosure. Observe that the enclosure contains a power supply
on each side of the unit behind the shipping bracket. Each power supply
handle (A) is attached to a tab (B) of
the rear shipping bracket (C) using an orange
releasable Panduit tie wrap (D), as shown in
the following figure.
Figure 1. Power supply
attachment to the rear shipping bracket
- To remove a Panduit tie wrap (D),
use one hand to hold the tie wrap head (E) between
two fingers, and use your other hand to hold the loose end (F) of
the tie wrap, as shown in the preceding figure. Then, while using
your thumb nail to catch and pull the release (G) in
the tie wrap head, push the loose end through the head to expand the
tie wrap loop. When the loose end is fed completely through, remove
the tie wrap. Then remove the other Panduit tie wrap.
- Using a screwdriver, remove the two screws (A) that
attach the rear shipping bracket (B) to the
left and right flanges of the rack frame, as shown in the following
figure. Use the screwdriver provided in the installation kit to remove
the six screws (C) that attach the rear shipping
bracket (B) to the rear of the PCIe storage
enclosure. Lift the bracket away from the rack frame.
Tip: Save
all of the brackets and screws that you have removed for any future
reinstallation and for shipping of the 5888 PCIe storage
enclosure that might be required.
Figure 2. Removing the rear shipping bracket
- Dock one of the power supplies by gently
sliding it into the enclosure until the orange release tab latches,
as shown in the following figure. Then dock the other power supply.
Figure 3. Docking the power supply
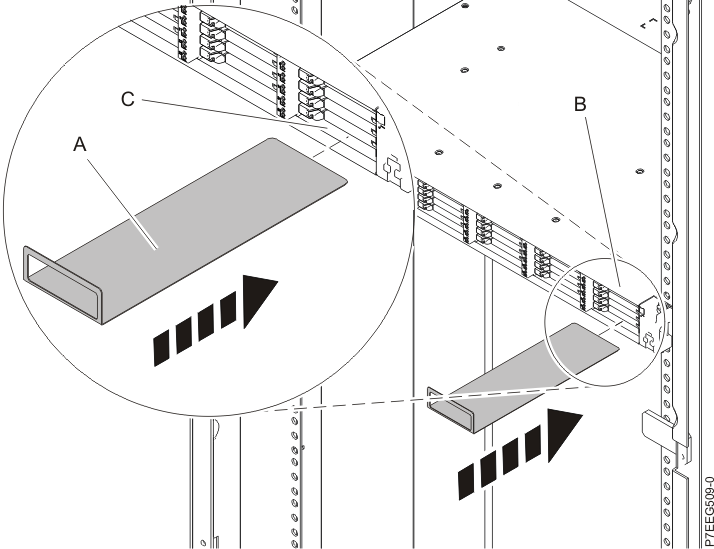
- At the front of the rack, find the front panel
of the 5888 PCIe
storage enclosure. Hold the service card (A) with
its handle away from the enclosure and facing upward, as shown in
the following figure. Align the other end of the service card with
the bottom of the last bank of solid-state drives (SSDs) on the right
of the enclosure (B). Gently slide the service
card into the space between the bottom SSD slot and the sheet metal
of the chassis (C).
Figure 4. Inserting the service card
- Install the six SSD EMC bezels (A) to
cover the slots that contain the SSDs, as shown in the following figure.
Figure 5. Installing the SSD EMC bezels
- At the rear of the rack, install the power
cables (A), as shown in the following figure.
Use Velcro ties to secure the power cords to the cable management
bracket.
Figure 6. Installing the power cords