Technical Blog Post
Abstract
ITNM 4.2 using a csv file to enrich the topology view for ncp_gis geographical display
Body
The IBM Tivoli Network Manager documentation has been updated with great information on the use of ncp_gis and the geographical discovery.
This blog post will focus on a specific example using a csv file with DB2 for the geographical discovery. The documentation is located here.
Knowledge center of csv ncp_gis discovery
Like any ncp_gis discovery enable the roles in DASH as documented
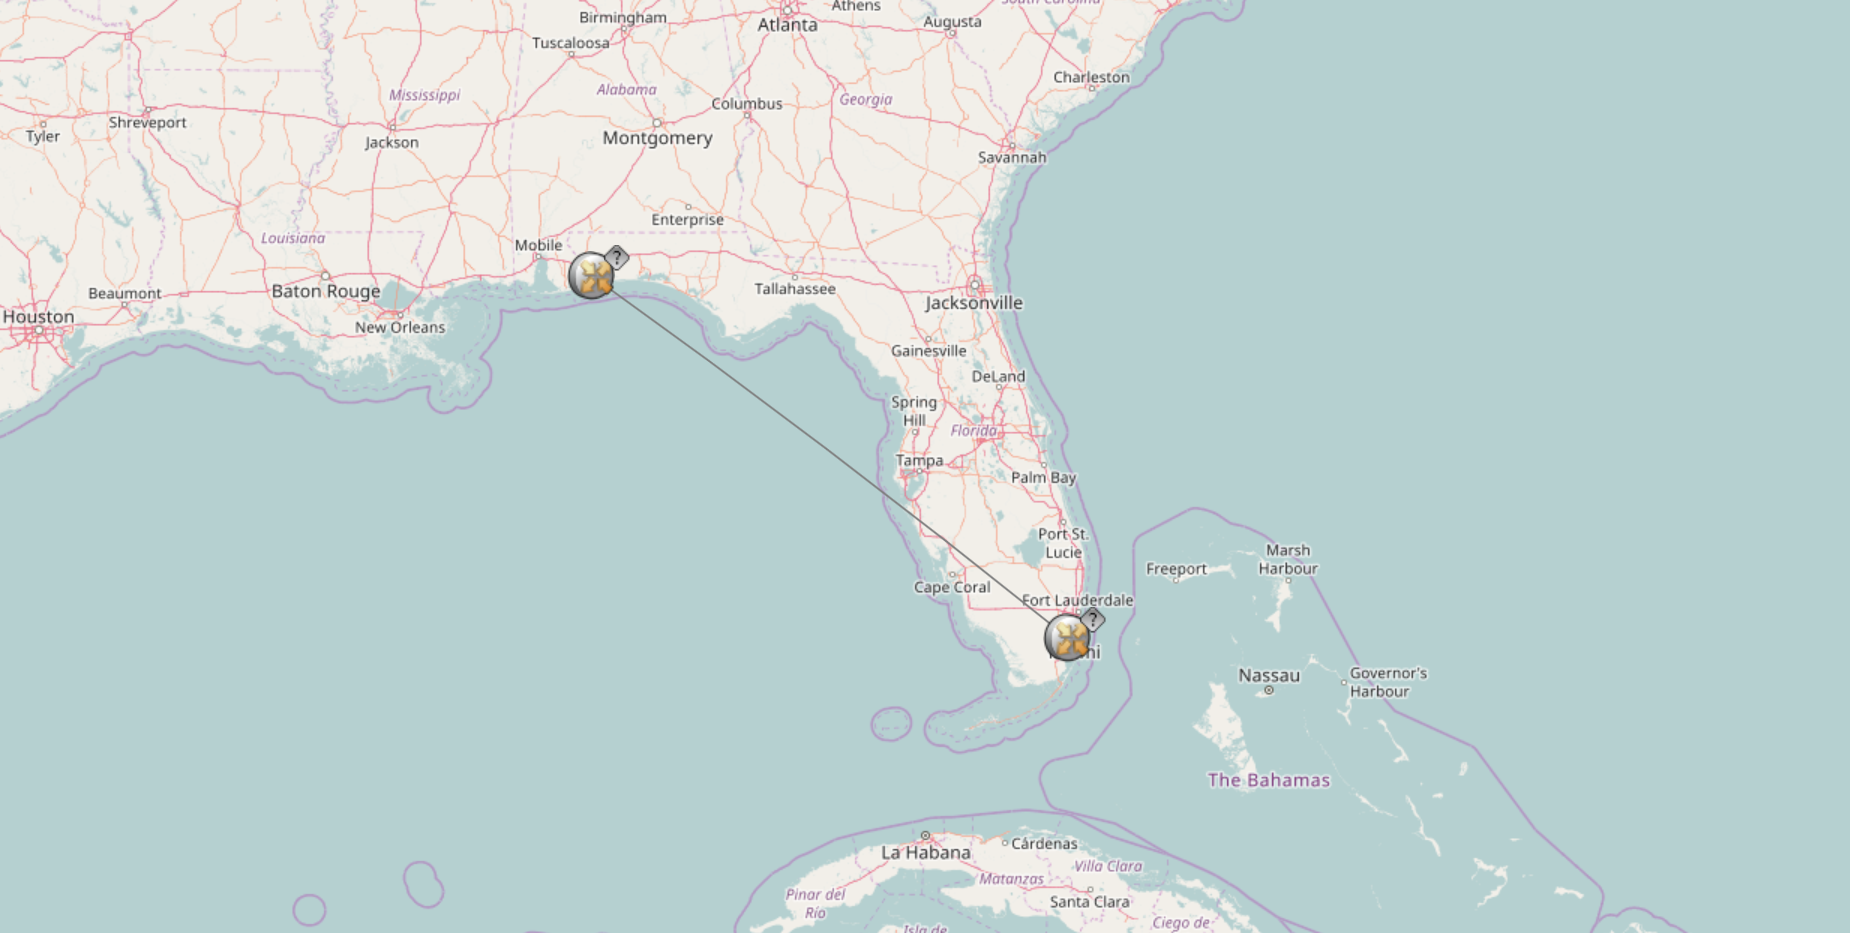
For this blog I'll create a simple lab using two devices already connected. These two devices are in the state of Florida, in the United States, but do not have the geographical information stored in the SysLocation field. I create a csv file with the properly formatted locations, and I am placing it in $NCHOME/etc/precision on the server which has my ncim DB2
[netcool@racquetball precision]$ pwd
/opt/IBM/netcool/core/etc/precision
[netcool@racquetball precision]$ cat usa.csv
172.31.230.172,123 Main,Pensacola,Florida,USA,30.4542052,-87.2738926
172.30.233.4,345 Elm,Miami,Florida,USA,25.7824618,-80.3010445
[netcool@racquetball precision]$
Next I am going to switch to my DB2 user, and create the new table in ncim
[netcool@racquetball:/opt/IBM/netcool/core/precision/disco/stitchers/DNCIM] $ su - itnmdb
Password:
[itnmdb@racquetball bin]$ ./db2
(c) Copyright IBM Corporation 1993,2007
Command Line Processor for DB2 Client 10.5.3
You can issue database manager commands and SQL statements from the command
prompt. For example:
db2 => connect to sample
db2 => bind sample.bnd
For general help, type: ?.
For command help, type: ? command, where command can be
the first few keywords of a database manager command. For example:
? CATALOG DATABASE for help on the CATALOG DATABASE command
? CATALOG for help on all of the CATALOG commands.
To exit db2 interactive mode, type QUIT at the command prompt. Outside
interactive mode, all commands must be prefixed with 'db2'.
To list the current command option settings, type LIST COMMAND OPTIONS.
For more detailed help, refer to the Online Reference Manual.
db2 => connect to ITNM
Database Connection Information
Database server = DB2/LINUXX8664 10.5.3
SQL authorization ID = ITNMDB
Local database alias = ITNM
db2 => CREATE TABLE NCIM.ECOMSGEOLOCATION ( IP VARCHAR(255) NOT NULL, ADDRESS VARCHAR(255), CITY VARCHAR(255), STATE VARCHAR(255), COUNTRY VARCHAR(255), LATITUDE DECIMAL(10 , 8) NOT NULL DEFAULT 0, LONGITUDE DECIMAL(11 , 8) NOT NULL DEFAULT 0 )
DB20000I The SQL command completed successfully.
db2 =>
I chose the name 'ECOMS' because that is the name of my ITNM domain, but any name is valid.
Next I populate the table with my csv data
db2 => import from /opt/IBM/netcool/core/etc/precision/usa.csv of del insert into ncim.ECOMSGEOLOCATION(ip,address,city,state,country,latitude,longitude)
SQL3109N The utility is beginning to load data from file
"/opt/IBM/netcool/core/etc/precision/usa.csv".
SQL3221W ...Begin COMMIT WORK. Input Record Count = "2".
SQL3222W ...COMMIT of any database changes was successful.
"2" rows were
successfully inserted into the table.
Number of rows read = 2
Number of rows skipped = 0
Number of rows inserted = 2
Number of rows updated = 0
Number of rows rejected = 0
Number of rows committed = 2
db2 =>
Next stitchers needs to be set up
This is documented here
Documentation of stitcher changes necessary for ncp_gis discovery
The GeoByLookup stitcher calls a DNCIM InferDNCIMObjects stitcher PopulateDNCIM_CustomGeography. The GeoByLookup stitcher builds a hierarchy of geographic regions-> geographic locations-> devices, by resolving the geographical data from an external database. The GeoByLookup stitcher can be called by a customer stitcher such as the example ACMEDeviceLocationEnrich stitcher. The example ACMEDeviceLocationEnrich stitcher resolves IP addresses to geographical locations to create a hierarchy of Address -> City -> State -> Country.
This section above is from the documentation. Let's break down part of this wording.
There is no 'GeoByLookup' stitcher. There are two stitchers in the DNCIM directory that need to be adjusted.
-bash-4.2$ pwd
/opt/IBM/netcool/core/precision/disco/stitchers/DNCIM
-bash-4.2$
First copy the default 'ACME' stitcher to your new stitcher.
cp ACMEDeviceLocationEnrich.stch ECOMSDeviceLocationEnrich.stch
Next edit the ECOMS stitcher above and change EVERY mention of
ACME to ECOMS. I use a global substitution.
Next
cp InferDNCIMObjects.stch InferDNCIMObjects.ECOMS.stch
And edit your domain custom stitcher to use your new ECOMS stitcher
-bash-4.2$ tail InferDNCIMObjects.ECOMS.stch
ExecuteStitcher('PopulateDNCIM_SLA', domainId, isRediscovery, dynamicDiscoNode);
}
delete( slaEnabled );
// Sample stitcher to create the geographic and regional hierarchies for a GIS mapping solution
ExecuteStitcher('ECOMSDeviceLocationEnrich', domainId, isRediscovery, dynamicDiscoNode );
}
}
}
-bash-4.2$
That's it!
Permissions added, csv file added. DB2 prepared and populated. Next the discovery is run
Using the default config.json file with 'osm' OpenStreetMap here are my two devices
UID
ibm11082451