Technical Blog Post
Abstract
How to Configure Java Batch environment in WebSphere V8.5
Body
Configuring the batch environment:
Configuring the batch environment includes configuring the job scheduler and grid endpoints. The job scheduler accepts job submissions and determines where to run them. Configurations for the job scheduler includes the selection of the deployment target, datasource JNDI name, database schema name, and endpoint job log location to be configured for the schedule. Batch applications are hosted in grid endpoints.
1. Configuring the job scheduler:
The first time a server or cluster is selected to host the grid scheduler, an embedded Apache Derby database is automatically created and configured to serve as the scheduler database if the default data source JNDI name jdbc/lrsched is selected. Although Derby is used as the default job scheduler database, you might want to use your own database.
1.1 Procedure
a. Choose the environment to host the job scheduler.
b. Log on to the administrative console.
c. Click System administration -> Job scheduler to view the Job scheduler page.
d. In the Scheduler hosted by list, select the deployment target.
e. Type the database schema name. The default is LRSSCHEMA.
f. Select the data source JNDI name from the list. If the default of (none) is selected, a default embedded Derby job scheduler database is created with a value of jdbc/lrsched.
g. Type the directory where the job scheduler and the batch execution environment write the job logs. The default is ${GRID_JOBLOG_ROOT}/joblogs.
h. Optional: Check a usage data check box.
(Specifies if the scheduler records job usage data for charge-back purposes in the scheduler database).
i. Click OK and save the configuration.
j. If administrative security is enabled, enable application security and secure the job scheduler.

1.2 Creating a job scheduler and grid endpoint database
See the product documentation topic Creating the job scheduler and grid endpoint database for details.
2. Configuring grid endpoints:
The WebSphere grid endpoints are automatically set up. By installing the application on the deployment target, the common batch container is automatically deployed on the server or cluster selected using the default Apache Derby data source.
a. Install a batch application on a server or cluster using the administrative console, wsadmin commands, or another supported method for deploying applications.
b. If the application is the first batch application installed on the server or cluster, restart the server or cluster.
3. Configuring the job management console:
When role-based security is enabled, you must be granted lrsubmitter role, lradmin role, or lrmonitor role through the administrative console to access the job management console.
When the security enabled is based on the group and the role, you must be in the appropriate group and the appropriate role to access the job management console. You must be in the user group of the job or the administrative group. You must also be in the lrsubmitter role, lradmin role, or lrmonitor role.

3.1. How to access the Job management console:
The job management console is a stand-alone web interface for users to perform job operations. You must be granted the lrsubmitter, lradmin, or both roles through the administrative console to access the job management console. Depending on role privileges, users can perform various job operations. The job management console provides controlled access when security is enabled.
a. Configure the job scheduler.
b. Ensure that the job scheduler is running.
- If the application server or cluster members on which the job scheduler is installed have the started icon in the status field, the job scheduler is usually running. You can verify whether the job scheduler started by checking the log files.
c. In a browser, type the web address: http://<job scheduler server host>:<port>/jmc.
d. If you cannot access the job management console, check the appropriate log. If you specified a server in the web address, check the server log. If you specified a cluster member in the web address, check the cluster member log.
4. Verifying the job scheduler installation:
To verify that the job scheduler is installed correctly:
a. Restart the application server (or cluster members) where the job scheduler is configured.
- If the application server (or cluster members) on which the job scheduler is installed has the started icon in the status field, the job scheduler is active. You can verify whether the job scheduler started by checking the log files.
b. Access the job management console through a web browser by typing: http://job_scheduler_server_host:grid_host/jmc
The grid_host port is the WC_defaulthost port for the server running the job scheduler. To find this port, go to your server in the administrative console, expand ports, and look for WC_defaulthost.
To ensure that the job management console is working correctly, check the SystemOut.log file on the target application server configured to host job scheduler.
SystemOut.log message
[09/09/15 12:15:48:739 EDT] 0000006c JobSchedulerS I CWLRB3220I: Long Running Job Scheduler is initialized
5. Installing the sample batch application:
Use the following steps to install the Java Batch IVT sample into WebSphere Application Server.
You can install, run, and monitor a batch application that reads and writes files using the Java Batch Installation Verification Test (IVT) sample. This sample provides an example of an application implementing the Batch programming model using the batch data stream framework. The sample creates a file at a specified path and populates it with data, and uses that for its operations.
5.1 Download the sample application:
a. Download the sample IVT application compressed file from the WebSphere Server V8.5 documentation here: Java Batch IVT sample
This sample includes five xJCLs (XML Job Control Language) that do the following:
- Copies one text file to another and compares the two (XDCGIVTtxt2txtxJCL.xml)
- Copies one byte file to another and then compares the two (XDCGIVTbyte2bytexJCL.xml)
- Copies a text file to a database and then copies the entries in the database to another file and then compares the two (XDCGIVTtxt2db2txtxJCL.xml)
- An example of the IVT application using a parallel step (ParallelStepXDCGIVTtxt2txtxJCL.xml). This example uses the default parameterizer (BuiltInParameterizer)
Restriction: This example is valid for WebSphere Application Server Version 8.5 only.
- An example demonstrating how to use OSGi bundles to run batch applications (XDCGIVTOSGi.xml)
Restriction: This example is valid for WebSphere Application Server Version 8.5 only.
b. Unzip the file on your target server.
c. In the administrative console, click Applications -> New application -> New Enterprise Application.
d. Specify the full path to the sample XDCGIVT.ear file(<unzipped_sample_dir>/installableApps/XDCGIVT.ear).
e. In the wizard, select Fast Path - Prompt only when additional information is required, accept default settings, apply the proper modules mapping, and continue through the steps.
When mapping modules of the batch application to servers, select the server (or cluster) to run the batch job (itsoBatch). Click Finish when you are done.
f. Restart the application server.
5.2 After the application server is restarted, verify that the application installed successfully:
a. Go to the Enterprise applications administrative console page by clicking Applications -> Application Types -> WebSphere enterprise applications.
b. If the application is not running, select the application, and click Start.
6. Submitting a sample batch job:
- The sample IVT application contains a few batch jog xJCL files:
- XDCGIVTtxt2txtxJCL.xml : Copies one text file to another text file and compares the two files.
- XDCGIVTbyte2bytexJCL.xml : Copies a byte file to another byte file and compares the two files.
- XDCGIVTtxt2db2txtxJCL.xml : Copies a text file to a database, copies the entries in the database to another text file, and compares the two files.
- To test these batch jobs, you must first edit these files and set the following parameters to a valid location on your test server:
- “inputDataStream” with a valid input file path, as shown in the following example: <prop name="inputDataStream" value="/tmp/ivtJobs/input-text.txt" />
- “outputDataStream” with a valid output file path, as shown in the following example: <prop name="outputDataStream" value="/tmp/ivtJobs/output-text.txt" />
- After you modify the files, follow this procedure to submit the XDCGIVTtxt2txtxJCL.xml job:
1. Connect to the Job management console as user1 (lrsubmitter role).
2. Navigate to Job Management -> Submit a job.
3. Under the Job Definition section, apply the following options:
a. Select Local file system.
b. Click Browse next to Specify path to xJCL to specify the file containing the job definition to submit as a new job: <unzipped_sample_dir>/IVT/scripts/XDCGIVTtxt2txtxJCL.xml
c. Select Update substitution properties to update the values of the substitution properties for the job. If a job has substitution properties without values, you must specify them. For the testing of this scenario, this option is disabled.
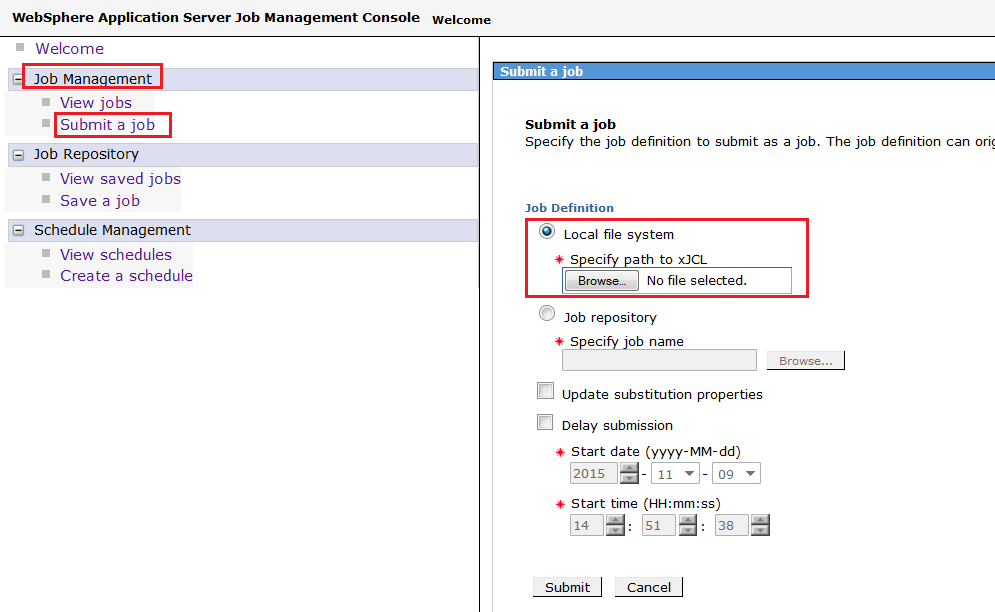
Figure 6.1 - Submit a job via JMC

Figure 6.2 - View jobs on the JMC
UID
ibm11080471