Technical Blog Post
Abstract
How To Create Multiple Deployment Environments Within One Cell
Body
In order to cater to various needs to extend a client's BPM topology, we offer multiple options to add cluster members, add deployment environments (DE), and add cells based on different business requirements from clients. This article is mainly focused on adding deployment environments in one cell and will cover the considerations and steps of creating multiple DEs within single cell.
Here are two typical topologies our clients most likely choose to use:
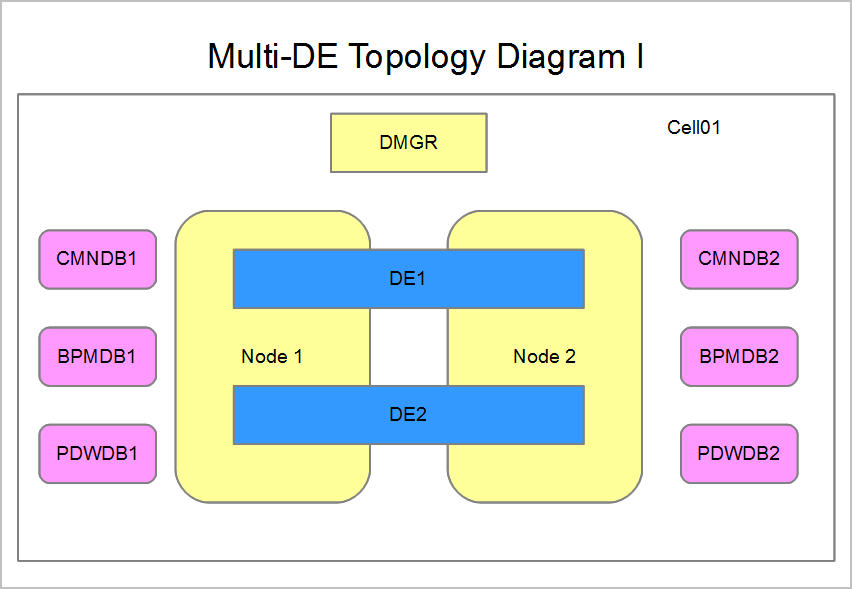
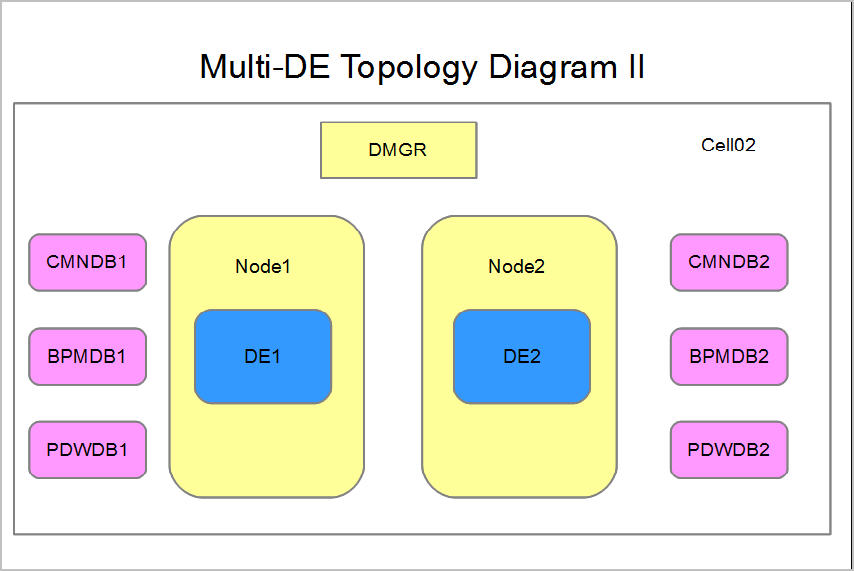
I. Considerations for Multiple Deployment Environments in the Same Cell
- The deployment manager and config is a single point of failure.
- Each DE must have their own application cluster, and if you select to use a three cluster topology, each DE must have their corresponding messaging and support clusters.
- In a multibus environment, such as a deployment environment that was migrated from WebSphere Process Server 7.0 or IBM BPM 7.5 or 8.0, the names of component-specific buses need to be changed.
- You cannot install two instances of the same Service Component Architecture (SCA) application in the cell with the same name. You can install many SCA applications, but they must have different module names.
- You must add databases and schemas for each set of clusters, which increases administration responsibilities.
- Only Process Server supports multiple DEs. Process Center does not support multiple DEs.
- If there is an issue with one application in the cell, it is not possible to apply an interim fix only to the affected application. Interim fixes affect all servers and clusters in the cell.
- Each Process Portal has one view to each deployment environment and requires unique context roots. Consider whether to use a different web server for each deployment environment. If not, you must provide different virtual hosts to ensure unique context roots for applications.
Therefore, technically creating multiple DEs can be implemented and supported by BPM. However, due to the considerations listed above, we don't practically recommend clients to use such topology in production.
II. Approaches to Create Multiple Deployment Environments
Option 1:
You could always create multiple DEs using the DE wizard at WebSphere Administrative Console to create second/third DE if you already have profiles created.
Detailed Steps to Create the DE Using DE Wizard can be found in the product documentation in section: Using the Deployment Environment wizard
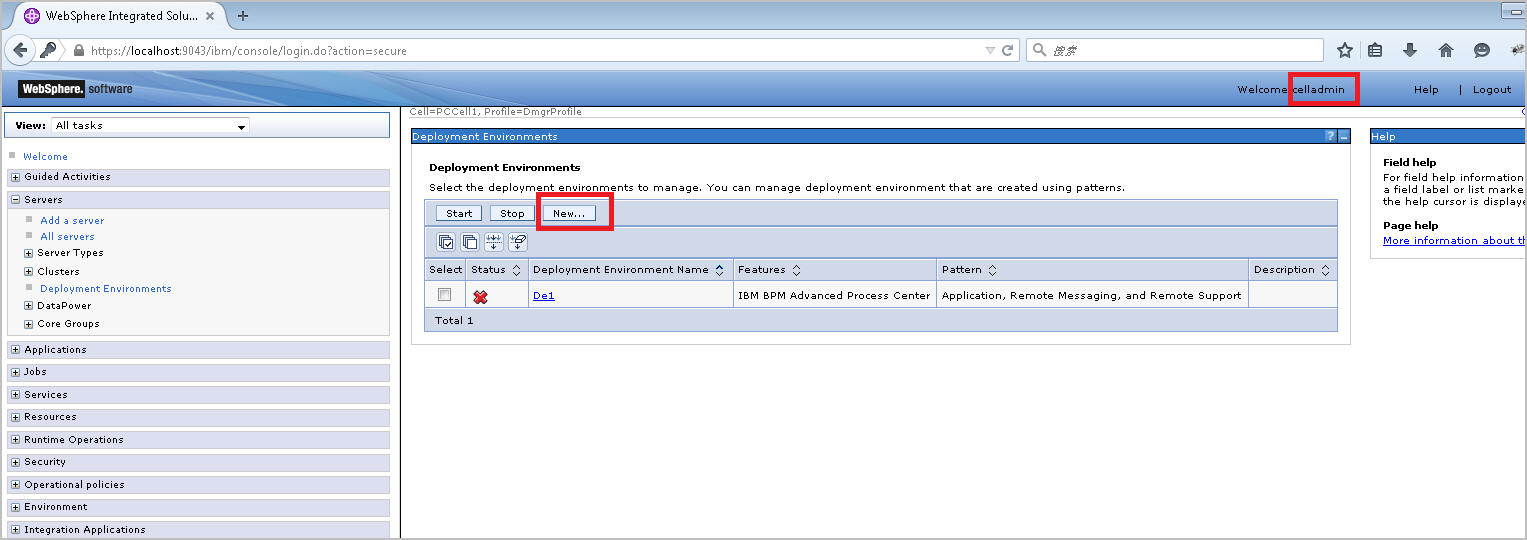
Please pay attention that you should use the cellAdmin user to create new DE rather than DeAmin user.
Please remember to have the databases (users) and custom profiles created before you start to use DE Wizard to create second/third DEs.
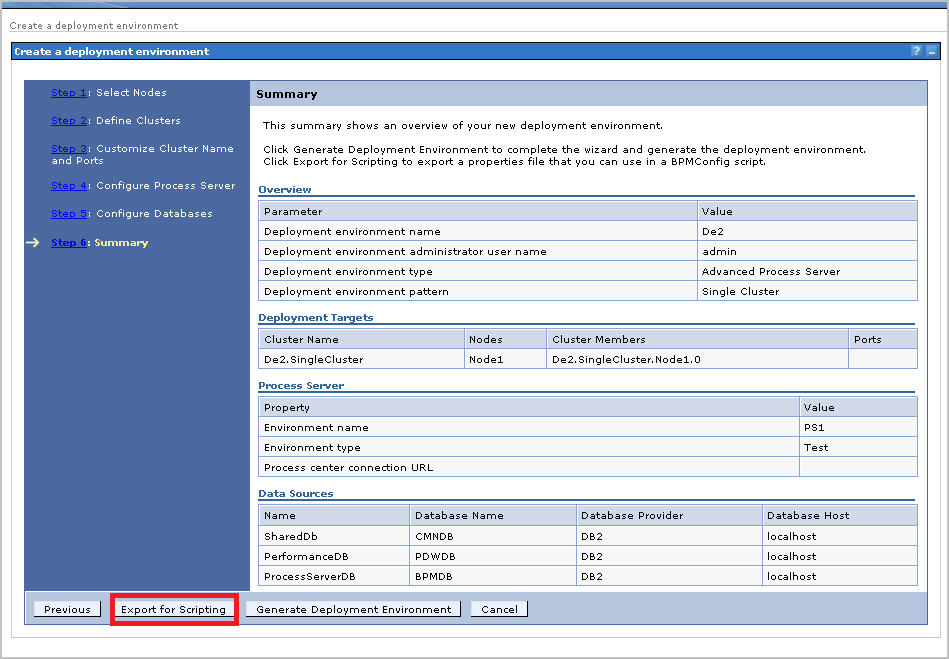
Before you create the environment, you could export a properties file based on the values you filled in DE Wizard using button 'Export for Scripting'. It's better to confirm and verify all of the values before submitting the changes.
Option 2:
Like we establish a freshly new environment, BPMConfig can be also used here to generate multiple BPM environments within a single cell.
Most of the steps, including database creation, are the same as configuring the first deployment environment using BPMConfig -create. What we want to highlight here is some properties you need to pay close attention to when editing the properties files:
- You are supposed to have separate properties files for each deployment environment.
- For the values & configuration related to particular deployment environment, please make sure that you have unique names or alias names defined between several DEs. Please refer to the following properties:
################################################################
# Deployment environment administrator authentication alias, it cannot have the same user name as the authentication alias of the cell administrator #
################################################################
bpm.de.authenticationAlias.1.name=DeAdminAlias_De2
bpm.de.authenticationAlias.1.user=admin
bpm.de.authenticationAlias.1.password=******
######################################
# Database user authentication alias #
######################################
bpm.de.authenticationAlias.3.name=BPM_DB_ALIAS_De2
bpm.de.authenticationAlias.3.user=db2admin
bpm.de.authenticationAlias.3.password=db2admin
################################################################
# Do not modify the name of the role mapping. Role mapping names are predefined. Specify the user name in the authentication alias that corresponds to this role.
bpm.de.roleMapping.1.name=DeAdmin
bpm.de.roleMapping.1.alias=DeAdminAlias_De2
* bpm.de.authenticationAlias.#.name is supposed to be same as bpm.de.roleMapping.#.alias for each DE.
#######################################################
# Database role and authentication alias associations #
#######################################################
bpm.de.db.#.roleMapping.1.name=DbUser
bpm.de.db.#.roleMapping.2.alias=BPM_DB_ALIAS_De2
#######################################################
# Database role and authentication alias associations #
#######################################################
bpm.de.db.#.roleMapping.2.name=DbUserXAR
bpm.de.db.#.roleMapping.2.alias=BPM_DB_ALIAS_De2
- For the configuration & database setting at cell level (we have cellOnlyDb since BPM 8.5.0), you are supposed to keep the value the same and consistent for all of the DEs exiting in one cell. Please refer to the properties as below:
############################
# Cell properties: PSCell1 #
############################
bpm.cell.name=PCCell1
bpm.cell.db=CellOnlyDb
##################################################
# Cell (WAS) administration authentication alias #
##################################################
bpm.cell.authenticationAlias.1.name=CellAdminAlias
bpm.cell.authenticationAlias.1.user=celladmin
bpm.cell.authenticationAlias.1.password=celladmin
##################################################
# Cell role and authentication alias association #
##################################################
bpm.cell.roleMapping.1.name=CellAdmin
bpm.cell.roleMapping.1.alias=CellAdminAlias
###################################
# Database properties: CellOnlyDb #
###################################
bpm.de.db.4.name=CellOnlyDb
bpm.de.db.4.dbCapabilities=CellScopedDB
bpm.de.db.4.type=DB2
bpm.de.db.4.hostname=localhost
bpm.de.db.4.portNumber=50000
# The name of the database.
bpm.de.db.4.databaseName=CMN856DB
bpm.de.db.4.schema=db2admin
- Once you have the properties file filled out, you could use in along with BPMConfig -create -de and have your second/third DE created successfully. And if anything is unclear regarding any of the specific properties, please refer to the product documentation section: Configuration properties for the BPMConfig command
III. Useful Links You May Want to Check:
- Expanding the IBM Business Process Manager V8.5 topology by using multiple deployment environments
- Considerations for multiple deployment environments in the same cell
UID
ibm11080693