Technical Blog Post
Abstract
Adding Approval Process to Deploy Single Virtual Server - IBM Cloud Orchestrator 2.5.0.x
Body
Overview
The following document was created to showcase the steps that are relevant in Adding Approval to your OOTB Deploy Single Virtual Server offering.
Introduction
When IBM Cloud Orchestrator (ICO) 2.5.0.x is installed, there are a set of out-of-the-box toolkits developed by the Product Team to help you when using ICO to ensure that you can extend the offerings. Currently when you have an ICO 2.5.0.x, the major thing that will work out of the box is the “Deploy Single Virtual Server” under the “Deploy Cloud Services” category.
Pre-requisites
You need to first ensure that the out-of-the-box “Deploy Single Virtual Server” works and executes successfully. Please run the following steps:
- Login to the ICO Dashboard as any user
https://<ico-server-fqdb>:443 - Go to Self-Service Catalog and Select “Deploy Cloud Services”
- Then choose the offering, “Deploy Single Virtual Server”
- Fill in the appropriate details and click Deploy
- You can see the status of your Virtual Machine being deployed on the “Requests” tab
- When the execution of the Virtual Machine deployment is successful you will notice a green tick sign next to your request
- You can validate the Virtual Machine was deployed successfully by clicking on the “Resources” tab and verify if your VM is active with an IP Address assigned
Note: If any of the above steps do not complete successfully, then your out-of-the-box IBM Cloud Orchestrator 2.5.0.x solution has some issues that need to be fixed.
Once you have completed the above steps, you can proceed in trying to create new and exciting offerings by using the IBM Process Designer. The instructions on how to install and configure your local IBM Process Designer is mentioned in the product documentation section Setting up the IBM Process Designer.
Create a Custom Toolkit
You will need to create a custom toolkit, as this will help you from not modifying any OOTB toolkits, implementation services, or processes & human services created by the Development Team. The idea of creating this custom toolkit is so you can have a workspace to create and modify exciting new offerings.
- Login in to your local IBM Process Designer with bpm_admin
- Select Toolkits and on the right-hand side select “Create New Toolkit”
- Fill in the appropriate details:
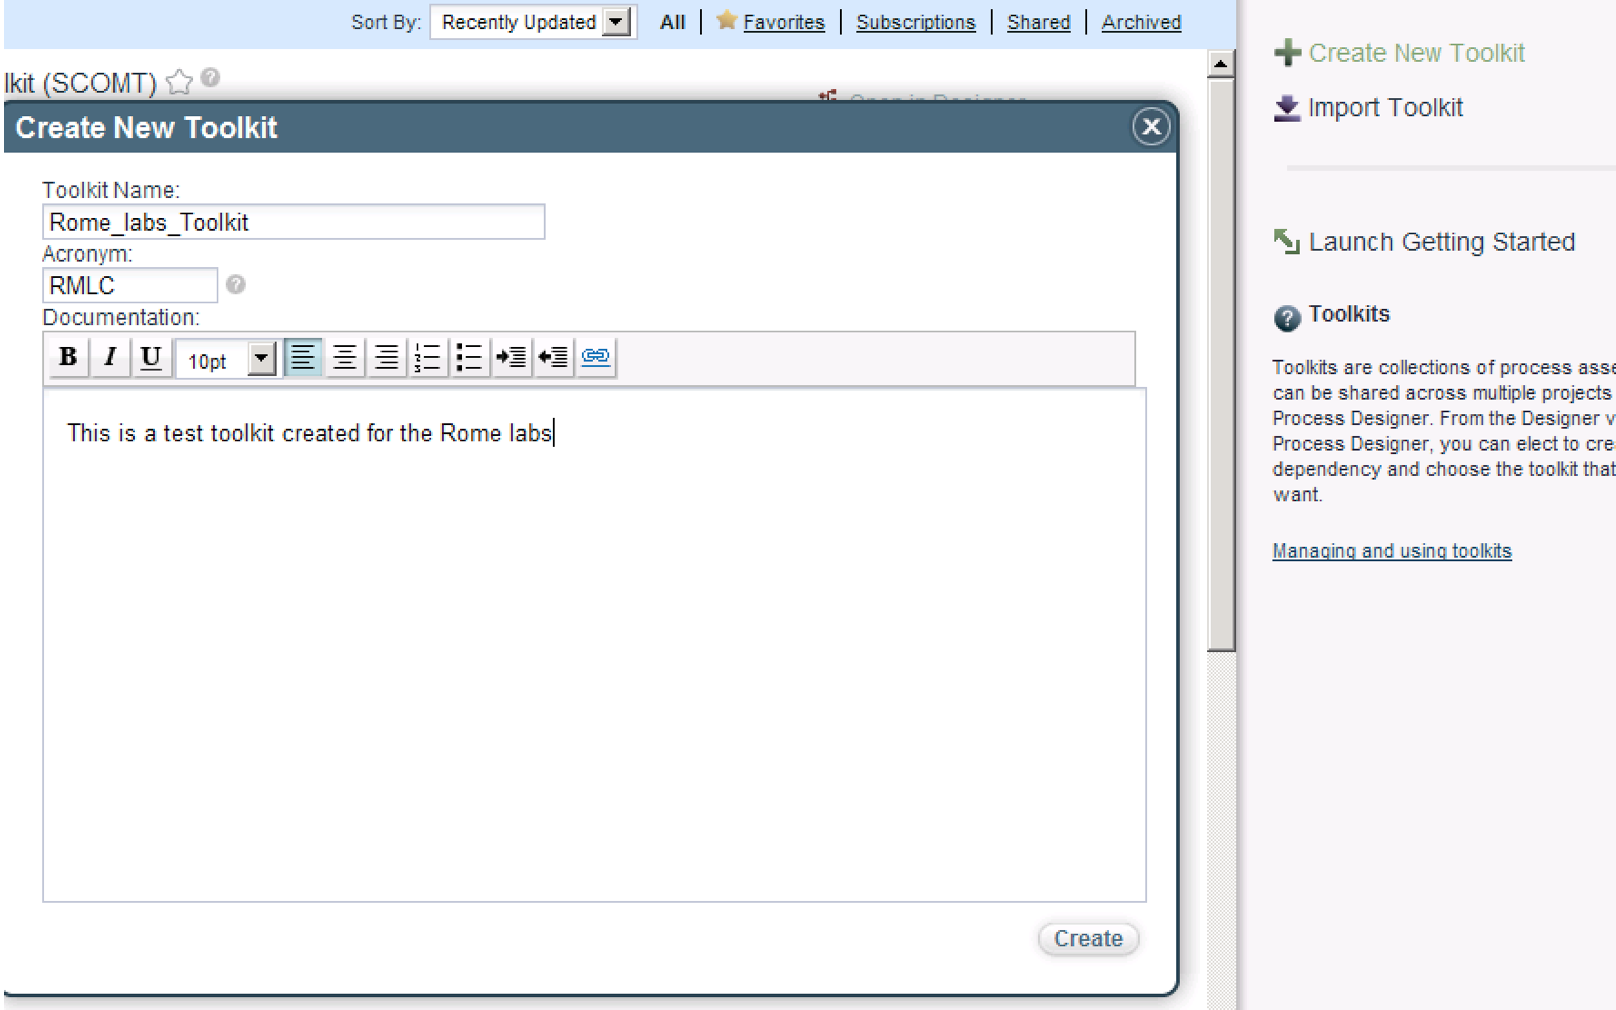
Toolkit Name [Required]
Acronym [Required]
Description [Optional] - Select Create
Re-using existing toolkits
As part of the IBM Cloud Orchestrator solution, you will receive several toolkits developed by the Development Team. If we want to re-use a specific toolkit we need to first validate which Toolkit to reuse. The following are the steps to validate the “Deploy Single Virtual Server” offering that we plan on modifying:
- Login to the ICO Dashboard as admin
https://<ico-server-fqdn> - Go to the “Configuration” Tab and select “Self-Service Catalog”
- Select “Offerings”
- Search for “Deploy Single Virtual Server” and select it
- You can should be directed to the following screen:

- Please note the following:
Application: SCOrchestrator Nova Support Toolkit
Process: Deploy Single Virtual Machine
Human Service: Deploy Single Virtual Machine - Given the above information collected, now login to your local IBM Process Designer with user “bpm_admin”
- Assuming that you have already created your custom toolkit, click on “Open in Designer”
- Now in order to re-use the OOTB toolkit you need to first make it a dependency of your toolkit. Start clicking on the + icon for adding dependency toolkits
- You will see a list of toolkits starting with “SCOrchestrator …”, You will need to add the following toolkits
SCOrchestrator Nova Support Toolkit
SCOrchestrator_Toolkit
SCOrchestrator Multi-tenancy Toolkit
SCOrchestrator_Support_IaaS_Toolkit
SCOrchestrator Email Notification Toolkit
SCOrchestrator_Scripting_Utilities_Toolkit
SCOrchestrator Openstack Services
Note: Explaining the contents of each of these toolkits is out of scope of this document. However, what is important to understand, in order to create customized offerings you need to re-use processes, services etc from the above toolkits for your offering to function appropriately.
- Now expand SCOrchestrator Nova Support Toolkit (Since that is the one we really want to modify) -> Select Processes -> Right Click Deploy Single Virtual Machine and “Copy Item to” -> Other toolkit. Select your custom toolkit name

- You need to repeat Step 11 for the User Interface “Deploy Single Virtual Machine”

- What you have essentially done now is copied the process and human service that invokes Deployment of a Single Virtual Machine from an ICO Dashboard
- You can validate that the processes and human service has been copied by Selecting processes and Human services under your custom toolkit
- It is highly recommended that you rename these processes and human services like below to avoid confusion with the already existing toolkit. Remember we are re-using the OOTB toolkit NOT modifying the original OOTB Toolkit.

- By the end of this step you have completed the step “Re-using the existing toolkits”. You can replicate the same for any other services or processes in the future for yourself to modify.
Validating your Process
If you open your “Deploy Single Virtual Machine <RK_Test>” you will notice the complete system process that takes place in deploying a Virtual Machine. What you need to understand is ICO uses Business Process Manager (BPM) engine to automate the system tasks of the Openstack services via a user interface.

Note: From here on, you will notice differences in content from my screenshots and what you are seeing; that could essentially mean two things:
i. You are probably using a different version of the IBM Process Designer (which is okay if you are on IBM Cloud Orchestrator 2.5.0.x).
ii. I’m using different namespaces for variables and content. I will try my best to mention wherever it is a required component to copy the same content or if it can be replaced with your choice.
Optional: At the same time, you can also validate the Human Service that you copied from the existing toolkit. We will not be making any changes to the human service, since for this document we have no intention of modifying the User Interface. We only want to add an approval component to our “Deploy Single Virtual Machine <RK_Test>” process.
Important Note: Typically, the way IBM Cloud Orchestrator works, if you want your Process to talk to your Human Service, you need to ensure that the variables (input and output) are the same. The focus here is on the Business Object, ServerDeployment. When you will add your process during the creation of an offering, ICO will search for all human services and filter out the corresponding business object related human services.
The below is an example of the variables section of the human service “Deploy Single Virtual Machine <RK_Test>.”

Adding Approval to your Process
In this section, you will need to follow the appropriate steps to add the Approvals to your existing process, “Deploy Single Virtual Machine <RK_Test>.”
- Ensure that you are under the “Diagram” section
- Drag an Activity from the right-hand side of the canvas and copy it above on the Participant Lane and name it “Approval”
- Drag a Gateway from the right-hand side of the canvas and copy it above on the Participant Lane and name it “isApproved?”
- Drag an Activity from the right-hand side of the canvas and copy it above on the Participant Lane and name it “MapToApprovalInputl”
- Click on the sequence flow and map the process as shown below

- It is important that you connect the processes as shown above. The Flow is as follows:
Start –> GetInputParameter –> MapToApprovalInput –> Approval –> isApproved? –> Initialization - Now drag an End Event from the right-hand side of the canvas and copy it above on the Participant Lane and name it “End”. Add another sequence flow from the isApproved Gateway to the End Event
Note: Screenshot might be different from your screen.

- By the end of this section you have completed adding an Approval Process in your existing process.
Configuring the Approval Process
By the end of the last section you would have completed adding the components needed for the Approval Process. This following section will outline the steps required to modify/update the components for your environment and the approvals to execute successfully.
Create Private Variables
- Select the “variables” tab
- Click on “Add Private” and create tw.local.reason variable with the following:
Name: reason
Variable Type: String

- Click on “Add Private” and create tw.local.isApproved variable with the following:
Name: isApproved
Variable Type: Boolean

- By the end of this you should have created two private variables which we will use in the next section.
MapToApprovalInput
- Select the activity “MapToApprovaInput” and look below for the “Properties” Tab
- Under the “Implementation” section you will need to make the following updates:

- Make sure Script is selected and copy the following code under the script object:
tw.local.description = "Approve the deployment of virtual system " + tw.local.inputParameterObject.server.name + " requested by " + tw.local.operationContext.user;
if (tw.local.inputParameterObject.businessJustification==null) {
tw.local.inputParameterObject.businessJustification = "";
}
var networkLabel = tw.local.inputParameterObject.networks[0].label;
var networkCidr = tw.local.inputParameterObject.networks[0].cidr;
var numberOfVolumes = tw.local.inputParameterObject.volumes.listLength;
var sizeOfVolumes = 0;
for (var i=0; i<numberOfVolumes; i++) {
var size = tw.local.inputParameterObject.volumes[i].size;
sizeOfVolumes = sizeOfVolumes + parseInt(size);
}
tw.local.parameters = [
{
name: "User (Domain, Project)",
value: tw.local.operationContext.user + " (" + tw.local.operationContext.domain + ", " + tw.local.operationContext.project + ")"
},
{
name: "Region",
value: tw.local.inputParameterObject.region
},
{
name: "Image",
value: tw.local.inputParameterObject.image.name
},
{
name: "Flavor",
value: tw.local.inputParameterObject.flavor.name
},
{
name: "Network Label (Subnet)",
value: networkLabel + " (" + networkCidr + ")"
},
{
name: "Number of Attached Volumes",
value: numberOfVolumes.toString()
},
{
name: "Sum of Attached Volumes",
value: sizeOfVolumes.toString() + " GB"
}
];
Approval
- Select the activity “Approval” and look below for the “Properties” Tab
- Under the “Implementation” Section make the following updates:

- Make sure you you select “Approval” for SCOrchestrator Toolkit (Not shown on screenshot)
- Under the “Data Mapping” section make the following updates:

- Under Input Mapping update with:
tw.local.operationContext.user
tw.local.parameters - Under the Output Mapping (Created earlier):
tw.local.reason
tw.local.isApproved
isApproved?
- Select the gateway “isApproved?” and look below for the “Properties” Tab
- Under the “Implementation” Section make the following updates:

- Under Decisions section update with:
tw.local.isApproved == true
Note: Make sure the next flow after tw.local.isApproved == true goes to Initialization step.
Approvers
For this step, you will need to change the OOTB configuration of the Participant Lane from All Users to only Approvers. This means that only the Approvers can approve/reject the Virtual Machine deployment process.
- Select the Participant Lane – you can click on the white space next Participant Lane to select the entire region
- Under Properties à Behavior you will need to update from “All Users” to “Approvers”. Make sure you select the Approvers from the SCOrchestrator_Toolkit
After this you have successfully configured an Approval process for your existing “Deploy Single Virtual Machine <RK_Test>” process.
Creating a New Offering
Now you will need to test your modified process via an offering process using the IBM Cloud Orchestrator dashboard.
- Login to the ICO Dashboard as admin
https://<ico-server-fqdn> - Go to the “Configuration” Tab and select “Self-Service Catalog”
- Optional: Select “Category” and create a new Category
If you want to separate your offerings from other ICO OOTB offerings, you should perform this step - Go to the “Configuration” Tab and select “Self-Service Catalog”
- Select “Offering” and create a new Offering

- You can edit the above based on your environment, but what you should focus on is the following parameters:
Application: <Your_Custom_Toolkit_Name>
Process: Deploy Single Virtual Machine <RK_Test>
Human Service: Deploy Single Virtual Machine <RK_Test> - Click on Create
Test the new Offering
- Login to the ICO Dashboard as any user
https://<ico-server-fqdn>:443 - Go to the Self-Service Catalog and Select your new category (if created)
- Select the new Offering “Your_Custom_Offering_Name”

- Fill in the appropriate details and click Deploy
- On the requests tab, you will notice that your process is now stuck at “Manual Intervention Required”
- Login to the ICO Dashboard as admin
https:<ico-server-fqdn> - Go to the Inbox Section, you will notice that there is a new message now
- Claim the Task, and approve the request. You will notice now that your Virtual Machine is being Deployed.
By the end of this section you would have successfully tested the deployment of a Virtual Machine with an Approval Process.
UID
ibm11080555