Technical Blog Post
Abstract
Using VMMSYNC to bring in custom attributes from Active Directory.
Body
When using VMMSYNC to synchronize user and person records, out of the box you are limited to the attributes that exist as part of the PersonAccount Entity in WebSphere and what exists in the User and Group mappings on the Crontask. This doesn't always fulfill the requirements of the end user who needs to bring more information in from other attributes that exist on a user record in the Active Directory domain. In this post I will outline the process of adding a field to Maximo and then synchronizing data from the directory server into that field.
To start we need to determine which attribute you need to synchronize from the directory. For the purpose of this example, we are going to synchronize the Home Page attribute to the person table. The property for Home Page on Active Directory is wWWHomePage, you can determine this by using an ldap browser to pull up user information.
1) Our first step is to create the field in Maximo we want to Map to the wWWHomePage attribute on the directory. We do this by going to the Database Configuration Application and Opening the Person Object. Click on the Attribute Tab, then choose new row.
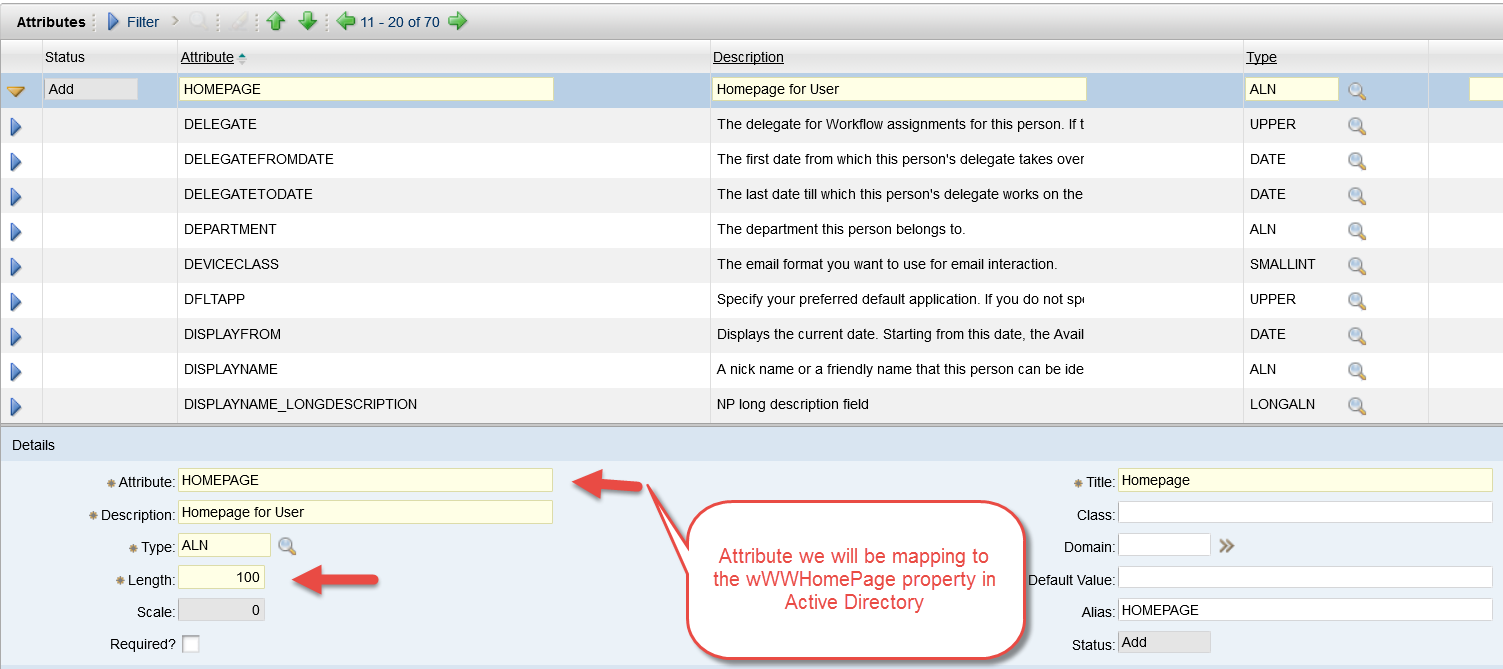
The attribute will be the name of the column that is mapped to wWWHomePage in the VMMSYNC user mapping XML. Ensure the length meets the criteria of the attribute you will be synchronizing from.
2) Once you column is configured, save the record and click back to the list tab. From the Select Actions menu turn on Admin Mode.

Once the Users are logged out go back to the Select Actions menu and choose Apply Configuration Changes to add the column to your Maximo database.
*Note* Remember to turn Admin Mode off after your database is configured.
3) Once the column is added we can now update the user mapping, this is done from the Cron Task Setup application. From it's list tab search for and choose VMMSYNC. Then under Cron task Parameters click to the second page and expand the user mapping section.

4) In the user mapping XML two changes need to be made to add a custom column to map to your attribute. The first change is to add your Active Directory attribute between the <attributes> </attributes> tag at the top of the file. The attribute is added using <attribute>wWWHomePage</attribute> syntax. This attribute is case sensitive.

5) The column we are mapping to this attribute belongs to the Person Object, so we need to map our HOMEPAGE database column to our wWWHomePage attribute under the person table section as seen below. The Column name is the database column and it's value is the Active Directory attribute.

6) This is all we need to do from the Cron Task Setup, once this is done, save your changes and reload the VMMSYNC cron task to pick up the new changes and that's it, the VMMSYNC will now bring your changes in to the database.
Adding attributes to the PersonAccount entity in the Virtual Member Manager
You may run into issues where the attribute in Active Directory does not exist in the Virtual Member Manager which will result in an error similar to the following.
[ERROR] The Virtual Machine Manager (VMM) user synchronization failed. Class 'PersonAccount' does not have a feature named 'wWWHomePage' Error count = 1
[INFO] BMXAA6794I - 0 User changes were processed.
To correct this problem you need to add the attribute to the PersonAccount Entity using the wsadmin tool from WebSphere. Please see the steps below.
1) From IBM\WebSphere\AppServer\bin run wsadmin.bat
2) Once the wsadmin command line displays run the following command
$AdminTask addIdMgrPropertyToEntityTypes {-name wWWHomePage -dataType string -entityTypeNames PersonAccount}
-name : This value is the name of the attribute on the directory server, for this example it will be wWWHomePage
-dataType : This is the database for the field, in our case string
3) After running the command you will see that your attribute was successfully added.

4) Synchronize your node
Now your attribute will be successfully synchronized into the Maximo database as seen below in the log files.

UID
ibm11133103