Technical Blog Post
Abstract
Looking for a new relationship??
Body
Co-Authored by Dan Miller, Maximo developer
In his Best Practices for Configuring Tivoli process automation engine application document Scott Dickerson discussed relating two existing objects in a new relationship. Bruno Portaluri has also blogged on this subject where he has discussed linking Parent-Child records in Maximo by writing java code.
Dan Miller and I would like to show you how you can link parent – child records using Maximo applications (NO CODING!) and also show you how you can use the Child to point back to the parent.
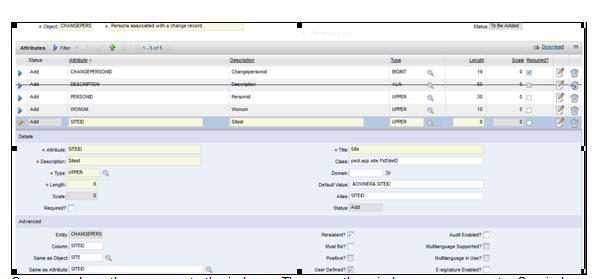
For this example, we want to add a table the Change Work Order which will list all Persons associated with that record. For instance, this could be interested parties, managers, etc. To do this we need only to use two applications - Database Configuration and the Application Designer. Open the Database Configuration application to create the new MBO. For this example, we will call the new MBO CHANGEPERSON. Using the Attributes and Indexes tabs we create one set of fields which point to the primary keys of the parent and child tables as this screenshot shows. The attributes we will be using are WONUM, SITEID, and PERSONID were added. (WONUM & SITEID is an unqiue index on the workorder table, and PERSONID is an unqiue index on the person table). Since this will be used from the CHANGE application, the default value for :&OWNER&.SITEID and :&OWNER&.WONUM will be needed for the siteid and wonum respectively.
Once saved, we then can create the indexes. There are three indexes we can create. One index is based on the newly created WOCHANGE table. One based on Work Orders, and the last one based on Person.
The index for the WOCHANGE table would include WONUM, SITEID, and PERSONID. The force uniqueness checkbox can be applied here. This will prevent the same person being entered twice for the same change record.
The second index that we will be creating will be used to quickly find the persons associated with a change record when the change record is opened. For this we will need, WONUM and SITEID. We can not force uniqueness here as we want multiple people for the same record.
The last index, which is optional, will be used from the person table to find the change records that this person is associated with. The only field we will need in the index is PERSONID. Again, we do not want to force uniqueness as we want the same person associated with multiple change records.
On the Relationships tab you create relationships with where clause which will point to unique indexes on the child table. The name of the relationship is what we will be using in the new Application Designer application

Now all you need to do is to go to the Parent objects. For this example, on the object WOCHANGE we create a new relationship to the newly created object CHANGEPERSON

And if you so choose, you can create one the Person table as well.
Save and apply your changes.
Note: if you are unfamiliar with Admin Mode, DB Config, and Application Designer please refer to this link https://www.ibm.com/developerworks/community/wikis/home?lang=en#!/wiki/IBM%20Maximo%20Asset%20Management/page/Configuring%20and%20customizing
Once the database configuration is complete, you access Application Designer, select the Changes application, and add the table and table columns using the relationship CHANGEPERSON on the table. And you now have a Parent -> Child -> Parent relationship
Here a table has been added to a tab in the Changes application. This is a screenshot of the table properties dialog box. Note that the table is using a relationship...

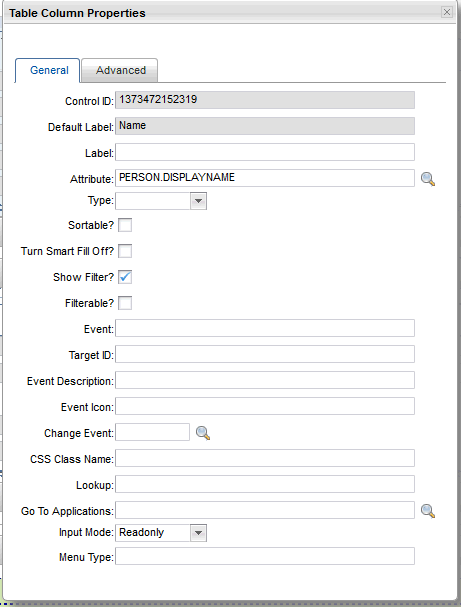
Then you will define the table columns. Here is a screen shot of the first table column properties dialog box

You may also wish to create columns for the PERSON.DISPLAYNAME as well. This will be helpful to know exactly who the personid belongs to
Lastly, here are screenshots for the third column, to allow for removing of people from the table, along with adding a New Row button to the table


Save your changes, then go to the Changes app. The hard work is now done!
To unit test this, go to the Changes application and enter a Change, click the new row under the new “CHANGEPERSON” table. Point the new row to a person and then click save on the Change object.
Now leave this record reload the list screen and come back into the same Change record.
If everything is configured properly, the new person you’ve added will still be correctly associated with the Change record. If you have made an error in database configuration the person will not be associated with the changerecord. You will want to double check the default values for wonum and siteid, and the relationships from wochange to changeperson.

UID
ibm11133433