Technical Blog Post
Abstract
Updating User Status from Active Directory to Maximo with LDAP.
Body
Overview
I see numerous clients who are always asking for updating user status based on their status in Active Directory (AD). While this functionality does not come with base Maximo, it can be accomplished by using a method that involves adding a custom (meaning not in Maximo by default) attribute to Maximo. This pulls the status directly from the field in Active Directory that tracks user status. After the attribute is added to Maximo, we can pull the data from AD using VMMSYNC or LDAPSYNC. Then once we have the information, we can use an escalation to change the user's status based on the information received. This document is intended to be a guideline to follow in order to get the status changed, feel free to use your own methods or steps in modify applications or setting up the different tasks.
These steps do not include the setup of LDAP, and are assuming that the environment is running Maximo with LDAP successfully.
1. Adding the Custom Attribute to Maximo
In order to get the data in to Maximo, we need to create a field to store the information we need to change the user's status to reflect the status that is in AD.
In Maximo, navigate to the Database Configuration application.
Filter for and select the MAXUSER object and go to the attributes tab.
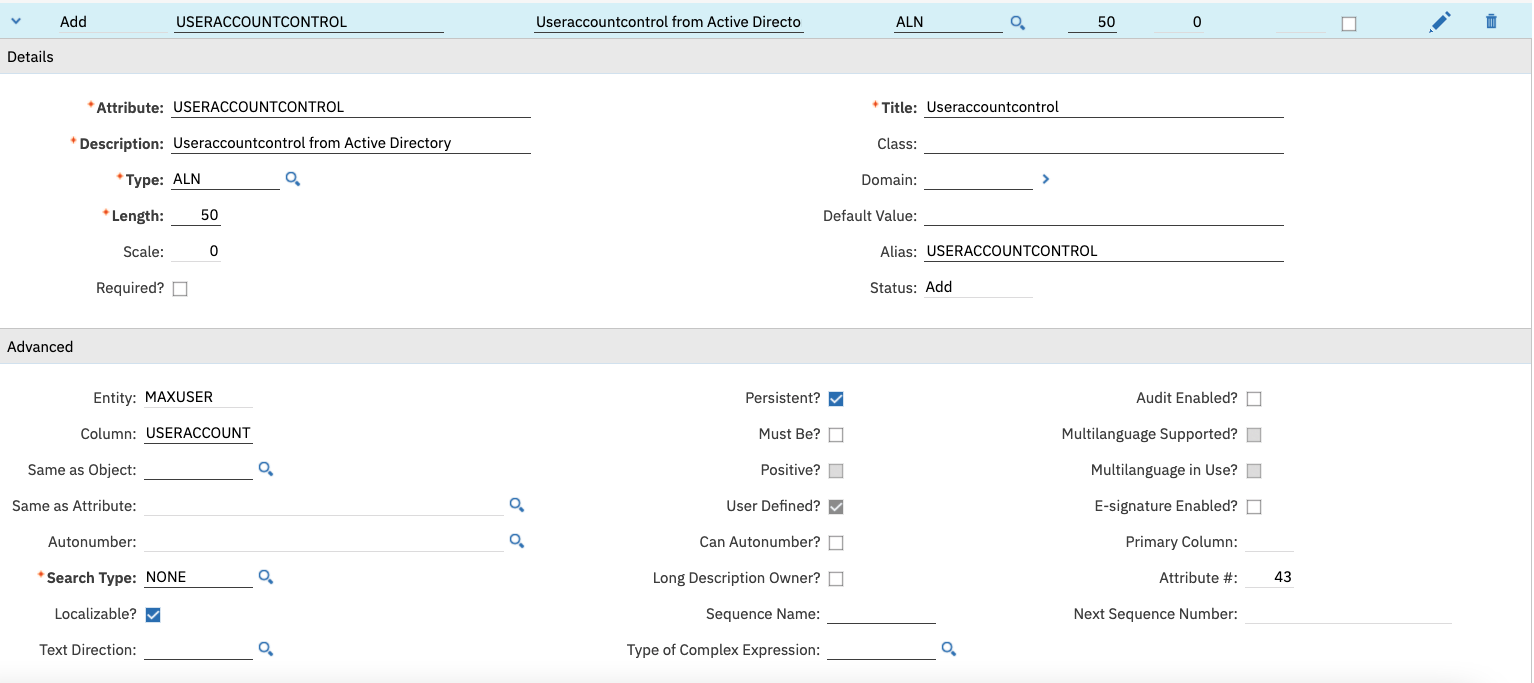
Add a New Row and define the attribute as seen in the screenshot.
After saving the new attribute, go back to the list view and turn on Admin Mode and Apply Configuration Changes. Once done, turn Admin Mode back off.
2. Adding the Attribute to the Application
This step is not required for the escalation to function, but is useful in determining whether the data was synced to Maximo and seeing what the user status is in AD.
Navigate to the Application Designer application.
Filter for and select the User application.
Add a Textbox into the application called Useraccountcontrol.
Right-click and map it to the attribute you created, USERACCOUNTCONTROL.
After configuring the attribute, save.
3. Verifying the Attribute in WebSphere Application Server.
There are three different scenarios for this step.
If you are using LDAPSYNC instead of VMMSYNC, you can skip this step of adding userAccountControl to the WebSphere VMM.
If you are using WebSphere ND 8.5.5 or later, follow these steps:
Log in to the WebSphere Admin Console and under Global security go to Configure (for Federated Repository) -> Repository Identified -> Federated Repositories Property Names to LDAP Attributes Mapping -> userAccountControl.
Here we want to make sure that the Name matches the case in the Directory, the Property name is all lowercase, and the Entity Types is PersonAccount.
Otherwise, you must add the userAccountControl property to the PersonAccount entity from the command line. Open a command prompt and run these commands:
WebSphere\Appserver\bin\wsadmin.bat
$AdminTask addIdMgrPropertyToEntityTypes {-name useraccountcontrol -dataType string -entityTypeNames PersonAccount}
After running this command, you will need to restart the dmgr and sync your nodes with the dmgr.
4. Using the LDAPSYNC or VMMSYNC Crontask to Pull in the data.
I chose to create new instances of the Cron tasks to separate out the functions. This Cron task shows what is needed for configuration and doesn't interfere with the full user sync. If you do not want to sync inactive users at all, you can put this with the original Cron task.
The userAccountControl field in Active Directory has more values that specified here. Depending on how your AD is set up and used, these numbers can change which changes your filter. For reference on AD userAccountControl values, reference Microsoft's Documentation. (https://msdn.microsoft.com/en-us/library/windows/desktop/ms680832%28v=vs.85%29.aspx)
For VMMSYNC:
In Maximo, go to the Crontask Setup and select VMMSYNC.
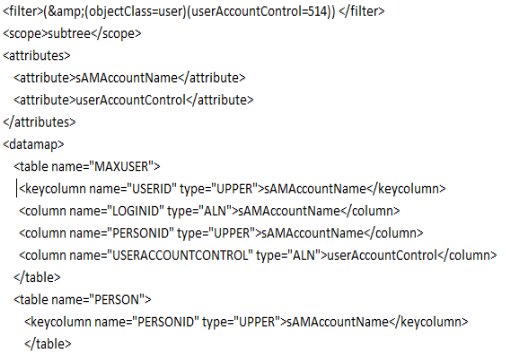
Update the filter to include the useraccountcontrol field. This filter is finding all users that are currently set as inactive in Active Directory.
We also want to add useraccountcontrol to the table to include the new column we added.

For LDAPSYNC:
In Maximo, go to the Crontask Setup and select LDAPSYNC.
Update the filter to include the useraccountcontrol field. This filter is finding all users that are currently set as inactive in Active Directory.
We also want to add useraccountcontrol to the table to include the new column we added.
5. Creating an Escalation to change the Users' Status.
To change the status of the users, we're going to create an escalation that reads from the newly created and synced field in Maximo and then change the status based on that value. Since this includes only the user status of 514 that is the only condition, however it is possible to add more escalations or conditions depending on needs.
Create an Escalation and name it.
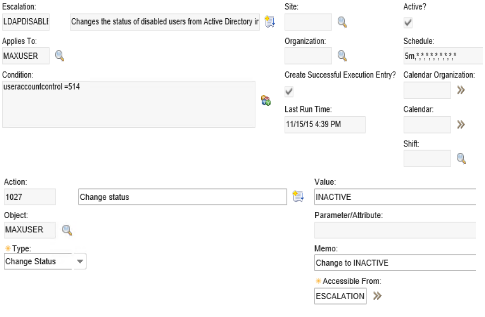
We want to set the condition to be useraccountcontrol=514.
Then, create an escalation point with the same condition.
Create an action that has the type of CHANGESTATUS on the MAXUSER object and sets the value to inactive.
6. Verifying the Status Change.
After we validate and active the escalation, wait until it runs and then we can check the users status.
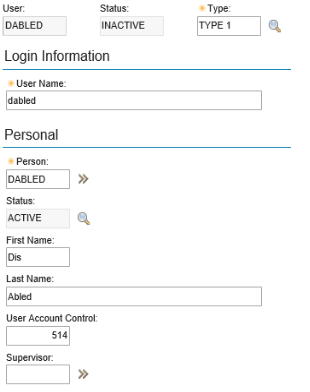
If you look at the snapshot, we can see that the User Account Control field has been updated to include the user's status (514), and that the user's status is inactive. The person record's status is still active. This status is separate from the user's status but can be changed as well. To do this, run an escalation change on the PERSON object.
UID
ibm11114005