Technical Blog Post
Abstract
This is the first in a series of How To documents that provide step-by-step set of instructions to install the 7.6.0 version of Maximo Asset Management with WebSphere Application Server 9.0.x and DB2 version 11.x
Body
WebSphere Configuration Tasks
To make profiles that are the same as those that the Maximo Configuration Tool creates, follow these steps.
Launch Profile Management Tool
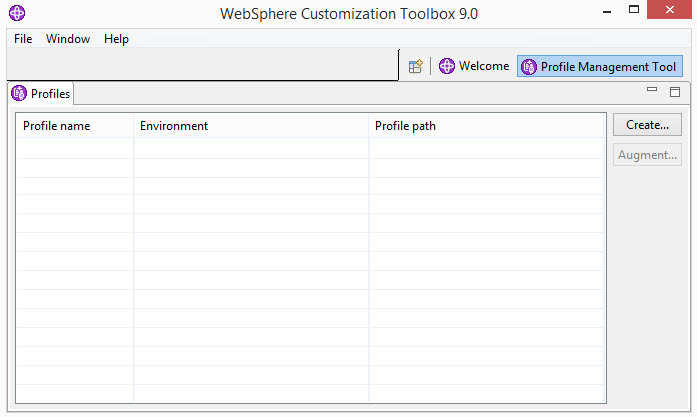
Click Create...
- Environment: Select Cell (deployment manager and a federated application server)
- Profile Creation Options: Select Advanced profile creation and click Next
- Optional Application Deployment: Untick deploy the default application check box and click Next
- Deployment manager profile name: Change Dmgr01 to ctgDmgr01
- Application server profile name: Change AppSrv01 to ctgAppSrv01
Click Next
Node, Host, and Cell Names
- Deployment manager node name: Change <hostname>CellManager01 to ctgCellManager01
- Application server node name: Change <hostname>Node01 to ctgNode01
- Hostname: keep
- Cell name: Change <hostname>Cell01 to ctgCell01
Click Next
Enable Administrative security
- User name: wasadmin
- Password: wasadmin
- Confirm password: wasadmin
Click Next
Security Certificate (Part 1)
- Keep defaults. Click Next.
Security Certificate (Part 2)
- The default keystore password is WebAS. If you want to change it, do it here.
Port Values Assignment (Part 1)
- Deployment manager ports. Keep defaults. Click Next.
Port Values Assignment (Part 2)
- Node agent ports. Keep defaults. Click Next.
Port Values Assignment (Part 3)
- Application server ports. This server is deleted later. Keep defaults. Click Next.
Web Service Definition
- Keep defaults. Click Next.
Web Server Definition (Part 1)
- Create a Web server definition. Keep defaults. Click Next.
Web Server Definition (Part 2)
- Change paths if necessary. Click Next.
Profile Creation Summary
- Click Create.
Clear the Launch the First steps console checkbox and click Finish.
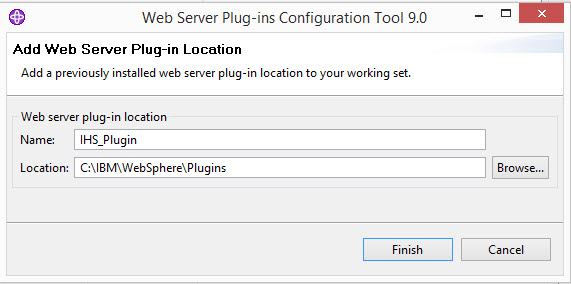
Launch Web Server Plug-ins Configuration Tool

Under Web Server Plug_in Runtime Locations, click Add...
- For name, type in IHS_Plugin
- For Location, type in <WebSphere_Home>\Plugins
- Click Finish.
Under Web Server Plug_in Configurations, click Create...
Note: Be careful on these pages. As with the Maximo Configuration Tool, WebSphere Configuration Toolbox (WCT) does not pull values from IBM Installation Manager's product installation database. The populated values are suggested only.
Web Server Selection: choose IBM HTTP server and click Next.
Web Server Configuration File Selection: Select the existing IBM HTTP Server httpd.conf file, located in <IHS_Home>\conf\httpd.conf. Leave the web server port at 80. Click Next.
Setup IBM HTTP Server Administration Server: Leave HTTP Administration Port at 8008. You can create a User ID and password on this screen, or clear the Create a User ID checkbox and configure the authentication later. Click Next.
Setup IBM HTTP Server Administration Server: Specify whether you want to IBM HTTP Server Administration Server to run as a service, the log on user to start the server and if you want it to start Automatically or Manual. Click Next.
Web Server Definition Name: The unique web server definition name must match the name supplied at the Web Server steps when the profile was created. Click Next.
Configuration Scenario Selection: If your Application Server exists on a different machine than your web server, choose Remote and enter the Hostname or IP address of the Application Server. For this example, the Application server is on the same system, so we chose Local and pointed to <WebSphere_Home>\AppServer. Click Next.
WebSphere Application Server Profile Selection: Choose your Application Server profile (ctgAppServ01). Click Next.
Click Configure. When it completes, click Finish.

Close the WebSphere Customization Toolbox window.
Start an Administrative command-line session and navigate to <WebSphere_Home>\AppServer\bin. Run wasservicehelper.bat
- Menu Options: At (default 1)[q to Quit], click Enter
- Profile: At select number next to the profile [q to Quit]: enter 1 and click Enter
- Servers: At select number next to server [q to Quit]: enter 1 and click Enter
- Service Name: At [q to Quit], enter ctgNode01 and click Enter
- Restart Policy: At (default 1)[q to Quit], click Enter
- Start Type: At (Default 1)[q to Quit], click Enter
- WebSphere Security: At (default N)[Y/N][q to Quit], enter Y and click Enter. Username and password are wasadmin.
- Log on user: default N[q to Quit], click Enter
- Execute: At (default=Yes) [Y/N][q to Quit], click Enter
- Menu Options: At (default 1)[q to Quit], enter q and click Enter
Open Windows services, or refresh it if already open. IBM WebSphere Application Server V9.0 - ctgCellManager01 is now available. Right-click and select Properties. Click Start.

Back at the Command Window prompt, run wasservicehelper.bat again.
Menu Options: At (default 1)[q to Quit], click Enter
Profile: At select number next to the profile [q to Quit]: enter 2 and click Enter
Servers: At select number next to server [q to Quit]: enter 1 and click Enter
Service Name: At [q to Quit], enter ctgNode01 and click Enter
Restart Policy: At (default 1)[q to Quit], click Enter
Start Type: At (Default 1)[q to Quit], click Enter
WebSphere Security: At (default N)[Y/N][q to Quit], enter Y and click Enter. Username and password are wasadmin.
Log on user: default N[q to Quit], click Enter
Execute: At (default=Yes) [Y/N][q to Quit], click Enter
Menu Options: At (default 1)[q to Quit], enter q and click Enter
Open Windows services, or refresh it if already open. IBM WebSphere Application Server V9.0 - ctgNode01 is now available. Click Start.

Java SDK
Start an Admin command line prompt session and navigate to <WebSphere_Home>\AppServer\bin and run managesdk -listavailable
It should show something like the following:
C:\IBM\WebSphere\AppServer\bin>managesdk -listavailable
CWSDK1003I: Available SDKs :
CWSDK1005I: SDK name: 8.0_64
CWSDK1001I: Successfully performed the requested managesdk task.
C:\IBM\WebSphere\AppServer\bin>
WebSphere 9.0 only runs Java 8.
Start a browser session. Go to the WebSphere console, https://<fully qualified hostname>:9043/ibm/console
- On the left, Expand Server > Server Types, and click Application servers.
- On the right, select server1 and delete it.
- On the left, expand System administration and click Deployment manager.
- On the right, expand Java and Process Management and click Process Definition.
- Under Additional Properties, Click Java virtual machine.
- Clear the verbose garbage collection checkbox. Change Initial and Maximum heap size to 1024 MB.
- Optional: On the left, click Console Preferences. Check Synchronize changes with Nodes and click apply.
Log out of WebSphere console, and exit the browser.
Start a browser session. Go to the WebSphere console, https://<fully qualified hostname>:9043/ibm/console
- On the left, Expand Server > Server Types, and click Application servers.
- Click New...
- Server name: MXServer
- Click Next twice, then Finish.
- Save changes and synchronize nodes.
Click MXServer.
- On the right, expand Java and Process Management.
- Click Process Definition.
- Under Additional Properties, click Java virtual machine.
- Clear the verbose garbage collection checkbox. Change Initial and Maximum heap size to 6144 MB.
- For Generic JVM arguments, use -Dsun.rmi.dgc.ackTimeout=10000 -Djava.net.preferIPv4Stack=true -Xmn1536m -Xcodecache32m -Xgcthreads4 -Dmxe.name=MXServer.
Click OK. Save changes and synchronize nodes.

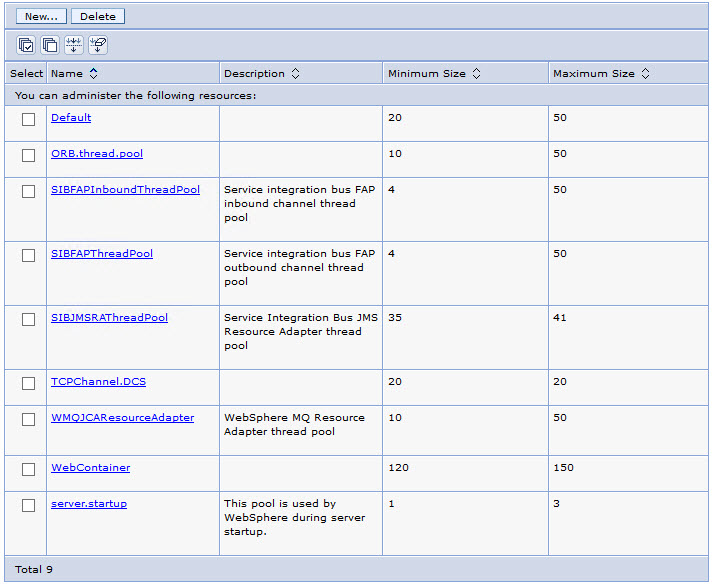
At Application servers > MXServer > Process definition, click MXServer.
- Under Additional Properties, click Thread pools.
- Click Default. Change Maximum Size to 50 and Thread inactivity timeout to 30000.
- Click Apply. Save changes and synchronize nodes.
- Click WebContainer. Change Minimum Size to 120 and Maximum size to 150.
Click OK. Save changes and synchronize nodes.
- Click MXServer. Under Communications, expand Ports. Note the port numbers for WC_adminhost, WC_defaulthost, WC_adminhost_secure and WC_defaulthost_secure.
- On the left, expand Environment. Click Virtual hosts.
- Click New...
Name: maximo_host
Create host aliases:
| Port |
Hostname
|
|---|---|
| 80 | <IP address> |
| 80 | <hostname> |
| 80 | <fully qualified hostname> |
| * | Port WC_adminhost port number |
| * | Port WC_defaulthost port number |
| * | WC_adminhost_secure port number |
| * | WC_defaulthost_secure |
Save changes and synchronize nodes.

Log out of WebSphere administrative console, and exit the browser.
To configure the JMS queues, complete the following steps:
Start a browser session. Go to the WebSphere console, https://<fully qualified hostname>:9043/ibm/console
Create service integration bus(SIBus)
- On the left, click Service Integration. Click Buses.
- Click New.
- Enter intjmsbus as the name of the new bus in the Name field.
- Clear the Bus security check box.
- Click Next.
- Click Finish and Save.
- Click intjmsbus.
- Enter SIBus intjmsbus as Description.
- Click OK and Save.
Add a server to the SIBus
- Click intjmsbus.
- Under Topology, click Bus members.
- Click Add.
- If not already selected, keep Server option selected, and select ctgNode01:MXServer. Click Next.
- Check that the Data store radio button is selected, and then click Next.
- From the Specify data store properties panel, select Use existing data source.
- For Data source JNDI name, enter jdbc/intjmsds. For Authentication alias, select ctgCellManager01/maxJaasAlias, and click Next.
- From the Tune application server for messaging performance panel, click Next.
- Click Finish and Save.
Create the SIBus destinations for queues
To create the Continuous queue inbound bus destination:
- Click intjmsbus.
- Under Destination resources, click Destinations. Click New.
- Leave Queue checked as the destination type and click Next.
- Type CQINBD in the Identifier field and Continuous Queue Inbound Bus Destination in the Description field. Click Next.
- If not already selected, select Node=ctgNode01:Server=MXServer.
- Click Finish and Save.
- Where Buses > intjmsbus > Destinations is displayed, click intjmsbus.
- Under Destination resources, click Destinations.
- Click CQINBD.
- In Exception destination, select None.
Click OK and Save.
Follow the same steps for these additional SIBus destinations, including setting the Exception destination to None.
Sequential inbound
| Identifier | SQINBD |
|---|---|
| Description | Sequential Queue Inbound Bus Destination |
| Node | ctgNode01:Server=MXServer |
Sequential outbound
| Identifier | SQOUTBD |
|---|---|
| Description | Sequential Queue Outbound Bus Destination |
| Node | ctgNode01:Server=MXServer |
Notification
| Identifier | NOTFBD |
|---|---|
| Description | Notification Bus Destination |
| Node | ctgNode01:Server=MXServer |
Notification Error
| Identifier | NOTFERRBD |
|---|---|
| Description | Notification Error Bus Destination |
| Node | ctgNode01:Server=MXServer |
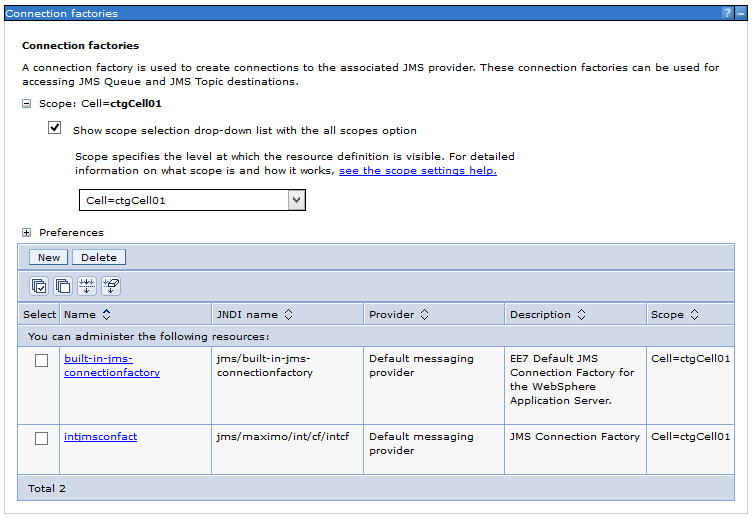
Create the JMS connection factory
- On the left side, expand Resources, then expand JMS. Click Connection factories.
- Select Cell=ctgCell01. Click New.
- Verify that the Default Messaging Provider is selected and click OK.
- Enter the following information:
| Name | intjmsconfact |
|---|---|
| JNDI name | jms/maximo/int/cf/intcf |
| Description | JMS Connection Factory |
| Bus name | intjmsbus |
Click OK and Save.
Create the JMS Queues
To create the continuous inbound JMS queue:
- On the left side, expand Resources, then expand JMS. Click Queues.
- Select Cell=ctgCell01. Click New.
- Verify that the Default Messaging Provider is selected and click OK.
- Enter the following information.
| Name | CQIN |
|---|---|
| JNDI name | jms/maximo/int/queues/cqin |
| Description | Continuous Inbound Queue |
| Bus name | intjmsbus |
| Queue name | CQINBD |
Click OK and Save.
Follow the same steps for these additional queues:
Sequential inbound JMS queue
| Name | SQIN |
|---|---|
| JNDI name | jms/maximo/int/queues/sqin |
| Description | Sequential Inbound Queue |
| Bus name | intjmsbus |
| Queue name | SQINBD |
Sequential outbound JMS queue
| Name | SQOUT |
|---|---|
| JNDI name | jms/maximo/int/queues/sqout |
| Description | Sequential Outbound Queue |
| Bus name | intjmsbus |
| Queue name | SQOUTBD |
Notification JMS queue
| Name | NOTF |
|---|---|
| JNDI name | jms/maximo/int/queues/notf |
| Description | Notification Queue |
| Bus name | intjmsbus |
| Queue name | NOTFBD |
Notification error JMS queue
| Name | NOTFERR |
|---|---|
| JNDI name | jms/maximo/int/queues/notferr |
| Description | Notification Error Queue |
| Bus name | intjmsbus |
| Queue name | NOTFERRBD |
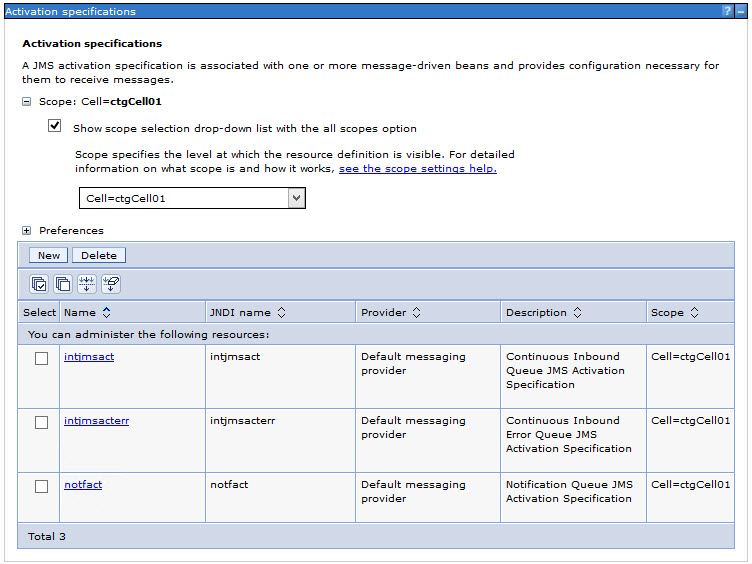
Create JMS activation specifications
To create the activation specification for the continuous inbound queue:
- On the left side, expand Resources, then expand JMS. Click Queues. Click Activation specifications.
- From the Scope drop-down list, select Cell=ctgCell01.
- Click New.
- Select Default messaging provider and then click OK.
- Enter the following information.
| Name | intjmsact |
|---|---|
| JNDI name | intjmsact |
| Description | Continuous Inbound Queue JMS Activation Specification |
| Destination type | Queue |
| Destination lookup | jms/maximo/int/queues/cqin |
| Bus name | intjmsbus |
Click OK and Save.
Follow the same steps for these additional activation specifications:
Activation specification for the notification queue
| Name | notfact |
|---|---|
| JNDI name | notfact |
| Description | Notification Queue JMS Activation Specification |
| Destination lookup | jms/maximo/int/queues/notf |
| Destination type | Queue |
| Bus name |
intjmsbus |
Activation specification for the notification error queue
| Name | notfacterr |
|---|---|
| JNDI name | notfacterr |
| Description | Notification Error Queue JMS Activation Specification |
| Destination lookup | jms/maximo/int/queues/notferr |
| Destination type | Queue |
| Bus name |
intjmsbus |
To create the SIBus destination for the Continuous inbound error queue:
- On the left, click Service Integration. Click Buses.
- Click intjmsbus
- Under Destination resources, click Destinations. Click New.
- Leave Queue checked as the destination type and click Next.
- Type CQINERRBD in the Identifier field and Continuous Inbound Error Queue Bus Destination in the Description field. Click Next.
- If not already selected, select Node=ctgNode01:Server=MXServer.
- Click Finish and Save.
- Where Buses > intjmsbus > Destinations is displayed, click intjmsbus.
- Under Destination resources, click Destinations.
- Click CQINERRBD.
- In Exception destination, select the Specify option and enter CQINERRBD as the exception destination value.
- Make sure the Maximum failed deliveries value to 5.
Click OK and Save.

To change the exception destination of CQINBD destination to CQINERRBD:
Click CQINBD.
- In Exception destination, select the Specify option and enter CQINERRBD as the exception destination value.
- Make sure the Maximum failed deliveries value to 5.
Click OK and Save.
To create the continuous inbound error JMS queue:
- On the left side, expand Resources, then expand JMS. Click Queues.
- Select Cell=ctgCell01. Click New.
- Verify that the Default Messaging Provider is selected and click OK.
- Enter the following information.
| Name | CQINERR |
|---|---|
| JNDI name | jms/maximo/int/queues/cqinerr |
| Description | Continuous Inbound Error Queue |
| Bus name | intjmsbus |
| Queue name | CQINERRBD |
Click OK and Save.

To create the Activation Specification for the continuous inbound queue:
- On the left side, expand Resources, then expand JMS. Click Queues. Click Activation specifications.
- From the Scope drop-down list, select Cell=ctgCell01.
- Click New.
- Select Default messaging provider and then click OK.
- Enter the following information.
| Name | intjmsacterr |
|---|---|
| JNDI name | intjmsacterr |
| Description | Continuous Inbound Error Queue JMS Activation Specification |
| Destination type | Queue |
| Destination lookup | jms/maximo/int/queues/cqinerr |
| Bus name | intjmsbus |
Click OK and Save.
WebSphere Application Server installation and configuration for Maximo Asset Management is complete.
Once completed, go to Custom Properties for improving application startup in WebSphere Application Server.
To install DB2 11.1 for Maximo, go to Installing and Configuring DB2 11.1.1 for Maximo 7.6.0.6+
To Maximo 7.6.0.6, go to Installing and Deploying Maximo 7.6.0.6+ to DB2 11.1.1 and WebSphere 9.0.0
UID
ibm11113909