Technical Blog Post
Abstract
Adding custom fields to Maximo Anywhere Part 2: Parent\Child object relationships
Body
A while back I wrote a blog going over adding a custom field to a Maximo Anywhere application, this was a very basic blog and only handled a situation where the field was part of the parent object (WORKORDER). In many cases however there are situations where the field we want to add is not part of the parent object on the resource, but possibly an associated child object through a relationship. I'm going to walk through the process of adding a field which displays data from another object other then work order based on a relationship.
What we're going to create
I recently worked on a situation where we were trying to bring over job plan data (not jpnum which is part of the WORKORDER object already). For our test we will use Job Plan Description field in Maximo and bring it over to the Work Execution application WO Details screen. I will explain each step and what is being done to help assist in your Maximo Anywhere customization's.
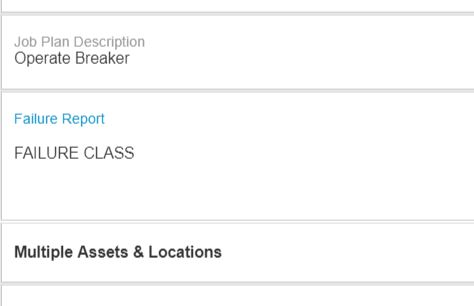
You can see the field I have below is already crossed over to my core Work Order tracking application, so when I attach a job plan it shows the description for that job plan as well. The Object\Attribute is JOBPLAN.DESCRIPTION which is not part of the OLSCWODETAIL object structure or the WorkOrder OSLC resource out of the box.

So how do we get this field in to anywhere without receiving the dreaded "invalid bindings" error?
Creating the relationship between parent and child objects.
First we need to create the relationship on the object structure used by Work Execution which is OSLCWODETAIL.
From the Integration Go To item select the Object Structures application and search for OSLCWODETAIL. Click on 'New Row' and add the JOBPLAN object which will be a child to the Work Order object in this relationship. We also want to define the relationship, I used the out of the box JOBPLAN relationship which is the following, but you may have a custom one or use another out of the box relationship
jpnum=:jpnum and ((orgid=:orgid and siteid=:siteid) or (orgid=:orgid and siteid is null)
or (orgid is null and siteid is null)) and status in (select value from synonymdomain where domainid='JOBPLANSTATUS' and maxvalue ='ACTIVE')

Once done save the record.
Updating the OSLC Resource
Our next step is to change the cardinality in the Work Order resource for our WORKORDER\JOBPLAN relationship. From the Integration menu choose OSLC Resources filter for WorkOrder and select it. Filter for your WORKORDER\JOBPLAN relationship in the OSLC Resource Details Menu. From here we want to change the cardinality From MULTIPLE to SINGLE, the reason we are doing this is because there will only ever be a 1 or 0 elements returned in the data set for a single work order. Once done save the record.

Updating the resource shape files for Maximo Anywhere
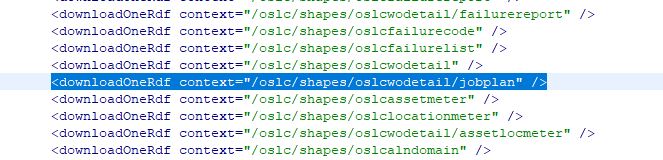
Now that our resources are configured, we need to ensure our shape files are updated in Maximo Anywhere. we do this by opening the anywhere-rdf-puller.xml located in the Anywhere/MaximoAnywhere root folder and adding the path to our job plan child resource as seen below under the <target name="all" description="downloads all rdfs"> section.
<downloadOneRdf context="/oslc/shapes/oslcwodetail/jobplan" />
Once done save the file and then run the RDF puller to bring down your updated resources using the commadn below from the root Maximo Anywhere directory or from the ant window in eclipse.
ant -f anyw
Once the updated resources are downloaded you should now see a shape file for your jobplan resources under the oslcwodetail parent as seen below

Updating the application artifact
We now have our relationship created, resources updated and downloaded in to our shape files, the next step is to update our app.xml and add our resource attribute and properties
First we want to search for <!--Work Order Resource--> under here you want to add your resource, below is the syntax I used, you will notice this is a bit different then my previous document where we just defined the field. Here we are also defining the child object as spi_wm:jobplan then the attribute inside that object of spi_wm:description. When we define the object like this before the description the application knows to look in oslcwodetail\jobplan\jobplan for the description attribute rather then the parent oslcwodetail resource document.
<attribute describedByProperty="spi_wm:jobplan{spi_wm:description}" id="workorder_jp_description" name="jpdescription" />

After we add our attribute we need to add our text field and map it to our attribute. Search for <!--Work Order Details View --> under here you want to add your attribute resource using syntax similar to what I have below. As we are not updating the Job Plan description from the work order my field is not editable, but this can be changed based on your needs.

Once our edits are done, you will need to run the build all script to rebuild and deploy your application updates.
And the result
Once our application is built and redeployed we can preview the results, you should now have a field crossed over from the Job Plan object showing on your Work Order based on the relation created on the object structure.
I hope this information helps, as always post any questions, comments or concerns below.
UID
ibm11129257