Technical Blog Post
Abstract
Adding Custom Fields to a Maximo Anywhere application.
Body
Today I'm going to describe the process of adding a custom field to a Maximo Anywhere application screen. Although we build the applications out of the box, you still have control over what you see and what you display to your users on the device. I've created an attribute in the work order object called reviewed, we want to bring this over to our Maximo Anywhere Work Execution application on to our Work Order details screen to show who has reviewed the Work Order. This can be done with new work order attributes, pre-existing ones that don't exist in Maximo Anywhere already as well as ones from other objects by creating the relationship on the object structure.
We will start with the simple customization of adding a new field to the Work Execution Work Order Details screen.
Maximo OSLC Resources
When you create a new attribute on the WorkOrder object is should automatically be part of the OSLCWODETAIL object structure, because of this we can skip right to the OSLC Resources to map our attribute to be pulled down via the rdf puller. If your attribute is not part of the work order object, you will likely need to open up the OSLCWODETAIL object structure and create a relationship between the object your custom attribute is in and the WORKORDER Object. I kept it simple for now, if we need more details I can follow up in a later blog.
Once in the OSLC Resources application you will want to open the WorkOrder resource. Here you will want ensure you select the parent WORKORDER hierarchy path from the OSLC Resource Details table. If you ended up creating a relationship on your OSLCWODETAILS object structure for your attribute on a different object you will want to select the PARENT/CHILD combination for WORKORDER and the object your attribute exists in.
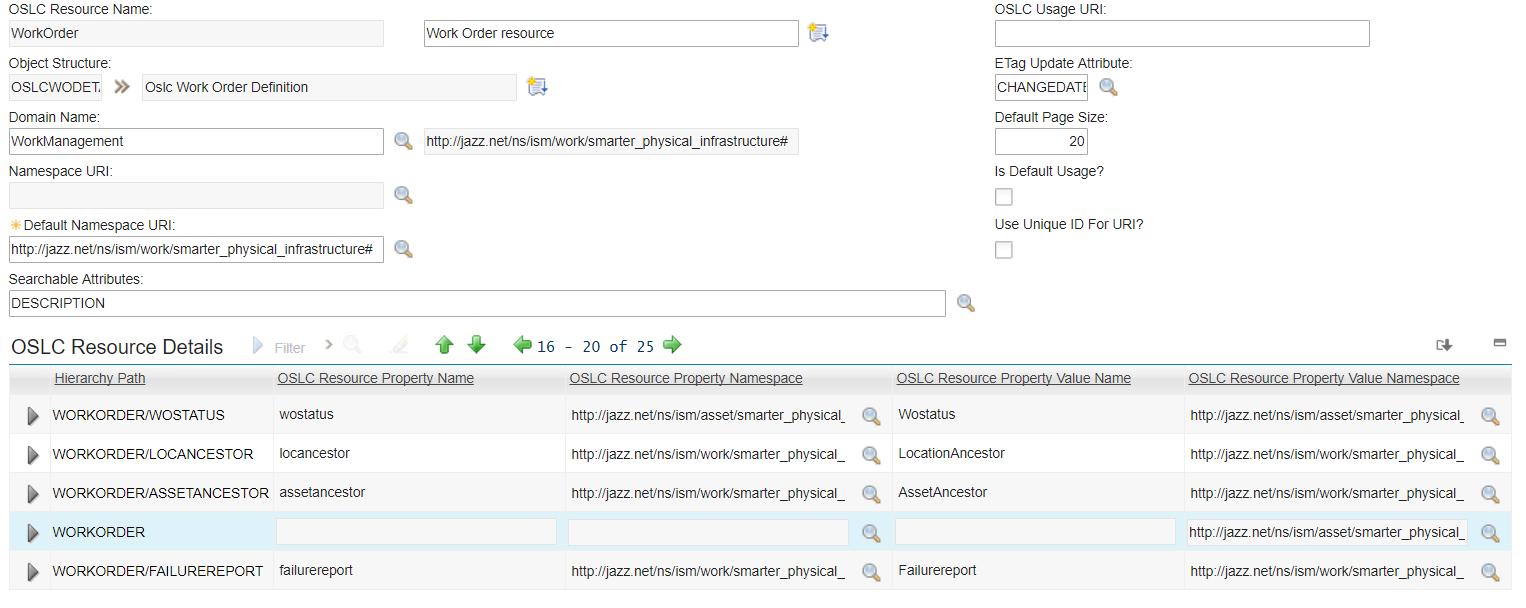
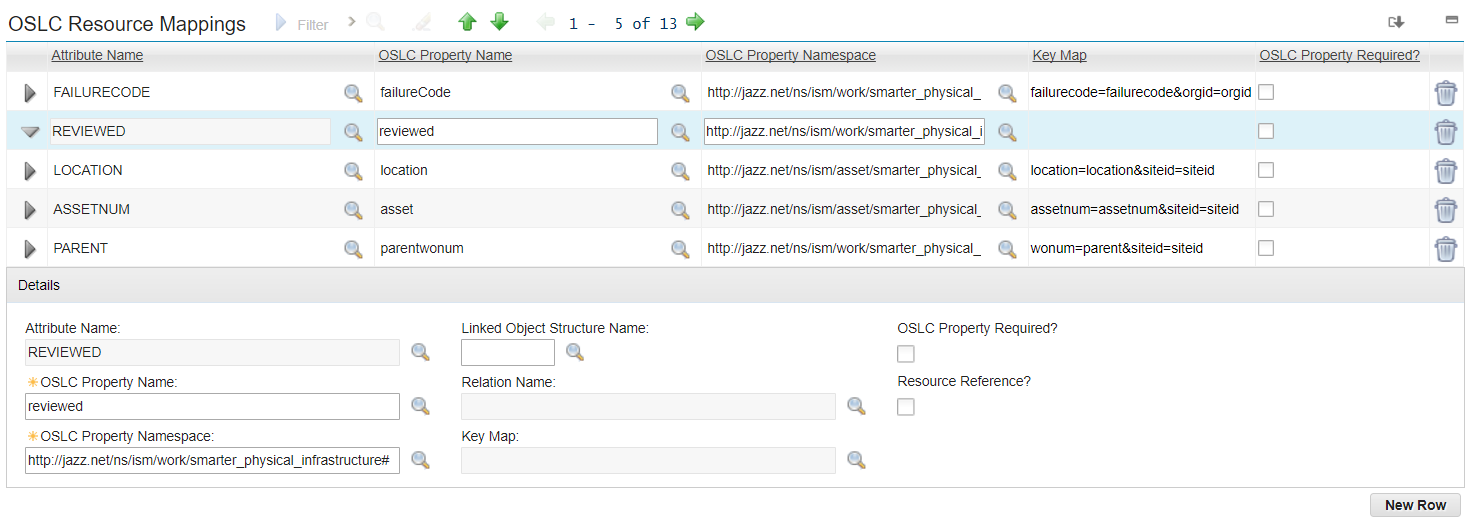
Once you select the Hierarchy Path the OSLC Resource Mappings table will populate with the current mapped resources at that level. Here will will add our attribute called REVIEWED, you can do this by clicking new row. Below is a screenshot and the values entered.
Attribute Name: Reviewed
OSLC Property Name: reviewed *Note this will be created as an OSLC common property if the name doesn't already exist.
OSLC Property Namespace: http://jazz.net/ns/ism/work/smarter_physical_infrastructure#
Once done save the record and we can now move over to the Anywhere side.
Updating the OSLC Shape Documents.
Now that we have configured our OSLC Resources in Maximo we need to use the RDF Puller to update our shape documents. Because our attribute is in the WORKORDER object we don't need to modify the rdf puller xml and can just run it to bring down our shape. If you created a relationship to another object, for example the person object you need to add the following line to your anywhere-rdfs-puller.xml.
<downloadOneRdf context="/oslc/shapes/oslcwodetail/person" />
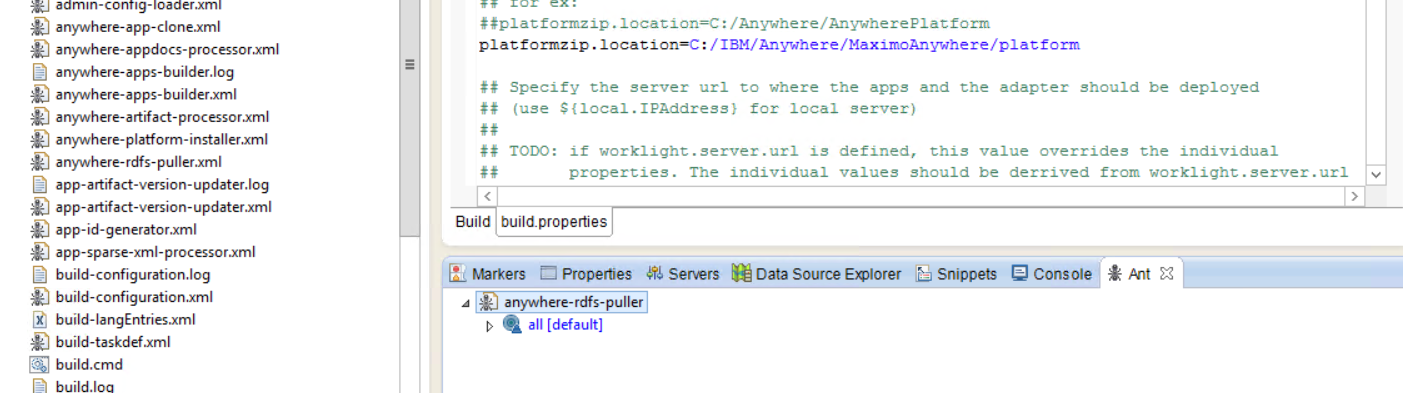
I ran my RDF puller using MobileFirst Studio as seen in the screen from below in the ant view, but you can also run it via the command line using the following command.
ant -f anywhere-rdfs-puller.xml -Dadapter.connection.user=<user_name> -Dadapter.connection.password=<password>
Replace the username and password with your Maximo user that can update the shapes.
Once your RDF puller completes successfully you can look at the OSLCWODETAIL shape document in oslc-docs/shapes/oslcwodetail. It should now show your mapped attribute from the OSLC Resources application as seen below.

Updating the application artifacts to defined your attribute and add new field.
Our last step is to update the app.xml for our Work Execution application, you can find this under apps/WorkExecution/artifacts. In here we need to define our attribute as well as add our text field to the Work Order detail view, you can also add it to the new work order view and search views if required.
Open your app.xml and search for <!--Work Order Resource--> under here you want to add your resource, below is the syntax I used.
Below is how it looks in the studio editor.

After we add our attribute we need to add our text field and map it to our attribute. Search for <!--Work Order Details View --> under here you want to add your resource using syntax similar to what I have below. I added mine right above the asset field.
<groupitem>
<text resourceAttribute="reviewed" label="Reviewed By" editable="true" placeHolder="Tap to enter"/>
</groupitem>
Our resource attribute is 'reviewed' as defined in our describedByProperty , the label is what displays above the field and place holder is what is shown until data is entered.

Once your edits are done, save the file and run a build all from the command prompt or double click the build script from your ant view in MobileFirst Sutdio.
And the results
Once the applications are rebuilt and your wlapp files uploaded to MobileFirst your changes will be ready to push to the devices or preview via simulator. Following the steps in this document should result in the following field being added to your Work Execution Details view.
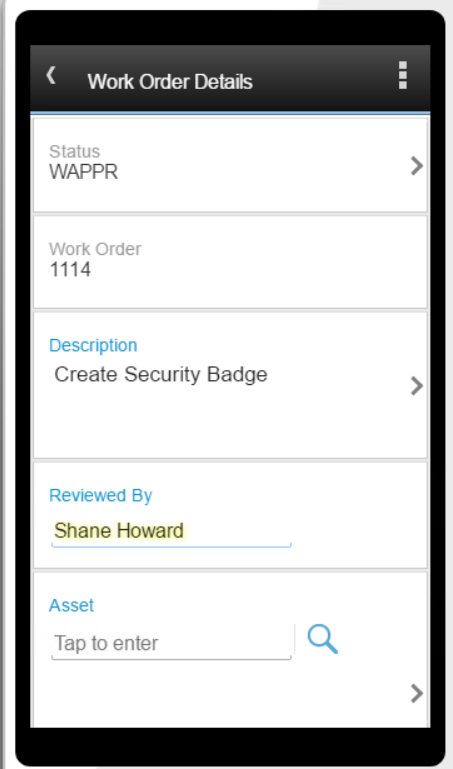
You can see the Reviewed By field with my name entered.
I hope this was informative and helps your Maximo Anywhere implementations, as always questions, comments or concerns please post below.
UID
ibm11129707