Technical Blog Post
Abstract
Updating an expiring AS2 Organization certificate: Part 1, Manually
Body
Manually updating an expiring AS2 Organization certificate
This blog is intended to provide a few simple steps to aid in replacing an AS2 certificate used in your profile Organization, when it is about to expire. I will outline creating a new certificate, how to update it in the profile Organization, and provide some tips for managing the process of coordinating the replacement of the certificate with partners who need to use it.
AS2 requires users to replace expired system certificates configured in the profile Organizations, and defined as the Exchange and Signing certificates. All certificates, used for any purpose, have an expiration date. An expired certificate cannot be used for Exchange (encrypting inbound data) or Signing (signing a document that is being sent outbound).
A note about testing: You can ensure a smooth transition if you can test your new system certificate in a non-production environment with your partners. I will assume the following steps are performed first in a non-production environment. I include a note at the end with instructions for exporting a new system certificate from your test environment to your production environment.
Clients often tell support analysts that testing is painful. Please note that production-down issues are also painful!
The profile Organization is found under Trading Partner > AS2. This image shows some Partner profiles and a couple of Organization profiles:

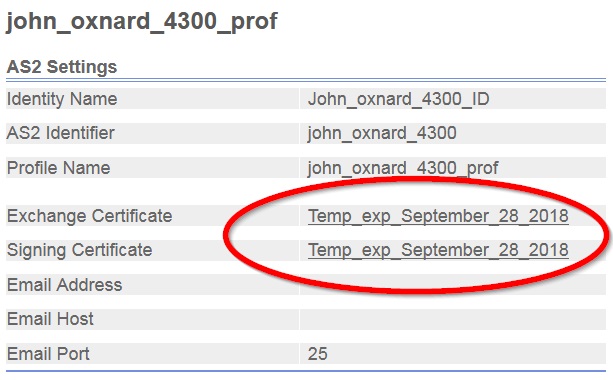
The certificates to be replaced in John_oxnard_4300_ID are shown in this image:
I use the certificate Temp_exp_September_28_2018 as my Exchange Certificate and Signing Certificate. I included the expiration date in the name of the certificate. Not all users name their certificates in this way. Here’s the certificate as shown in Trading Partner > Digital Certificates > System Certificates when I list this certificate:
The certificates to be replaced in John_oxnard_4300_ID are shown in this image:
And here is the expiring certificate as viewed if I click on the underlined name:
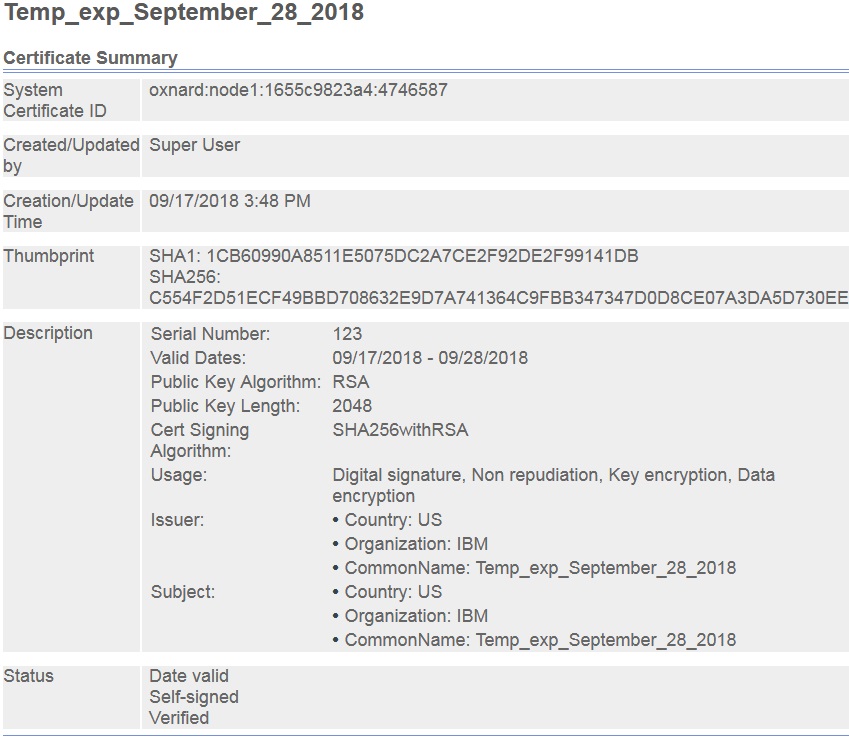
This cert will expire on September 28. 2018 (as I write it is September 17), so it’s pretty urgent to replace it soon!
- Creating a new certificate
A new certificate can be purchased through a Certificate Authority, or by creating a self-signed certificate which is done within Sterling B2B Integrator. Note that some partners will require using a certificate purchased through a Certificate Authority.
- Instructions for purchasing a certificate through a Certificate Authority are found here:
- To create a self-signed certificate, go to the Sterling B2B Integrator dashboard, then navigate to Trading Partners > Digital Certificates > System Certificates.
- Select the button for Create Self-Signed Certificate
- Follow the screens to create the new certificate. Here are some suggestions:
- Include the expiration date for the new certificate in the name of the certificate. You can edit the new certificate later if you are not sure when it will expire.
- The serial number can be any positive numeric string.
- The duration in days is the number of days until the certificate will expire. 1 year is 365 days, 2 years is 730 days, 3 years is 1095 days. I recommend having a certificate expire 2 years after it has been created.
- The key length should always be the largest size that is supported. In current releases that is 2048 bits.
- In versions which support SHA256withRSA, that should be selected as the Signing Algorithm. If that is not supported, SHA1 should be selected. MD5 is not recommended.
- With a self-signed certificate it is not necessary to define the List of IP addresses, List of DNS Names, or to select the Validity, Auth Chain or Set Certificate Signing Bit buttons.
Here is an example of a new certificate to be used as the Exchange and Signing certificate in a profile Organization:

That is the end of the information on creating a new certificate.
- Preparing to update your AS2 certificate
Changing over to the new certificate requires coordinating the change with all of your partners who send and/or receive data using AS2.
The certificate specified in the Exchange certificate field is used by partners to encrypt data to send to you. If they do not encrypt the data using the correct certificate, your system will reject it and return an error message to your partner.
The certificate specified in the Signing certificate field is used when you send data to your partners. Your system will create a Signing string using this certificate. Your partners must be able to validate the signing string, or they will reject the data you send to them.
- Check out the new certificate from Trading Partner > Digital Certificates > System Certificates, and sending the resulting file to your partner.
Note: Checking out a system certificate allows you to send the public part of the certificate.The private part is a secret of your company, and should not be shared with anyone.
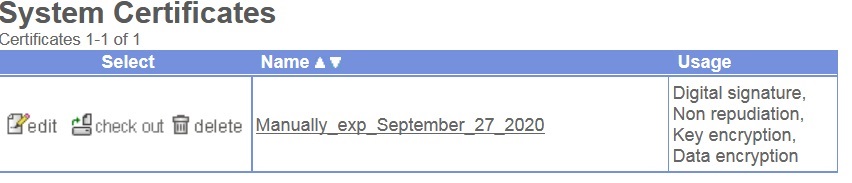
- Go to the System Certificates screen, then enter the name of your certificate in the Search by Certificate Name field:
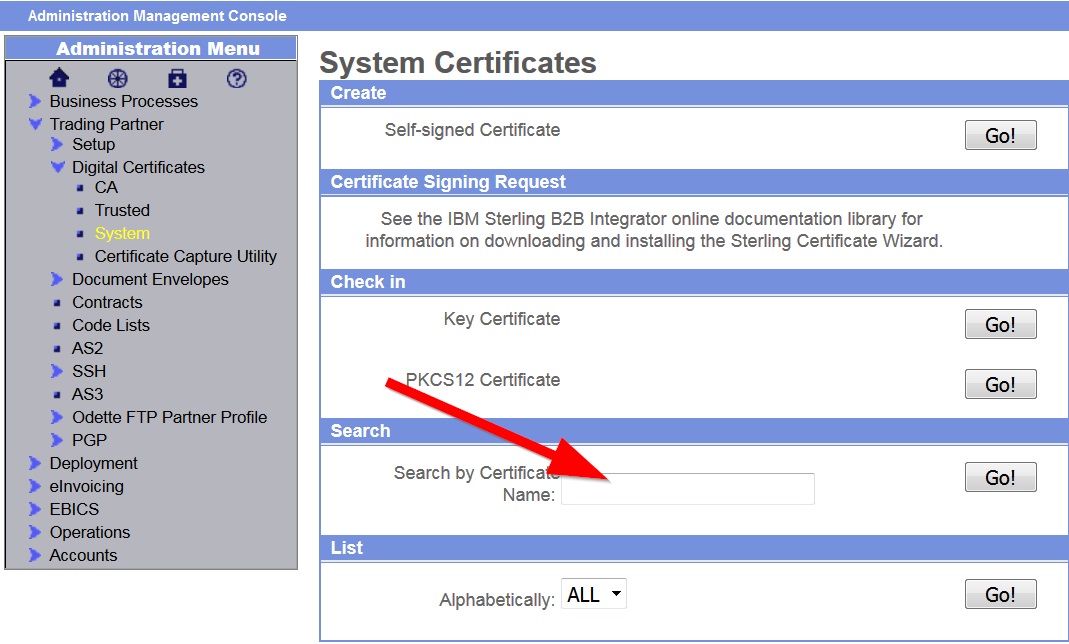
Note that you can use any part of the certificate name in the Search box. For example, if my new certificate is called “Manually exp September 27 2020” I can search for “Manually”, “September” or “2020”. That may help a lot if I had a lot of certificates.
- Then check out the certificate using the “check out” button:
Select Base64 (to create a file with a .cer extension), then save the certificate to a location where it is easy to find.
- Send it to your partner as an e-mail attachment. In the body of the message, I recommend explaining this is your new AS2 certificate, and stating the date, time and time zone when you will replace your old certificate. That way they know exactly when they will need to take action. Also provide your contact information in case the partner wants to discuss it with you.
Note that if you use a time in the middle of the day for your time zone, it is more likely to be during business hours for your partners who are in different time zones.If you are in the US Eastern time zone and you change your certificate at 8 am your time, or if you are in the US Pacific time zone and you change your certificate at 5 pm your time, your partners in other US time zones may not be at work in the event of questions or problems.
- Update your AS2 certificate
- At the stated time, go to Trading Partners > AS2 and search for your Organization profile using Search Profiles by Identity:

B. Edit your partner:

Select the Configure Certificates buttons for both the Exchange and Signing certificates.
- Select the new certificate from the Available column on the left, and click on the arrow to place it on the Certificates Used column on the right. Make sure you only have one certificate selected for the Exchange certificate, and one for the Signing certificate! These certificates are normally the same certificate.

- Test sending and receiving data with each of your partners.
- Migrating your new certificate to production
Once the steps have been completed in a test environment, you can use the same certificate in production as follows:
- On the non-production environment, navigate to the Deployment > Resource Manager > Import/Export > Export screen
Select XML Document
Answer “No” to the question, Do you want to export resources based on a tag name?
Select “Standard” for “Which type of export should be performed on versioned resources?”
Select Digital Certificates then click on Next
Select System Certificates
Select the new system certificate and make sure it appears in the “To Be Exported” section
Create a simple Passphrase that you can type in again on the production environment.
Click on Finish
Click on “Download” and save the file Export.xml to a directory
- Copy the file Export.xml to a directory which you can access from the user interface for your production instance
- Navigate to the Deployment > Resource Manager > Import/Export > Import screen
Browse to the Export.xml file location and select it.
Enter the Passphrase you created when exporting the certificate
Do NOT enter a Tag Name or Description
When prompted “ Some objects being imported may exist in the system. Do you want to update them?” select “Yes”
Select the certificate that was exported from your non-production environment
Finish
- In your production environment, execute the steps in section 3, “Update your AS2 certificate” which are in this document
You should be all finished.
In the event of any problems, please open a case with Support.We will be very happy to assist you with them.
If this blog is helpful, or if you have any suggestions for improving it, please add a comment to the end of it. I will appreciate anything you have to say!
UID
ibm11120527