Technical Blog Post
Abstract
Assigning a Certificate to your AS2 Trading Partner
Body
BEFORE YOU BEGIN: Confirm with your Trading Partner that the new certificate is in place and ready to be used. Once you change the certificate in their profile our software expects that certificate to be used for signing and encryption. I will discuss in another blog posting the "Go Live" option but for the purposes of the following exercise, when you select this new certificate your Trading Partner must be configured on their end to utilize this same certificate
Once you've checked in your trading partner's new certificate, the last step is to select this new certificate in their partner profile. From the dashboard select Trading Partner -> AS2 and in the Search Profiles by Identify section, select Go!

Locate the partner who provided the new certificate to you and click edit.

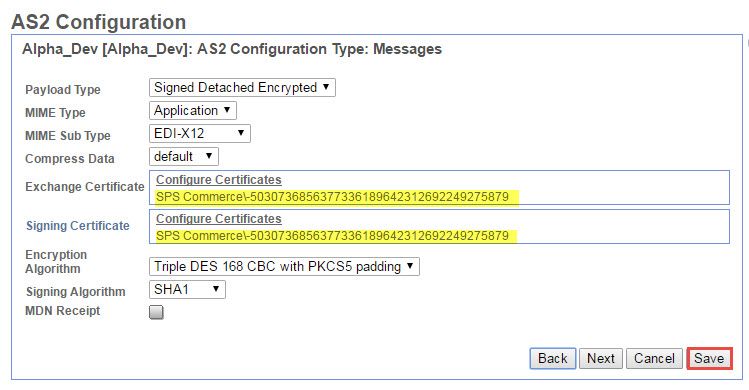
Click Next > until you reach the A2 Configuration Type: Messages screen. Most trading partners use the same certificate for both Exchange and Signing. In the Exchange Certificate field, click the Configure Certificates link (highlighted in yellow).

On the Exchange Certificate screen the left-hand side contains the Available certificates, while the right-hand side shows the one currently in use. At the bottom of this screen it also shows when that certificate will expire. From the Available certificates, locate the new certificate; highlight it and then click the -> arrow to move it to the Certificates Used side.

Next, on the Certificates Used side, highlight the old certificate and use the <- arrow to remove it from the list.

NOTE: It is possible to leave a certificate in the "used" column so long as the "Go Live" dates do not conflict . Typically the old certificate either has expired or will expire soon and your partner has provided you with a certificate designed to replace the previous one.
Once you have the correct certificate in the Certificates Used column, click Save.

You are returned back to the previous screen. Here you should notice that the Exchange Certificate is now showing the new certificate. Next, in the Signing Certificate field, click on the Configure Certificates link

Repeat the steps for selecting the new and removing the old certificate, save the changes and confirm that both the Exchange Certificate and Signing Certificate fields reflect the correct certificate and click Save.
 Then click Finish.

Previous blog posting: Checking in a Trading Partner's Chained Certificate
UID
ibm11121115