Technical Blog Post
Abstract
Dynamic Resource Linking via Business Service Composer (BSC) Project Policies - BSM Solution Development Series and Demo Development
Body
In the previous blog post we walked through the use of the new Business Service Composer (BSC) to create a basic structure model in TBSM to underpin our “BSM Dashboard” content and the navigation model. We took advantage of the BSC’s ability to easily define a static model of resources related to the company, the line of business and how key attributes of a global application such as online order performance and application infrastructure might be rendered in TBSM. Static resources provide nearly the entire needed context to enable the goals and objectives of BSM for a typical end user.
Now that the static resource structure model is in place we need to bring it to life with the actual things blinking green in the datacenter, discovered via an application or network discovery tool, described in a CMDB, etc. and brought into TBSM’s SCR database. Our goal here is to establish a policy based approach to create the relationship between those resources and the unique touchpoint(s) they have with one or more static resources within our structure model(s). No manual point click, point click in the GUI. No stitching together multiple branches and levels using AutoPop rules. No complex SQL queries to group resources using an ESDA rule and multiple repositories.
The power of the policy is that once it’s in place, it’s in place. When 1000 new virtual machines are spun up overnight to support application growth across multiple datacenters and all of their associated application, middleware, system, network, storage or other attributes flood various tools and repositories if you’ve created your policies correctly you’re all set. The web servers go to the right spot. The application servers go to the right spot. The database servers go to the right spot. The links between components are in the right spots. You’re all set, in production, with an accurate structure model underpinning your behavior models, navigation models, content and dashboards. No more waiting for manual change or release process. No more manipulating templates or rules to account for new resources in the datacenter.
Policy pattern descriptions
This section briefly describes each policy pattern provided with the Business Service Composer. The general structure of the input that you must provide for each policy pattern is outlined as well as additional information that aims to outline the appropriate use of each policy pattern.
Note: Each of the policy patterns are named to indicate the action that the Business Service Composer initiates within the Service Component Repository (SCR). When a resource meets the criteria of the policy pattern, it is placed under the static resource to create a relationship between the static resource which is the source of the relationship, and the matching resource which is the target resource. By default, this relationship is interpreted as a dependency from the source resource to the target and is managed with the static resource as a parent of the target resource.
- Placing resources by class: The PlaceByClass policy pattern places all instances of the specified resource class. This policy pattern can be used for a resource class with a low number of instances. For example, common data model (CDM) classes such as those representing CICS Transactions, cdm:sys.zOS.CICSTransaction, often have a very large number of instances that could result in a unmanageable model, if they were all placed under a single parent.
- Placing resources by class and matching attribute criteria: The PlaceByAttribute policy pattern places all instances of the specified resource class when an attribute matches the supplied pattern. Each instance of the PlacebyAttribute policy pattern specifies a single attribute name that identifies the static resource touch point and a single attribute name that is matched against the supplied pattern to locate resources to be placed. If a different attribute must be used in the pattern matching, create another policy pattern instance. All instances are evaluated independently of one another. For example, it is not uncommon for J2EE applications or CICS transactions to be named in a way that helps identify the application that they implement.
- Placing resources by class and matching label criteria: The PlaceByLabel policy pattern is a variation of the PlacebyAttribute policy pattern that matches the supplied pattern against the label, or display name, of the resource in the Service Component Repository (SCR) and TBSM.
- Placing resources that require pattern matching beyond a single attribute: The PlaceByIdentifier policy pattern works similarly to the PlaceByAttribute pattern except that it matches against Service Component Repository (SCR) resource identifier values rather than the attributes of a resource. Because the SCR resource identifiers are generated by an SCR Identifier rule that can output a string and associate it with a resource that is a combination of any number of literals, attribute values, and source tokens of a single resource or any number of related resources, this policy pattern brings a significant amount of pattern matching capability to the Business Service Composer.
- Placing application servers based on their network domain: The PlaceAppServersByFQDN policy pattern places all instances of the specified middleware class when the supplied pattern matches one or more of the fully qualified domain names of the server it runs on. The policy pattern implements the most common mechanisms for accessing all server fully qualified domain names. This includes looking for fully qualified domain names on the related operating system resource, on the related computer system resource, and on the related FQDN objects. The pattern also requires an attribute pattern match against a single attribute of the application server resource. If this condition is not desired, use the wildcard (%) pattern to match any attribute value.
- Placing subsystems based on the subsystem identifier: The PlaceSubsystemsBySMFID policy pattern places all instances of the specified subsystem class when the supplied pattern matches the system identifier of the z/OS system. The pattern also requires an attribute pattern match against a single attribute of the subsystem. If this condition is not appropriate, use the wildcard (%) pattern to match any attribute value.
- Placing subsystems based on the domain name: The PlaceServersByFQDN policy pattern places all instances of the specified computer system class, for example cdm:sys.ComputerSystem, cdm:sys.aix.AixUnitaryComputerSystem, or cdm:sys.windows.WindowsComputerSystem, when the supplied pattern matches one or more of the fully qualified domain names of the server. The policy pattern implements the most common mechanisms for accessing all server fully qualified domain names. This includes looking for fully qualified domain names on the computer system resource, on the related operating system resource, and on the related FQDN objects.
- Reorganizing resources into technology groups within an imported business service: Using the DefineTechGroups and DefineTechGroupsByAttr policy patterns, you can take advantage of deep service model dependency trees to reorganize the structure of a business service model. This allows you to highlight the key technology components upon which a business services depends.
In the previous blog post, we connected to the TBSM SCR database using the CR Viewer tool and were able to see all of the unique attributes of the six systems we loaded via the demo DLA. The picture below shows one of the six systems loaded of the Tivoli CDM class cdm:sys.linux.LinuxUnitaryComputerSystem. Each resource of that class has various attributes used to describe common information about the resource. In our case we made sure that the name of each system captured the functional role that system played in the application’s architecture. The name ‘websvr1’ is available in four different attributes of that class and can then be used in one of the patterns associated with our BSC policy.

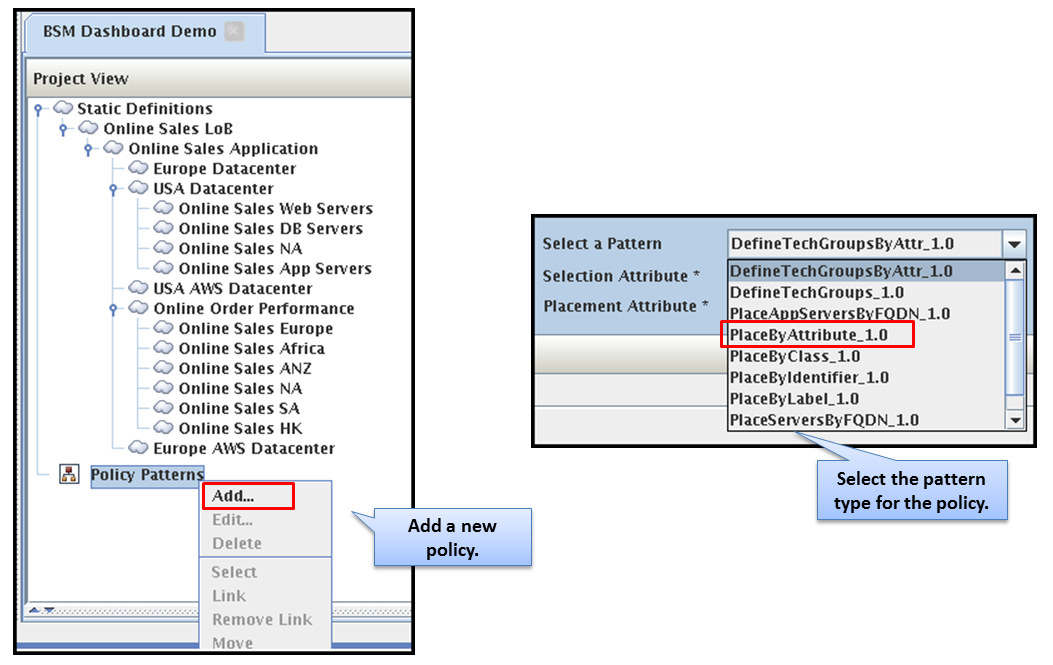
Our first task is to open our existing BSC project and navigate to the Project View panel which contains the Static Definitions we previously created as well as the Policy Patterns section. To add a new BSC policy pattern, right click on Policy Patterns and select ‘Add’. In the Policy Pattern panel we need to select the desired out of the box pattern type to use. In our demo, we’ll be using the PlaceByAttribute_1.0 pattern.
This out of the box pattern ‘PlaceByAttribute_1.0’ is one of the more flexible patterns available when you need to match resources of a given class by a specific attribute. In the picture above showing the CR Viewer details for one of our systems, we see that ‘websvr1’ is available in cdm:Name, cdm:Label, cdm:Fqdn and cdm:ManagedSystemName attributes. Any one of those would allow us to uniquely identify the systems by functional role and map them to a specific static resource.
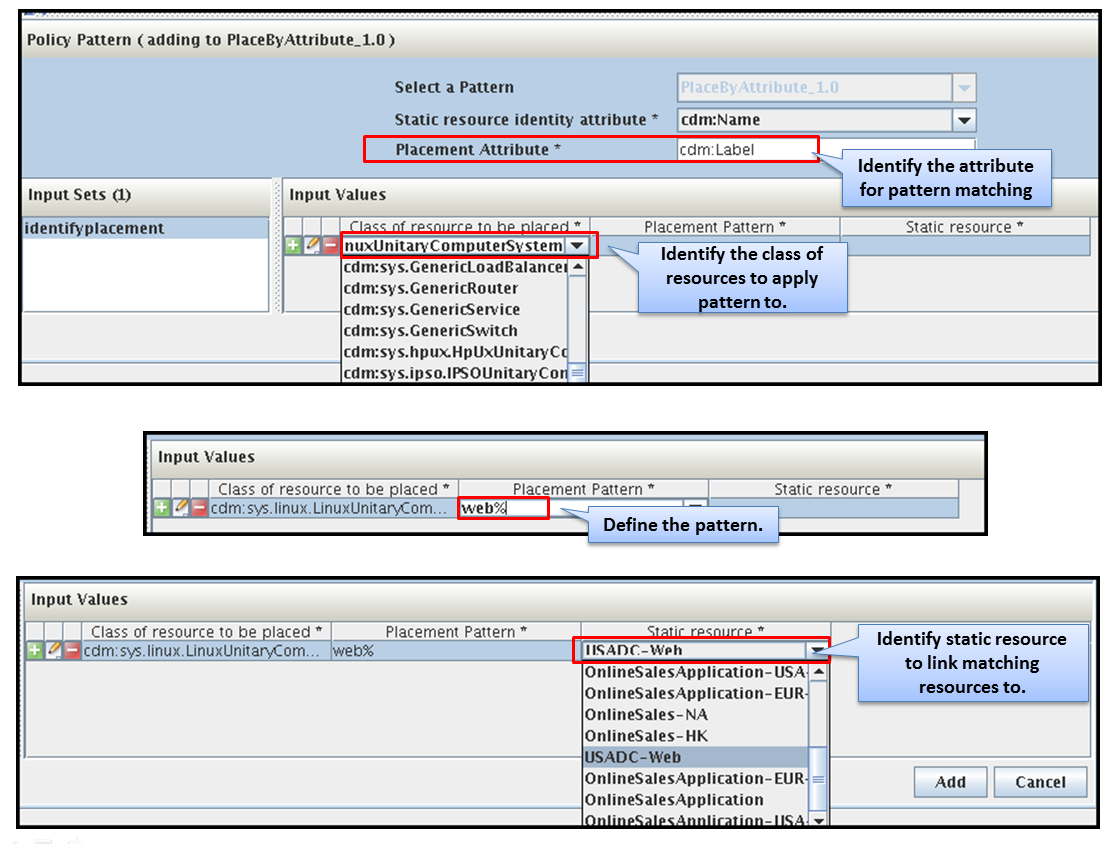
In the Placement Attribute section, enter the attribute we’ll use for matching in our policy rule. In our demo we’ll use the cdm:Label attribute for pattern matching. We could have easily chosen the ‘PlaceByLabel_1.0’ pattern and not had to enter this but using the PlaceByAttribute_1.0 pattern allows us to show how to select a specific attribute in our policy.
Our next task is to identify the specific CDM Class we will use to identify the specific resources within the SCR database. It’s important here to choose the best class and attribute pair. Recall from our CR Viewer use, an attribute such as cdm:Label is so generic that it may appear in many of the classes used to describe resources in the SCR. We’re interested in using the cdm:sys.LinuxUnitaryComputerSystem class and the specific cdm:Label attribute for that class.
Now that we know the class of resources we’re targeting, we need to specify the actual pattern we want to use in evaluating the cdm:Label attribute. In our demo we’ll enter in ‘web%’ as the placement pattern which means that any resources found in the SCR database of class cdm:sys.LinuxUnitaryComputerSystem with the cdm:Label beginning with web will be acted upon. The percentage (%) symbol is a wildcard symbol so in our case ‘web%’ will match both the ‘websvr1’ and ‘websvr2’ resources in the SCR database.
The last configuration step is to select the previously defined static resource that will become the target for all resources matching the placement pattern. For our demo, we’ll be mapping ‘websvr1’ and ‘websvr2’ to the USADC-Web static resource.
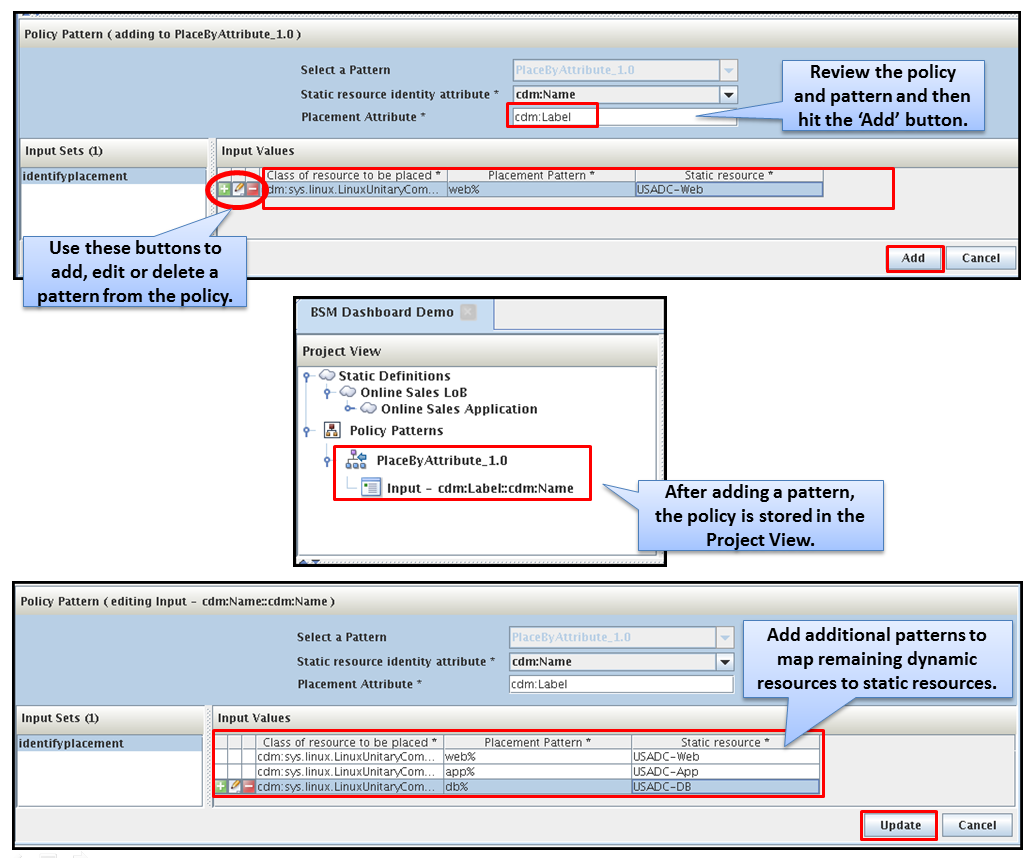
We’ve now defined one unique pattern for our policy that will act upon the two web servers in our SCR database. After clicking the ‘Add’ button the policy pattern is added to our BSC project and can be seen in the Project View panel.
To complete our BSC project we need to add patterns to match the application servers and the database servers. Right click on the policy rule ‘Input – cdm:label::cdm:Name’ located underneath the ‘PlaceByAttribute_1.0’ pattern type. In the Policy Pattern panel Input Values section locate the icons to the left of the existing pattern and press on the ‘+’ icon to add two new pattern rows. Complete one pattern for the application servers and one for the database servers. When completed, click on the add button to add these to the policy.
Once you’ve completed all of your work building the BSC project – HIT SAVE! Saving the BSC project creates a project file within the projects directory which then needs to be loaded into the SCR via the XML Toolkit by running a specific command called ‘loadBusinessComposerDefinitions’. See the previous blog post for more details on this task.
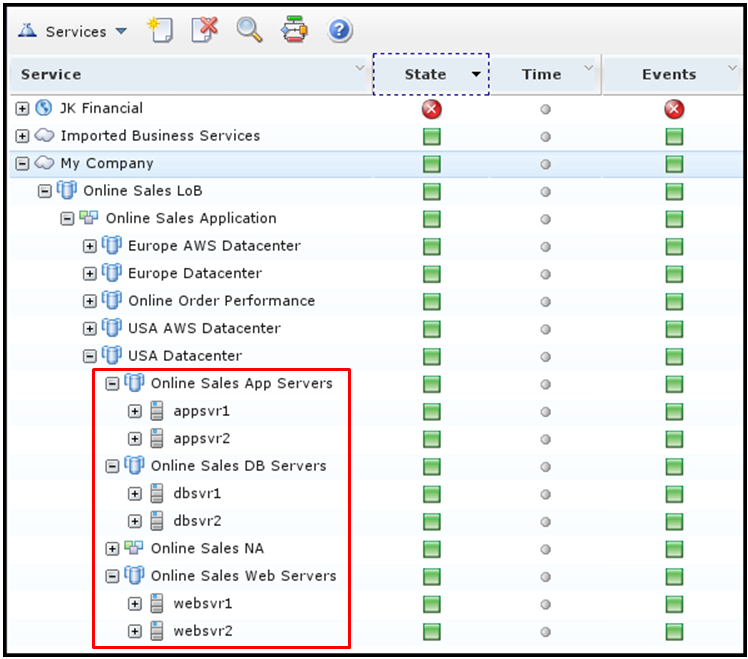
Upon successful BSC project load and processing, the services panel should display a structure model resembling the one shown below.
If things don’t look right or didn’t show up at all you may need to try these things:
- Refresh your browser or log out/log in again.
- Invalidate the ‘Imported Business Services’ or ‘My Company’ instance to force things to reorganize behind the scenes.
- Verify that the ‘ResEnrichReader’ service within Impact is running. You should set this to start automatically on server restart. If it’s not running, start it allow processing to finalize and recheck structure model.
· If things still don’t show up after the BSC project has been successfully loaded and processed you’ll have to troubleshoot the policy and pattern logic you’ve used to ensure it matches what’s in the SCR and for those resources.
I hope this simple example of how we can create pattern based policies that will act upon the attributes of resources in the SCR makes sense and demonstrates the simple yet powerful approach for building and maintaining structure models within TBSM. If you’ve worked with TBSM in the past and experienced the headaches of trying to do this manually or via complex template and rule structures required of AutoPop and ESDAs you should begin to think about how you might exploit this in your environment.
While the example we used to demonstrate the BSC was very Tivoli Common Data Model (CDM) centric, you have the opportunity to define your own version of a CDM that might better represent your environment by using custom namespaces for TBSM. This is only available in TBSM and not something possible in any other Tivoli product. If you wish to integrate with your 3rd party CMDB, internal tool or repository to build structure models in TBSM with that data, you should take the time to create a data model that fits the integration and expected use cases for TBSM in your environment. Using Netcool/Impact’s SCR API the process of getting data into the SCR database from those other sources can be simplified. The following section of the manuals discusses how to create and use a custom namespace (e.g. common data model) for TBSM and the SCR. If you implement something like this the use of the BSC may become even easier within your complex multi-vendor, multi-product environment.
Over the next few posts I will describe the process for designing and implementing the following key components of the BSM Solution and the "BSM Dashboard".
- Creating the "BSM Dashboard" using custom canvas technology.
- Creating a view, page and portlet and catalog for the "BSM Dashboard"
- Creating a more detailed dashboard for a specific geographic area.
- Creating a drill down dashboard page for a functional technology area and location.
- Creating the required template model to allow for the navigation flows from one dashboard to another.
- Discuss behavior models required for placing highly accurate content on the ‘BSM Dashboard’ and drill down dashboard pages.
I look forward to hearing from you!
UID
ibm11276294