Technical Blog Post
Abstract
Creating a Structure Model for the "BSM Dashboard" using the Business Service Composer (BSC) Part 2 - BSM Solution Development Series and Demo Development
Body
Please see part 1 of this blog posting here.
We’ll be creating a new BSC Project for our demo. A BSC Project is the output of the BSC tool and is just a form of a DLA book with expressions of how static instances will be created and how policies will be implemented to act upon other SCR instances. Create a new BSC project as shown below and hit OK.
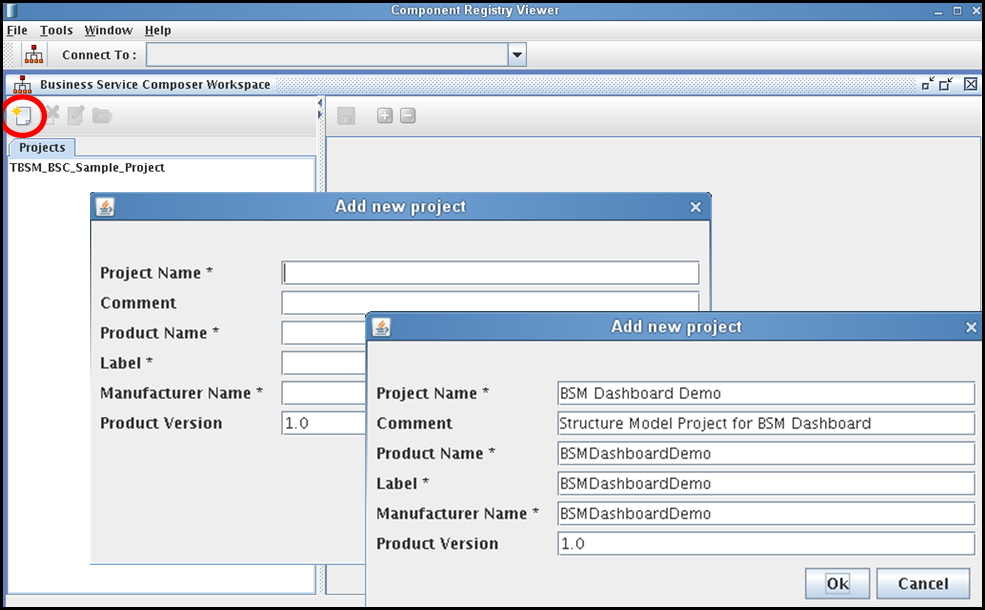
After creating the new BSC project you’ll now be placed in a project workspace tab for that project. All projects are listed under the Projects tab in the left window. If you’re working with multiple projects, each one will be shown in its own project tab in the main area. The BSM Dashboard Demo project tab contains three main areas: Project View, Static Definition and Policy View. We will now work in our project view and create a static definition.
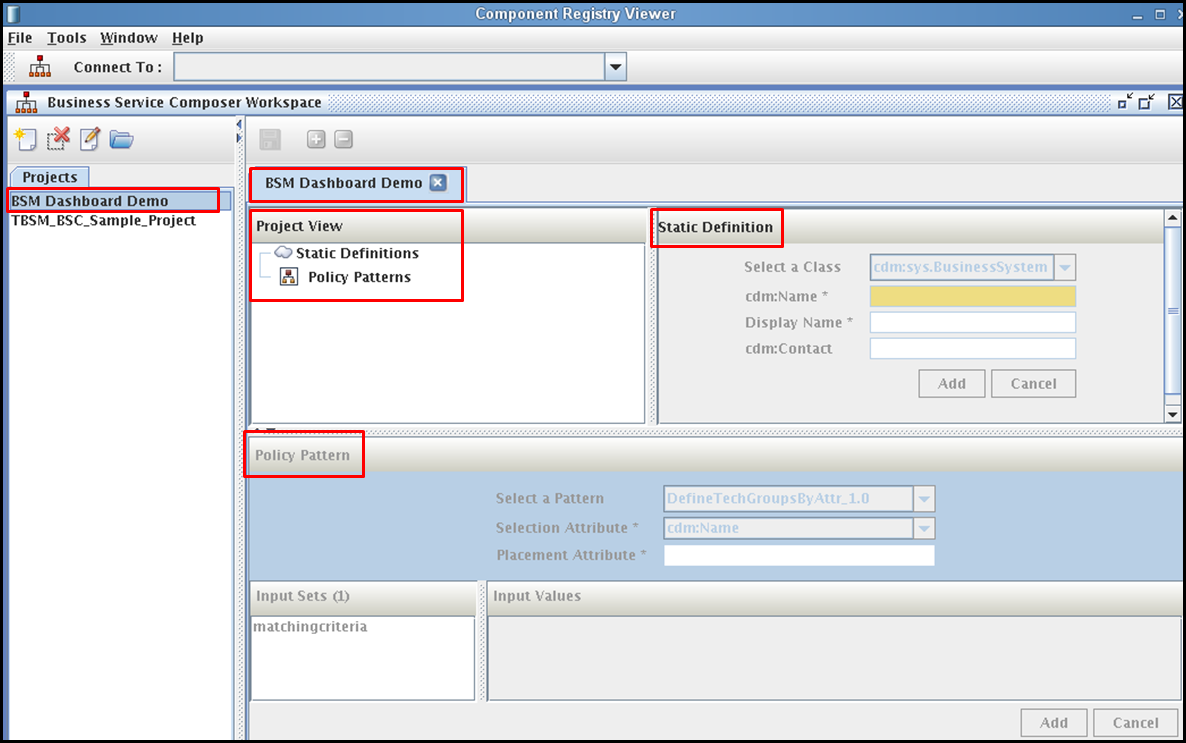
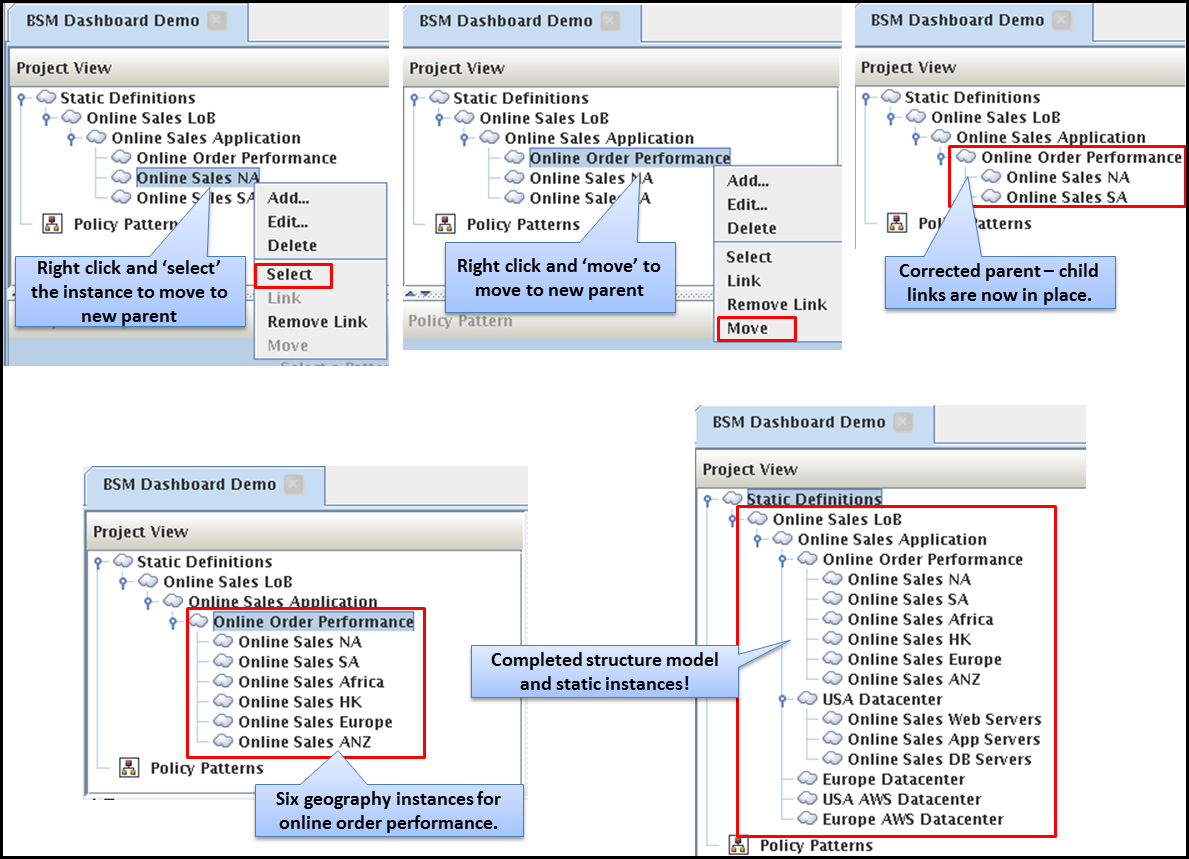
The process to create a new static definition begins by right clicking on the Static Definitions object in the Project View section. A menu will appear with various options applicable to static definition instances. As we do not have any created yet our only option is to ‘Add’ a new one. Click on ‘Add’ and the Static Definition panel will highlight to the right. Our first decision about this static instance is to select from one of three common Tivoli CDM classes that we think are most appropriate for statically created instances. We feel that these will most likely be classified as a Business Service (System), Application or Collection of things.
The first object that we will be creating is a simple representation of the Line of Business organization that owns the Online Sales application. Fill in the cdm:Name field with a unique name for this instance. This is used to uniquely identify the instance within the system. Enter in the desired display name. This would be the name for the object that’s visible in the TBSM service tree. When you’re finished, click on ‘Add’ and you’ve now created the first of our many static instances.
The first object that we will be creating is a simple representation of the Line of Business organization that owns the Online Sales application. Fill in the cdm:Name field with a unique name for this instance. This is used to uniquely identify the instance within the system. Enter in the desired display name. This would be the name for the object that’s visible in the TBSM service tree. When you’re finished, click on ‘Add’ and you’ve now created the first of our many static instances.
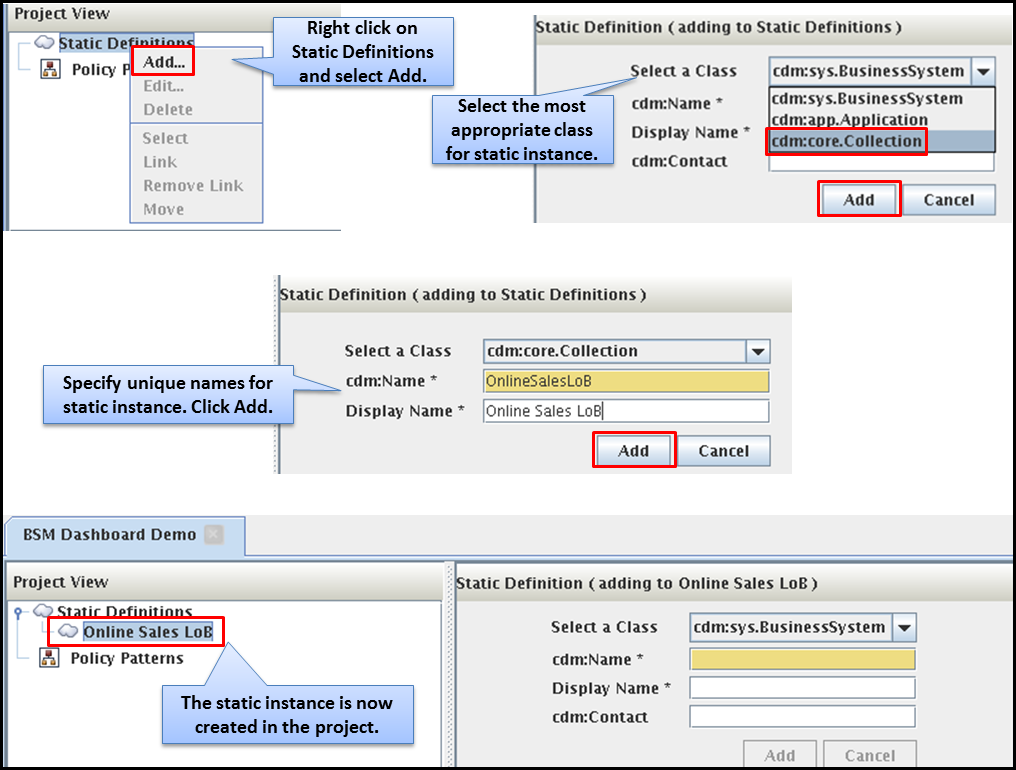
I’d like to point out some key things that have happened within the BSC project workspace. The Static Definitions object in the Project View panel is actually mimicking a parent – child hierarchy model that you should be very familiar with from TBSM. After clicking on the ‘Add’ button for the ‘Online Sales LoB’ static instance, it was placed under the Static Definitions object. (Don’t worry, ‘Static Definitions’ won’t show up in TBSM.) The ‘Online Sales LoB’ is our top level instance. We’ll be creating an anchor point within TBSM for this to connect to at the end of this process.
Notice that after creating the ‘Online Sales LoB’ instance, the Static Definition panel on the right has been updated to state “adding to Online Sales LoB”. This means that any additional static instances created will be linked to the ‘Online Sales LoB’ parent instance automatically.
Our next static instance will be the one representing the actual Online Sales Application. Naturally we want this instance to be linked to the ‘Online Sales LoB’ parent. Click ‘Add’ to create this instance. Notice the updated linking note “adding to Online Sales Application” in the Static Definition panel to the right.
Our next static instance will be a grouping object to organize all of the static instances needed to represent online order performance from our six geographical regions. I’ll call this instance ‘Online Order Performance’ and it will also be a child of the ‘Online Sales Application’ parent.
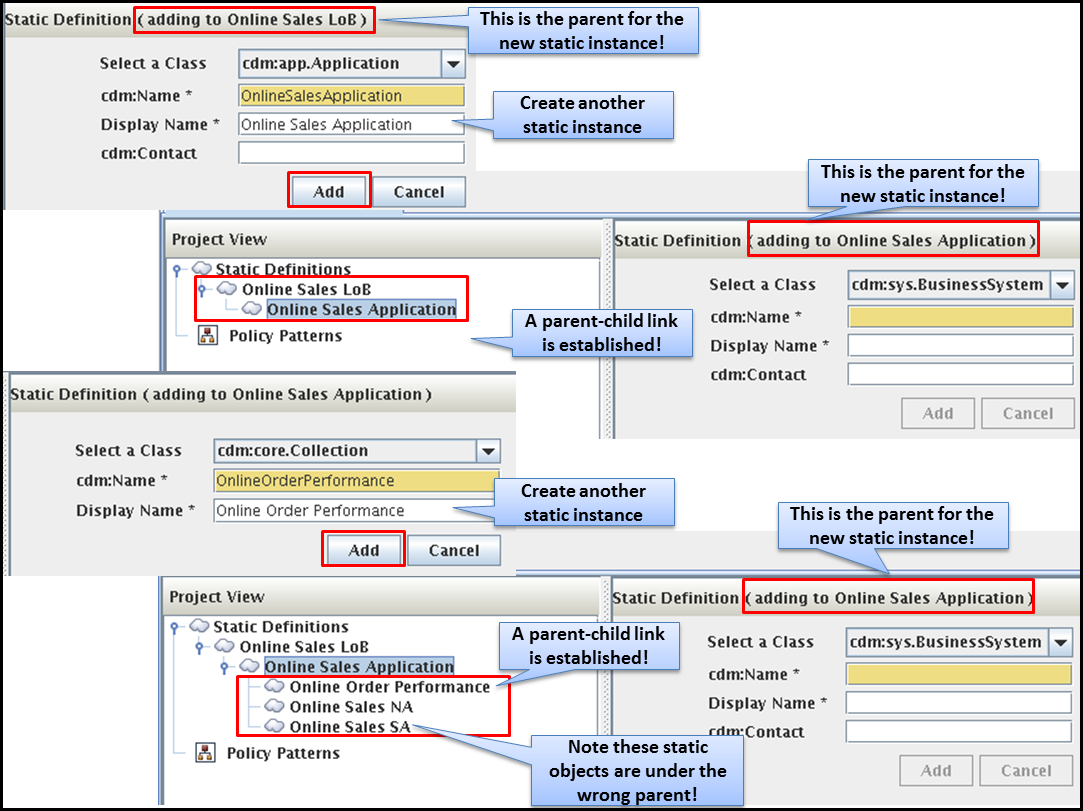
I’ve jumped ahead here as this is a repetitive process that should be straight forward. I wanted to point out a mistake that I made above. If you happen to go into edit mode for a previously created instance within the Project View panel, the linking target will change. Any instances created from then on might be placed under the wrong parent as I demonstrated above with ‘Online Sales NA’ and ‘Online Sales SA’ located under ‘Online Sales Application’ when they should have been under ‘Online Order Performance’.
To correct this we can use the ‘Select’ and ‘Move’ options for the static instance. This begins with a right click action on the static instance that you want to move and choosing the ‘Select’ option in the menu. The next action is to right click on the new parent static instance and choose the ‘Move’ option from that menu. The instance should now be relocated to the desired parent.
Another capability of the BSC is to establish links between one static instance and multiple parent targets. Creating links takes place in a similar manner (not shown) by right clicking on the static instance and choosing ‘Select’ from the menu and then on each desired parent static instance right click and choosing ‘Link’ to create the link. You’ll see multiple copies of that instance in the structure model but there really only is one real instance when brought into TBSM. There will be multiple links (relationship dependencies) for that instance.
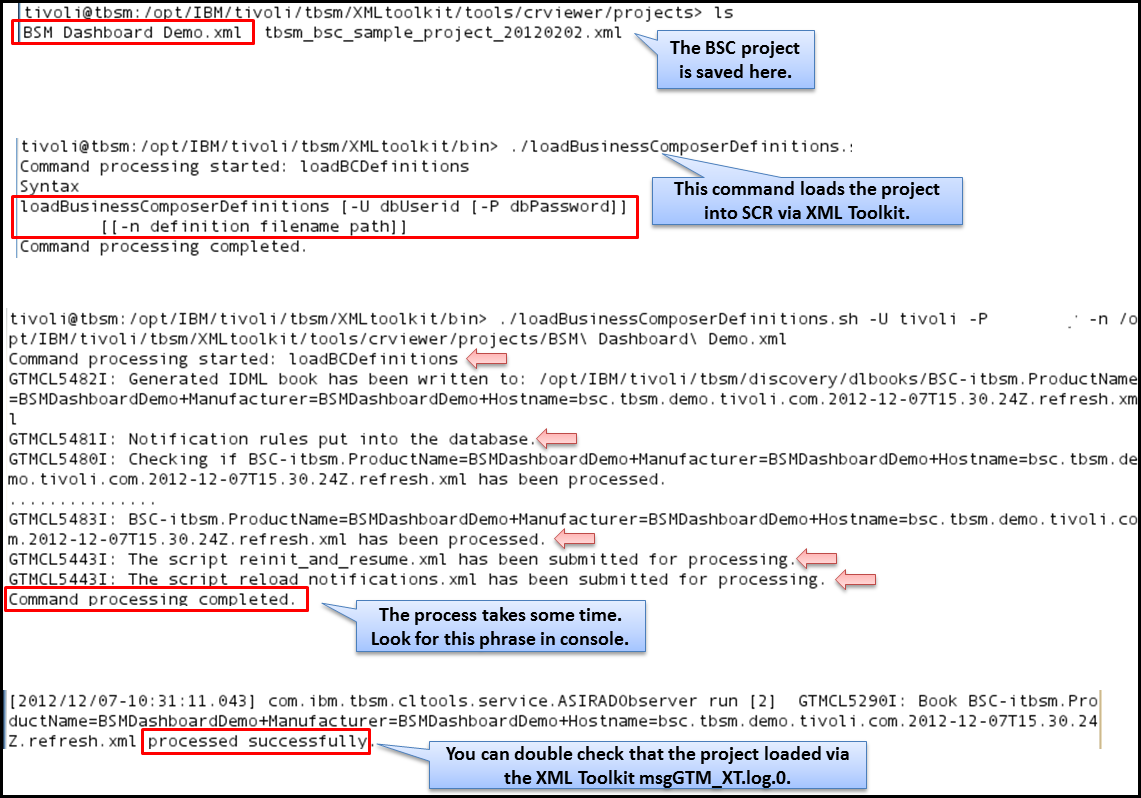
Once you’ve completed all of your work building the BSC project – HIT SAVE! Saving the BSC project creates a project file within the projects directory which then needs to be loaded into the SCR via the XML Toolkit by running a specific command called ‘loadBusinessComposerDefinitions’.
When this command is executed the project file (really just a special DLA book) is moved from the projects directory to the XML Toolkit’s DLA books directory (e.g. /tbsm/discovery/dlbooks) and the normal processing occurs. Simultaneously a notification rule is created in the SCR database. Once the BSC project file has been processed completely the XML Toolkit is reinitialized and the static structure model is instantiated within the SCR and TBSM visible under either the Service Component Repository structure or under the Imported Business Services section.
When this command is executed the project file (really just a special DLA book) is moved from the projects directory to the XML Toolkit’s DLA books directory (e.g. /tbsm/discovery/dlbooks) and the normal processing occurs. Simultaneously a notification rule is created in the SCR database. Once the BSC project file has been processed completely the XML Toolkit is reinitialized and the static structure model is instantiated within the SCR and TBSM visible under either the Service Component Repository structure or under the Imported Business Services section.
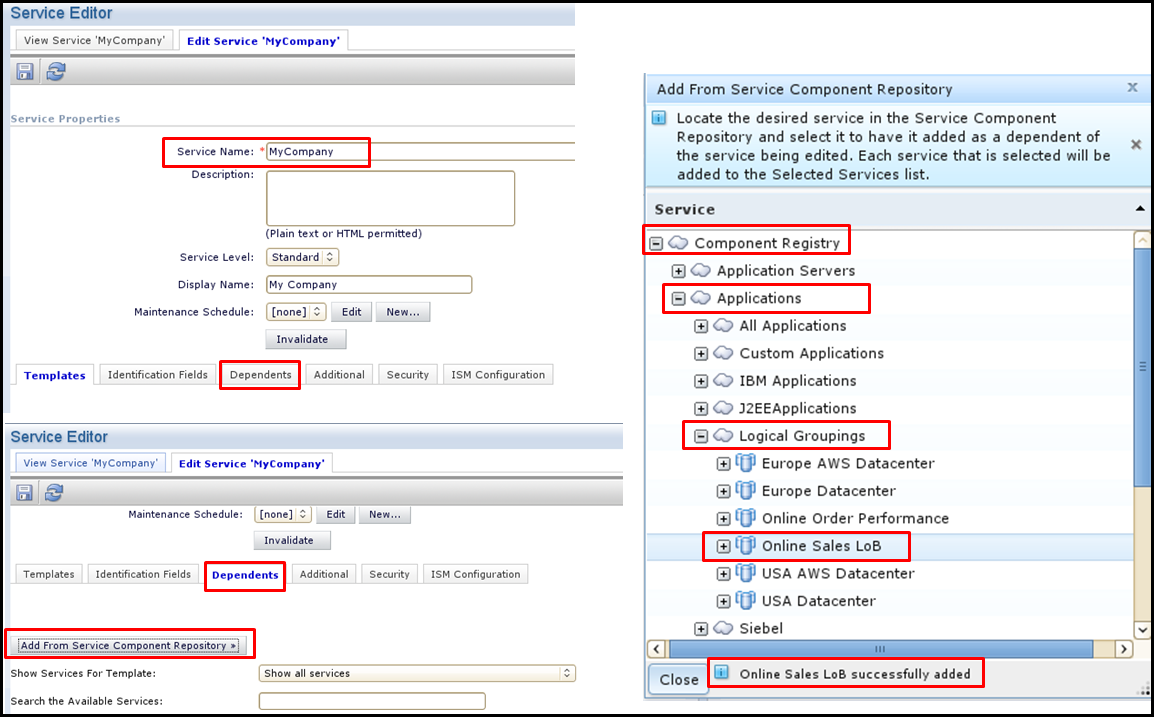
What we need to do next is create an object that will serve as our highest level static instance representing ‘MyCompany’. We could have created this via the BSC but I wanted to show this process via the traditional TBSM GUI. There would have been additional detailed steps required in XML Toolkit configuration files for a business service, application or collection defined in the BSC to automatically show up as a top level instance within TBSM (e.g. not under Imported Business Services).
Create a new service instance called ‘MyCompany’ via the TBSM GUI. Select the ‘Dependents’ tab for that instance and click on the ‘Add From Service Component Repository’ button. This will pop up a box that will allow you to navigate the Component Registry instance hierarchy to find the ‘Online Sales LoB’ instance that we created via the BSC. Click on that instance and add it as a dependent instance or ‘MyCompany’. Save the ‘MyCompany’ instance.
Create a new service instance called ‘MyCompany’ via the TBSM GUI. Select the ‘Dependents’ tab for that instance and click on the ‘Add From Service Component Repository’ button. This will pop up a box that will allow you to navigate the Component Registry instance hierarchy to find the ‘Online Sales LoB’ instance that we created via the BSC. Click on that instance and add it as a dependent instance or ‘MyCompany’. Save the ‘MyCompany’ instance.
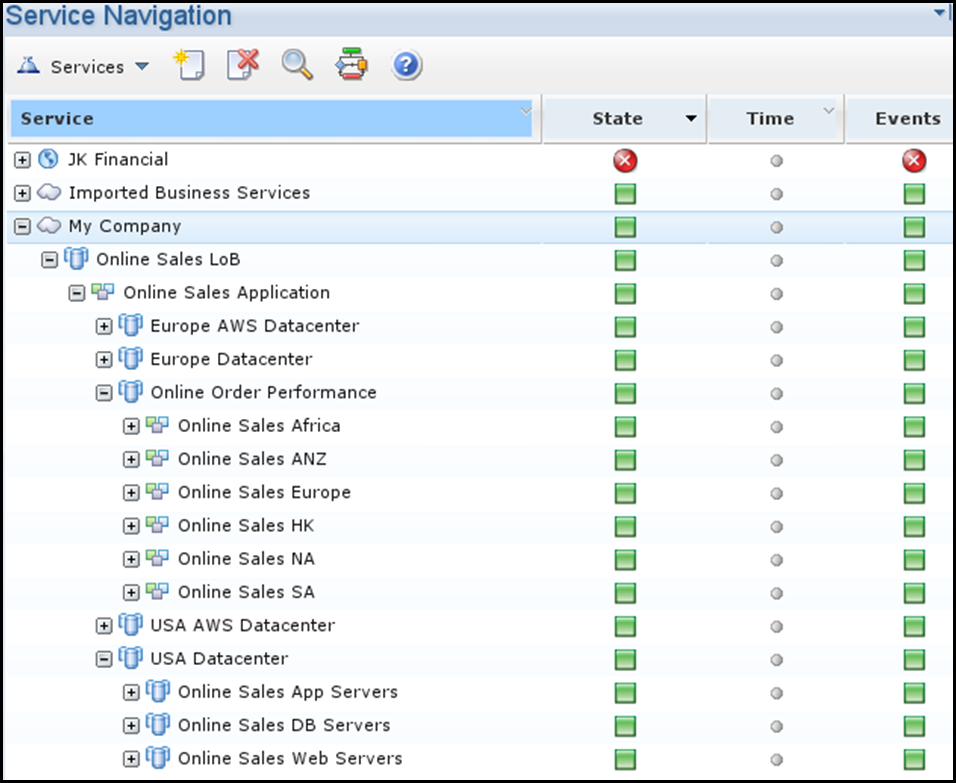
After saving the instance you should have everything in place to get the instantiated structure model. If you don’t see a similar picture as the one below you may need to do one of a few things.
The ‘+’ besides each instance normally means that there’s a dependent instance below. Unfortunately, everything loaded via the XML Toolkit and SCR will have that ‘+’ beside every instance. If you click on the ‘+’ sign and there’s nothing beneath it, the ‘+’ will go away for that session. The tree will expand as expected when there are actual instances beneath. I’m not aware of any fix for this behavior, sorry!
- You may need to just refresh your browser or log out/log in again.
- You may need to invalidate the ‘Imported Business Services’ or ‘My Company’ instance to force things to reorganize behind the scenes.
- Worst case you would have to restart TBSM.
The ‘+’ besides each instance normally means that there’s a dependent instance below. Unfortunately, everything loaded via the XML Toolkit and SCR will have that ‘+’ beside every instance. If you click on the ‘+’ sign and there’s nothing beneath it, the ‘+’ will go away for that session. The tree will expand as expected when there are actual instances beneath. I’m not aware of any fix for this behavior, sorry!
This brings us to a close for this blog posting. Sorry that it was a bit on the long side, but I guess you know by now I’m not known for being short and to the point. We have now created a basic structure model within TBSM that will enable creation of our “BSM Dashboard” in terms of our top level content and navigation into our drill down dashboard pages. Our next step will be to continue with the BSC tool and create policies in the BSC project that will automatically create relationships between dynamic instances found in the SCR (via DLAs) based on CDM attributes and our static structure model instances.
Over the next few posts I will describe the process for designing and implementing the following key components of the BSM Solution and the "BSM Dashboard".
I look forward to hearing from you!
Over the next few posts I will describe the process for designing and implementing the following key components of the BSM Solution and the "BSM Dashboard".
- Creating BSC project policies to associate dynamic technology infrastructure resources to the static structure model instances.
- Creating the "BSM Dashboard" using custom canvas technology.
- Creating a view, page and portlet and catalog for the "BSM Dashboard"
- Creating a more detailed dashboard for a specific geographic area.
- Creating a drill down dashboard page for a functional technology area and location.
- Creating the required template model to allow for the navigation flows from one dashboard to another.
- Discuss behavior models required for placing highly accurate content on the ‘BSM Dashboard’ and drill down dashboard pages.
I look forward to hearing from you!
[{"Business Unit":{"code":"BU053","label":"Cloud & Data Platform"},"Product":{"code":"SSSPFK","label":"Tivoli Business Service Manager"},"Component":"","Platform":[{"code":"PF025","label":"Platform Independent"}],"Version":"","Edition":"","Line of Business":{"code":"LOB45","label":"Automation"}}]
UID
ibm11276270