Technical Blog Post
Abstract
Custom Integrations with Alert Notification – Using Incoming Webhooks
Body
Overview
IBM® Alert Notification Service is a hybrid cloud based solution that allows you to centralize and simplify your notification strategy. It works seamlessly with other cloud based and on premise applications. Alerts are forwarded to Alert Notification using a secure Restful API. Additionally, you can define custom incoming webhooks so you can integrate with virtually anything.
Example – Using Pingdom
For more information about Pingdom, please visit their website: http://www.pingdom.com
Pingdom was setup, configured and tested in under 20 minutes following these steps:
- Create a Pingdom trial or get a full account
- Using Monitoring/Uptime create an HTTPS Uptime Check for one of your websites, and set an interval meaningful to you
- Give the integration a name, and click on the instruction link for webhooks
- At this link you will find a JSON example for the HTTP Check – make a copy and place it in your clipboard.
- Now log into Alert Notification
- Navigate to Integrations, and click on Incoming Webhook
- Click “Create Incoming Webhook”
- Paste the clipboard into the “Sample JSON Validation box” on the right side in Figure C.
- In the left box you must map the source JSON to the Alert Template. The JSON used for this mapping is shown below in Figure A. For a slightly more complex example, see Figure B. The JSON used is also visible on the left side of Figure C.
- Once you have mapped the source JSON, click on the “Validate” button to ensure your mapping is correct (you can learn the syntax by clicking on “Use Example”. See Figure C.
- When the validation is successful (see Figure D), click Save and copy the newly created and unique webhook to your clipboard. The “Incoming Webhook URL” is displayed just below where you specified the webhooks name. And appears similar to the following:

- Paste the Alert Notification incoming webhook from the clipboard into the “URL” field of the Pingdom, Add integration dialog
- The Pingdom configuration is now complete. You can elect to receive Archive Alerts (a.k.a. resolution Alerts) when the test passes, select the “Alert when back up:” checkbox, if this behavior is desired.
- In Alert Notification, press “OK” to complete the Incoming Webhook dialog. If this is your first Incoming Webhook, in the Integration table above, set the “Enablement” of Incoming Webhooks to “On”.
- That’s it! When Pingdom detects an outage at the URL, Alert Notification will receive an Alert. Configure a Notification Policy with rules to notify the proper team and channels when this URL is offline. Alerts generated using this webhook are shown in Figure E. If you look at the History for the selected alert, you can see notifications are being generated including a Slack channel.
Figure A
Simple Alert Template used to map the Pingdom JSON into Alert Notification (you could map more fields in the source JSON, but this will get you up and running).
{
"What":"{{json check_name}} Uptime reporting for {{json check_id}}",
"Where": "{{json check_params.full_url}}",
"Severity": "Critical",
{{#ifCond current_state '==' "DOWN"}}
"Type": "Problem",
{{else}}
"Type": "Resolution",
{{/ifCond}}
"Source": "{{json check_params.header}}",
"ApplicationsOrServices": [ "Pingdom" ]
}
Figure B
This JSON sets and maps a few additional fields, not required. It pulls from the example JSON and adds fields to the Details and includes a URL to Pingdom.
{
"What":"{{json check_name}} Uptime reporting for {{json check_id}}",
"Where": "{{json check_params.full_url}}",
"Severity": "Fatal",
{{#ifCond current_state '==' "DOWN"}}
"Type": "Problem",
{{else}}
"Type": "Resolution",
{{/ifCond}}
"URLs": [ {"Description": "Pingdom URL", "URL": "https://my.pingdom.com"} ],
"Source": "{{json check_params.header}}",
"ApplicationsOrServices": [ "Pingdom" ],
"Details": [ { "Name": "first_probe_ip", "Value": "{{json first_probe.ip}}" }, { "Name": "first_probe_ipv6", "Value": "{{json first_probe.ipv6}}"}, { "Name": "first_probe_location", "Value": "{{json first_probe.location}}"} ]
}
Figure C

Figure D
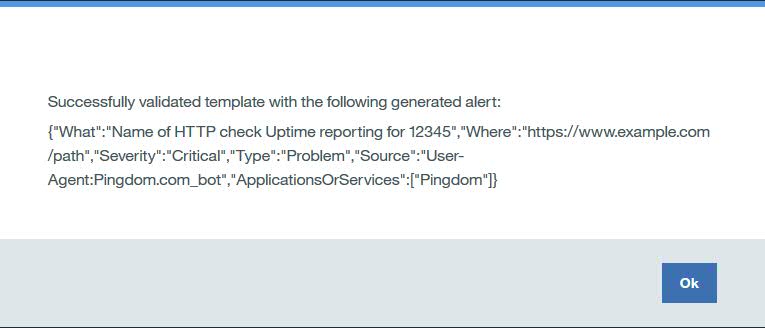
Figure E


Conclusion
IBM's Alert Notification Service provides out of the box integrations with Slack, New Relic and IBM Runbooks. Incoming webhooks provide a simple methodology to integrate with any application or service which can send events/updates to an outbound webhook. Routing these communications to Alert Notification, empowers you to have a single, centralized set of definitions for all your notification needs.
© Copyright IBM Corporation 1994, 2017
Learn more:
Start your free 60 day trial on IBM Cloud Marketplace here:
https://www.ibm.com/us-en/marketplace/alert-notification/purchase#product-header-topu
Find out more about Alert Notification on IBM Bluemix here:
https://console.ng.bluemix.net/catalog/services/ibm-alert-notification/
IBM Knowledge Center:
IBM developerWorks wiki:
UID
ibm11080033