Netcool Operations Insight
Version 1.4
Quick Start Guide
This guide describes a quick and easy way to install the products in the solution.
Solution overview
Netcool Operations Insight helps unify, reduce and prioritize your business service impacting events by using real-time and historical analytics. The included products are listed at http://ibm.biz/ProdOv14.
The Quick Start Guide provides a simple multiserver installation that is useful for a proof of concept or test environment. High-level instructions are given, with links to detailed information.
Step 1: Access the software and documentation

Step 2: Evaluate the hardware and system configuration

Review the system requirements at http://ibm.biz/SysReqsNOI14. A suitable operating system for a test environment is Red Hat Enterprise Linux V6 on 64-bit hardware, on which all the products and components are supported.
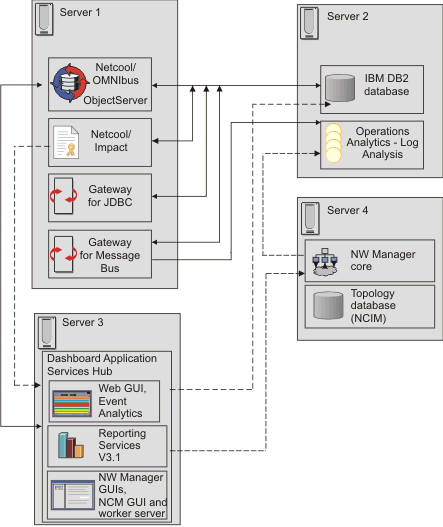
Step 3: Review the installation architecture
Step 4: Install a database or database client

Step 5: Install the products on server 1

- Install the Tivoli Netcool/OMNIbus V8.1 server components, apply fix pack 5, and update the ObjectServer schema. Install Netcool/Impact V7.1 and apply fix pack 4. See http://ibm.biz/BdHTkg.
- Configure the connection to the DB2. See http://ibm.biz/BdHTkh.
- Install the Gateway for Message Bus V7.0 and the Gateway for JDBC. See http://ibm.biz/BdHTkA.
Step 6: Install Operations Analytics - Log Analysis
Step 7: Install the Dashboard Application Services Hub products on server 3
Use Installation Manager to install the underlying GUI framework and the features it provides, for example, Jazz™ for Service Management and Reporting Services. Then, install the packages for the Web GUI and the Insight Pack and Event Analytics extensions. Apply fix packs and configure the communication with Operations Analytics - Log Analysis in the server.init file. Install Event Analytics. See http://ibm.biz/BdHTtd.
Step 8: Optional: Install the Networks for Operations Insight products
- Install the Tivoli Netcool/OMNIbus V8.1 instances of the Probe for SNMP and the Syslog Probe.
- On server 4, install the Network Manager V4.2 core components and create an NCIM database connecting to the DB2 database installed on server 2.
- Install the Network Manager GUI components on server 3 and configure the Network Manager GUI to display menu items that launch Operations Analytics - Log Analysis.
- Install Netcool Configuration Manager V6.4.2 on server 3.
Step 9: Install the Insight Packs into Operations Analytics - Log Analysis on server 2
- Install the OMNIbusInsightPack_v1.3.0.2. See http://ibm.biz/BdHTtm.
- Install the Network Manager Insight Pack V1.3.0.0 and configure the connection to the NCIM database. See http://ibm.biz/BdHTta.
Step 10: Configure the integration

- Configure the mapping between the Gateway for Message Bus and the Tivoli Netcool/OMNIbus Insight Pack. See https://ibm.biz/BdEQaD.
- Optional: Configure the integration between Network Manager and Netcool Configuration Manager. See http://ibm.biz/BdHTte.
- Optional: Configure SSO between servers if needed. See http://ibm.biz/BdHTtp.
Step 11: Get started

More information

For more information about using the solution, see the documentation at http://ibm.biz/BdHTt9.