< Previous | Next >

Task 5: Deploying your ruleset

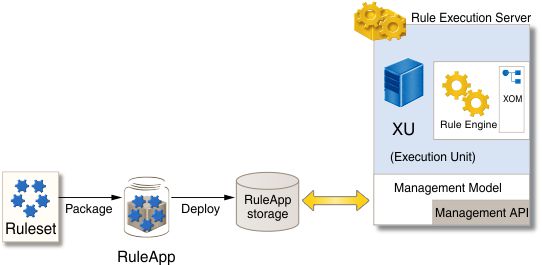
You deploy your ruleset to the Rule Execution Server, which contains the rule engine that runs the rules.

About this task

Your rules are verbalized and tested. You must now integrate the rules into the Miniloan application.

You start by creating a deployment configuration that generates a RuleApp archive. The RuleApp contains a ruleset and uses the format that is expected by Rule Execution Server. In the same way that a Java™ class is packaged in a JAR file, a ruleset is packaged in a JAR file that includes everything that is needed to run the ruleset, including the rules and the ruleflow. You deploy the ruleset in this configuration.

After you create the deployment configuration, you call the integration code in the Miniloan web application to run your new business logic in Rule Execution Server.

Graphic presentation of the deploying process

In this task, you can also test your deployed ruleset by using a hosted transparent decision service (HTDS). After you deploy the RuleApp in Rule Execution Server, you can generate a Web Services Description Language (WSDL) file from your ruleset, and then test it in Rule Designer.

Time This task takes 15-30 minutes to complete.

Step 1: Creating a deployment configuration

About this task

To deploy the rules from Rule Designer, you must create a deployment configuration.

Procedure

  1. Ensure that the sample server is started (see Starting the Miniloan web application).
  2. If you are still in the Operation Map, click return to decision service map.
  3. In the Decision Service Map view, click Create deployment configuration.
    Tip: You can also click File > New > Project and select Deployment configuration.
  4. In the New Deployment Configuration wizard, browse to select the deployment folder my decision service/deployment, and in the Name field, type my deployment.
  5. Click Finish. A message is displayed because the deployment configuration does not reference an operation yet.
  6. Open the Decision Operations tab.
  7. In Configured Decision Operations, click the plus button. Ensure that Select existing decision operations is selected, and then expand my decision service and select my operation.
  8. Click Finish.

Step 2: Enabling ruleset monitoring

About this task

You set properties to enable the monitoring of the ruleset when it runs.

Procedure

  1. Select my operation in Configured Decision Operations.
  2. In the Ruleset Properties, click the plus button to add a property.
  3. In the Name field, type ruleset.bom.enabled, and in the Value field, type true.
  4. Click OK to create a new property for the ruleset.
  5. Repeat steps 1 to 4 to define the properties monitoring.enabled and ruleset.sequential.trace.enabled. Set the values of these properties to true.
  6. Save the changes. You must save your changes before you can deploy the RuleApp.

Step 3: Deploying the ruleset

About this task

You deploy the ruleset from Rule Designer to Rule Execution Server.

Procedure

  1. In Ruleset Version Policy, ensure Increment minor version numbers is selected.
  2. Click the Target Servers tab and click the plus button to define a new target server.
  3. In the Target Server wizard, ensure Create a Rule Execution Server connection is selected and click Next.
  4. In the Name field, type Sample server. In the URL field, enter the following address: http://localhost:<PORT>/res. Enter the correct port number in the URL (see Checking the server port number).
  5. Enter resAdmin as the user name and password.
  6. Click Test Connection. Check that the connection succeeded, and then click Finish.
  7. Save your work.
  8. Open the Overview tab, and click Proceed to RuleApp deployment in the Deployment section.
  9. Select my operation and verify the deployment summary. Click Next.
  10. Check the credentials and click Next.
  11. Check the version summary and click Finish. The Deployment report opens and shows that the deployment was successful.

Step 4: Viewing the deployed RuleApp

About this task

You now view the deployed RuleApp in Rule Execution Server, which is the rule execution environment that has the rule engine. Rule Execution Server handles the management, performance, security, and logging capabilities that are associated with the execution of your rules.

From your application, you access Rule Execution Server by using either web services, Enterprise JavaBeans (EJB), or pure old Java objects (POJO).

Procedure

  1. Click Start > All Programs > IBM > package_group > Sample Server > Rule Execution Server Console.
    Tip: You can also enter http://localhost:<PORT>/res in a browser. Enter the correct port number for the URL.
  2. Sign in to the Rule Execution Server console by using resAdmin as the user name and password.
  3. Click the Explorer tab.
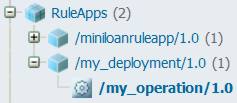
  4. In the Navigator, expand RuleApps, and then /my_deployment/1.0.

    You see that Rule Execution Server contains version 1.0 of my_deployment, which contains version 1.0 of the my_operation ruleset:

    Expanding RuleApps in the Explorer tab
  5. Click /my_operation/1.0 to view the details of the ruleset in the Ruleset View.

    The status of the ruleset is enabled, indicating that it can be run.

    Image shows that the ruleset is enabled for running.
  6. Click the Show Properties link to view the ruleset properties.

    The properties that you added in the previous step are set to true.

Step 5: Running the Miniloan web application with rules

About this task

In the Miniloan web application, you can choose whether the business logic that is embedded in the application is pure Java code or coded in a ruleset. The first time that you started the Miniloan application, you did not have the ruleset, so you ran the application by using the Java code. You can now use your deployed ruleset in Rule Execution Server by selecting the Use Rules check box.

The validateWithJRules method of the Miniloan bean validates the rules.

Procedure

  1. Open a new browser window, and enter the following URL with the correct port number: http://localhost:<PORT>/miniloan-server
  2. Select the Use Rules check box.

    The check box activates the code that runs the ruleset. When you click Validate Loan, the Miniloan web application runs the rules that you deployed to Rule Execution Server. The behavior of Miniloan is the same, except that the business logic now relies on your rules.

  3. Click Validate Loan. The results of the validation are the same:
    The loan is rejected 
    Messages: 
    Too big Debt-To-Income ratio 

    The Rules Execution Summary shows that the eligibility.minimum income rule was run in the rule task miniloan#eligibility.

    A rule is run when the conditions of the rule are met and the actions of the rule are triggered. This rule sets the approved status of the loan to false.

  4. Change the amount to 300000 and click Validate Loan again.

    You now see the following response:

    The loan is approved 
    The yearly repayment is 23 758 

    The loan is approved and no rule is run.

  5. Close the Miniloan web application. You reopen it later to monitor the application.

(Optional) Step 6: Retrieving the HTDS WSDL file

About this task

A hosted transparent decision service (HTDS) is a web service that provides an interface to access a deployed ruleset. The transparent decision service component passes input parameters to the rule engine and accesses the return values. The transparent decision service support includes traceability from transparent decision services to rules, runtime monitoring, and version management.

You retrieve the Web Services Description Language (WSDL) file for the my_operation ruleset from the Rule Execution Server console.

Procedure

  1. In the Rule Execution Server console, ensure that you are still on the my_operation ruleset page, and click Retrieve HTDS Description File.
  2. Keep the SOAP option selected, and then select Latest ruleset version and Latest RuleApp version, and click Download.
  3. Save the WSDL file to <MyEclipseWorkspace>/my decision service and rename it to MyDecisionService.wsdl.

    <MyEclipseWorkspace> refers to your workspace directory on the file system.

    Tip: To import the WSDL file into Rule Designer, you can also use the Import wizard:
    1. On the File menu, click Import.
    2. Click General > File System, and then click Next.
    3. Browse to the folder that contains the WSDL file, and select the file to import.
    4. In the Into folder field, select my decision service, and then click Finish.
  4. Sign out of the Rule Execution Server console.

(Optional) Step 7: Testing the HTDS in Rule Designer

About this task

If you retrieved the WSDL file and saved it to your workspace, you can use Rule Designer to test the web service. In the test environment, you enter test data and call the WSDL operation.

Procedure

  1. In the Rule Explorer, right-click my decision service, and click Refresh.

    The MyDecisionService.wsdl file is displayed in the rule project.

  2. Double-click the MyDecisionService.wsdl to open it in the WSDL editor.

    MyRuleProject is the only operation of request-response type that has an input message, an output message, and a Simple Object Access Protocol (SOAP) fault.

  3. Close the MyDecisionService.wsdl file.
  4. Switch to the Java perspective:
    1. On the Window menu, click Open Perspective > Other > Java (default).
    2. Click OK.
  5. In the Package Explorer, expand my decision service.
  6. Right-click MyDecisionService.wsdl, and click Web Services > Test with Web Services Explorer.
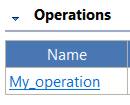
  7. In the Web Services Explorer, under Operations, click My_operation.
    Image shows WSDL binding details.
  8. Enter the following values in the empty fields for the borrower:
    • creditScore: 100
    • yearlyIncome: 70000
  9. Enter the following values in the empty fields for loan:
    • amount: 8000
    • duration: 12
    • yearlyInterestRate: 2.5

    You can expect the loan to be rejected because the credit score is below the minimum limit.

  10. Click Go to call the web service on Rule Execution Server.
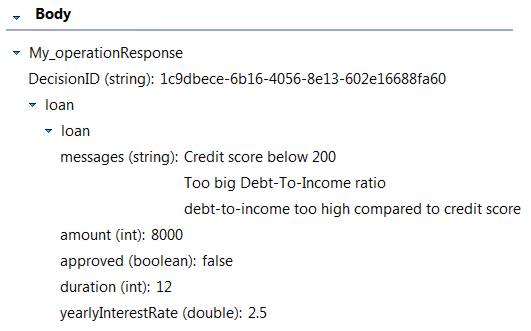
  11. In the Status section, review the response:
    Image shows the WSDL execution results.
  12. Close the Web Services Explorer, and switch back to the Rule perspective.

Results

Your ruleset is now deployed to Rule Execution Server. You tested the ruleset in the Miniloan web application and as a web service. In the next task, you use Rule Execution Server to monitor and audit the execution of the rules.

< Previous | Next >