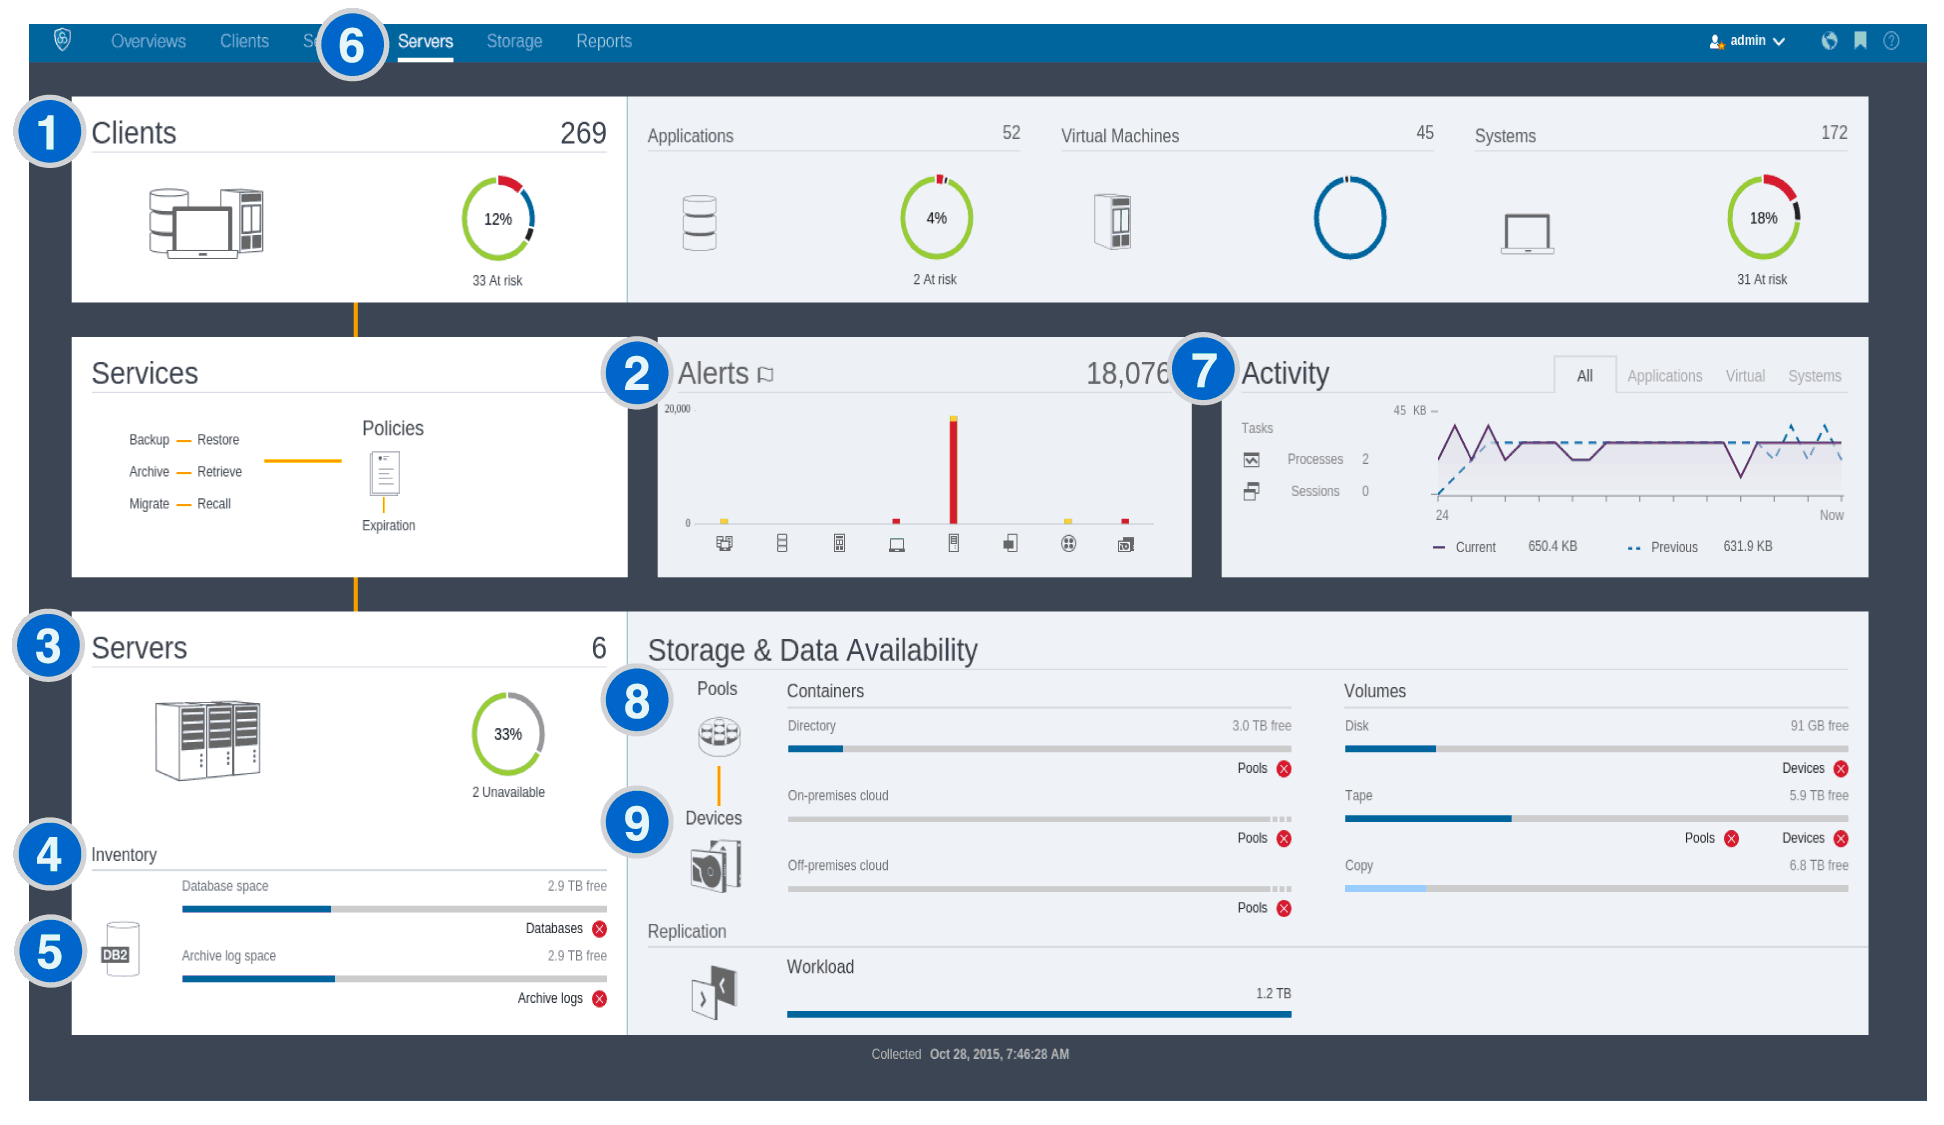
Determine whether clients are at risk of being unprotected due to failed or missed backup operations. Determine whether clients are at risk of being unprotected due to failed or missed backup operations. |
To verify whether clients are at risk, in the Clients area, look for an At risk notification. To view details, click the Clients area. If you installed the client management service on a backup-archive client, you can view and analyze the client error and schedule logs by completing the following steps: - In the Clients table, select the client and click Details.
- To diagnose an issue, click Diagnosis.
|
For clients that do not have the client management service installed, access the client system to review the client error logs. |
 Determine whether client-related or server-related errors require attention. Determine whether client-related or server-related errors require attention. |
To determine the severity of any reported alerts, in the Alerts area, hover over the columns. |
To view additional information about alerts, complete the following steps:- Click the Alerts area.
- In the Alerts table, select an alert.
- In the Activity Log pane, review the messages. The pane displays related messages that were issued before and after the selected alert occurred.
|
 Determine whether servers that are managed by the Operations Center are available to provide data protection services to clients. Determine whether servers that are managed by the Operations Center are available to provide data protection services to clients. |
- To verify whether servers are at risk, in the Servers area, look for an Unavailable notification.
- To view additional information, click the Servers area.
- Select a server in the Servers table and click Details.
|
Tip: If you detect an issue that is related to server properties, update the server properties: - In the Servers table, select a server and click Details.
- To update server properties, click Properties.
|
 Determine whether sufficient space is available for the server inventory, which consists of the server database, active log, and archive log. Determine whether sufficient space is available for the server inventory, which consists of the server database, active log, and archive log. |
- Click the Servers area.
- In the Status column of the table, view the status of the server and resolve any issues:
- Normal
 Sufficient space is available for the server database, active log, and archive log. Sufficient space is available for the server database, active log, and archive log.
- Critical
 Insufficient space is available for the server database, active log, or archive log. You must add space immediately, or the data protection services that are provided by the server will be interrupted. Insufficient space is available for the server database, active log, or archive log. You must add space immediately, or the data protection services that are provided by the server will be interrupted.
- Warning
 The server database, active log, or archive log is running out of space. If this condition persists, you must add space. The server database, active log, or archive log is running out of space. If this condition persists, you must add space.
- Unavailable
 Status cannot be obtained. Ensure that the server is running, and that there are no network issues. This status is also shown if the monitoring administrator ID is locked or otherwise unavailable on the server. This ID is named IBM®-OC-hub_server_name. Status cannot be obtained. Ensure that the server is running, and that there are no network issues. This status is also shown if the monitoring administrator ID is locked or otherwise unavailable on the server. This ID is named IBM®-OC-hub_server_name.
- Unmonitored
 Unmonitored servers are defined to the hub server, but are not configured for management by the Operations Center. To configure an unmonitored server, select the server, and click Monitor Spoke. Unmonitored servers are defined to the hub server, but are not configured for management by the Operations Center. To configure an unmonitored server, select the server, and click Monitor Spoke.
|
You can also look for related alerts on the Alerts page. For additional instructions about troubleshooting, see Resolving server problems (V7.1.1). |
 Verify server database backup operations. Verify server database backup operations. |
To determine when a server was most recently backed up, complete the following steps:- Click the Servers area.
- In the Servers table, review the Last Database Backup column.
|
To obtain more detailed information about backup operations, complete the following steps:- In the Servers table, select a row and click Details.
- In the DB Backup area, hover over the check marks to review information about backup operations.
If a database was not backed up recently (for example, in the last 24 hours), you can start a backup operation: - On the Operations Center
Overview page, click the Servers area.
- In the table, select a server and click Back Up.
To determine whether the server database is configured for automatic backup operations, complete the following steps: - On the menu bar, hover over the globe icon
 and click Command
Builder. and click Command
Builder.
- Issue the QUERY DB command:
query db f=d
- In the output, review the Full Device Class Name field. If a device class is specified, the server is configured for automatic database backups.
|
 Monitor other server maintenance tasks. Server maintenance tasks can include running administrative command schedules, maintenance scripts, and related commands. Monitor other server maintenance tasks. Server maintenance tasks can include running administrative command schedules, maintenance scripts, and related commands. |
To search for information about processes that failed because of server issues, complete the following steps:- Click .
- To obtain the two-week history of a process, view the History column.
- To obtain more information about a scheduled process, hover over the check box that is associated with the process.
|
For more information about monitoring processes and resolving issues, see the Operations Center online help. |
 Verify that the amount of data that was recently sent to and from servers is within the expected range. Verify that the amount of data that was recently sent to and from servers is within the expected range. |
- To obtain an overview of activity in the last 24 hours, view the Activity area.
- To compare activity in the last 24 hours with activity in the previous 24 hours, review the figures in the Current and Previous areas.
|
- If more data was sent to the server than you expected, determine which clients are backing up more data and investigate the cause. It is possible that client-side data deduplication is not working correctly.
- If less data was sent to the server than you expected, investigate whether client backup operations are proceeding on schedule.
|
 Verify that storage pools are available to back up client data. Verify that storage pools are available to back up client data. |
- If problems are indicated in the Storage & Data Availability area, click Pools to view the details:
- If the Critical
status is displayed, insufficient space is available in the storage pool, or its access status is unavailable.
- If the Warning
status is displayed, the storage pool is running out of space, or its access status is read-only.
- To view the used, free, and total space for your selected storage pool, hover over the entries in the Capacity Used column.
|
To view the storage-pool capacity that was used over the past two weeks, select a row in the Storage Pools table and click Details.
|
 Verify that storage devices are available for backup operations. Verify that storage devices are available for backup operations. |
In the Storage & Data Availability area, click Devices to open the Storage Devices table. If a Critical
or Warning
status is displayed for any device, investigate the issue. |
Tip: Devices might have a critical or warning status for the following reasons: - For DISK device classes, volumes might be offline or have a read-only access status.
- For FILE device classes that are not shared, directories might be offline. Also, insufficient free space might be available for allocating scratch volumes.
|