subscribe iconSubscribe to this information

Replacing the cache battery pack on the 2757 controller

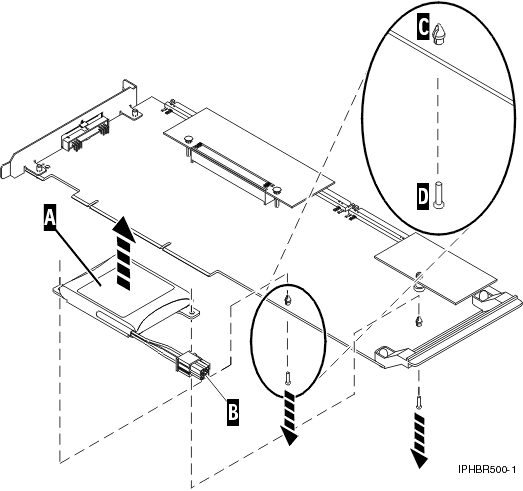
You might need to replace the cache battery pack. Use the procedure in this section to perform this task.

This procedure describes how to replace the cache battery pack on the PCI-X Ultra RAID controller, CCIN 2757. The following feature codes apply to the 2757 controller.

Feature CCIN Description

2757

2757 PCI-X Ultra RAID controller

5581
5591

2757

2757 Controller with Auxiliary Write Cache

Replacing this feature is a customer task. You can perform this task yourself, or contact an authorized service provider to perform the task for you. You might be charged a fee by the authorized service provider for this service.

Important: Removing the cache battery with the system or partition already in a powered-off state might result in the loss of customer data. If the system has been powered off prior to the battery service action, you must IPL to DST and continue this procedure before replacing the battery.

To replace the cache battery pack on the 2757 using the IBM® i operating system, complete the following procedure:

  1. Ensure that the cache battery pack is in an error state before replacing it. This action will prevent possible data loss by ensuring that all cache data is written to disk before battery replacement. To force the cache battery pack into an error state, do the following steps on the system or partition that is using the 2757:
    1. Be sure that you are signed on to the system with at least service level authority.
    2. On the command line, type strsst and press Enter.
    3. On the System Service Tools (SST) Sign On display, type your service tools user ID and service tools password. Press Enter.
    4. On the System Service Tools (SST) display, select Start a Service Tool. Press Enter.
    5. On the Start a Service Tool display, select Hardware Service Manager. Press Enter.
    6. On the Hardware Service Manager display, select Work with resources containing cache battery packs. Press Enter.
    7. On the Work with Resources containing Cache Battery Packs display, select Force battery pack into error state for the I/O card. Press Enter.
    8. On the Force Battery Packs Into Error State display, verify that the correct I/O adapter has been selected and press the function key that confirms your choice.
    9. Return to the Work with Resources containing Cache Battery Packs display and select Display battery information. Then verify that the Battery pack can be safely replaced field indicates yes. If it does not indicate yes, contact your next level of support before continuing this procedure.
  2. Remove the 2757 from its PCI-X slot:
  3. Remove and replace the cache battery pack.
    CAUTION:
    The battery is a lithium ion battery. To avoid possible explosion, do not burn. Exchange only with the IBM-approved part. Recycle or discard the battery as instructed by local regulations. In the United States, IBM has a process for the collection of this battery. For information, call 1-800-426-4333. Have the IBM part number for the battery unit available when you call. (C007)
    Attention:
    • Attach a wrist strap to an unpainted metal surface of your hardware to prevent electrostatic discharge (ESD) from damaging your hardware.
    • When using a wrist strap, follow all electrical safety procedures. A wrist strap is for static control. It does not increase or decrease your risk of receiving electric shock when using or working on electrical equipment.
    • If you do not have a wrist strap, just prior to removing the product from ESD packaging and installing or replacing hardware, touch an unpainted metal surface of the system for a minimum of 5 seconds.
    1. Unplug the battery connector  B  from its connector on the adapter. Squeeze the retaining latch while gently pulling on the plug. The plug connects to the board in only one way, so it cannot be inserted incorrectly during the replacement procedure.
    2. Locate the two plastic rivets  C  that hold the cache battery pack in place. From the back of the adapter, remove the two pins  D  that are installed inside of the rivets.
      Cache battery pack for the 2757
  4. Release the push rivets  C  that secure the battery assembly to the adapter. Push the rivets through the back of the adapter and remove the battery pack  A  from the adapter. If the rivets C cannot be pushed through the back of the adapter, go to step 4a.
    Note: Ensure that the cache battery pack is disconnected for at least 60 seconds before connecting the new battery. This is the minimum amount of time needed for the adapter to recognize that the battery has been replaced.
    If the rivets C cannot be pushed through the back of the adapter, follow these steps to push the rivets out with a ballpoint pen:
    1. Locate a retractable-ballpoint pen.
      Note: A medium-sized retractable-ballpoint pen is preferred or an equivalent item with a small opening can be used. The small opening must be large enough so the pen (or equivalent) will go around the tip of the rivet, but small enough that it does not slide over the rivet and make contact with the battery assembly bracket.
    2. Slide the card off the edge of the work area just enough so rivet  C  can be pushed out of the back of the adapter.
    3. Hold the pen with the ballpoint retracted, place the pen on top of rivet  C , and gently push straight down until rivet  C  pushes out.
    4. Repeat steps 4b and 4c for the other rivet  C .
    5. Remove the cache battery pack  A  from the adapter.
    6. Turn the adapter over and push the rivets  C  back into the adapter.
  5. Install the new battery pack  A  onto the push rivets  C  of the adapter.
  6. Reinsert the pins  D  into the rivets from the back of the adapter.
  7. Connect the cache battery pack connector  B  to the adapter. The plug connects to the adapter in only one way, so it cannot be inserted.
  8. Reinstall the adapter.
  9. Verify that the part is correctly installed.

Send feedback | Rate this page

Last updated: Fri, June 27, 2014