Creating Custom Menu Items
Custom menu items can be created to easily run command syntax files, other applications, or scripts. You can add an item to an existing menu or create an entire menu of your own.
- From the menus choose:
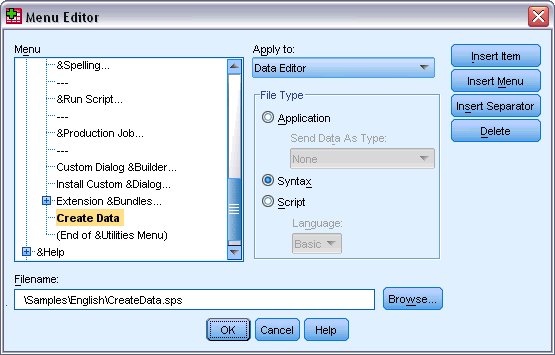
In this dialog box, you can create entire menus, add items to existing menus, insert separators between menu items, or delete menus or menu items.
Figure 1. Menu Editor dialog box 
- Use the Apply To list to select the Window to which your menu item or menu will be added. For this example, select the Data Editor window.
- Double-click Utilities in the Menu list to expand it.
- New menu items are inserted above the currently selected item. So, to add a new item at the bottom of the menu, select the item at the end of the Utilties menu (which contains text in parentheses that indicates this is the end of the menu).
- Click Insert Item and select Syntax.
- Type Create Data as the new item's name.
- Click Browse and navigate to the Samples directory of the installation directory.
- Select CreateData.sps.
Now, when you select this menu item, the command syntax file will be run.
- Click OK to save your changes and close the Menu Editor dialog box.
- From the Data Editor window menus choose:
This runs the command syntax file, which in this example generates a new dataset with 100 cases and 20 variables with normally distributed values.