
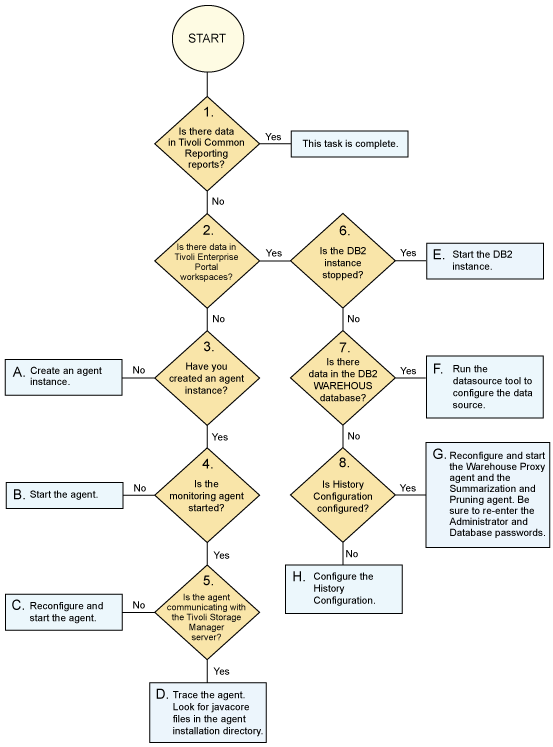
The flowchart provides steps to help guide you through resolving problems with the Tivoli® Common Reporting reports.
Symptom
After you run a Cognos® report, the report does not display data. The report either states that there is no data to be displayed, or an error message is displayed.
No data is available based on your selections.Causes
Several errors might cause data to be missing from the Tivoli Common Reporting reports. The flowchart covers the possible causes and resolutions.
Resolving the problem
Use the flowchart as a step-by-step procedure to diagnose problems where no data is displayed in the Tivoli Common Reporting reports. The diamonds are decision questions to be answered. The boxes are the tasks to complete. Answering Yes or No advances you to the next question or final task. Use the two tables for more information about the question and task. Decisions are numbered 1 - 8, and tasks are lettered A - H.
| Question | Question Explanation | Decision |
|---|---|---|
Decision 1: Is there data in Tivoli Common Reporting reports? |
Log on to the Dashboard Application Services Hub and view any of the Cognos reports in Tivoli Common Reporting. The Cognos reports might display No data is available based on your selections, or An attempt to connect to the data source failed, or some other error. |
If yes, the task is complete. If no, go to decision 2. |
Decision 2: Is there data in Tivoli Enterprise Portal workspaces? |
Start the Tivoli Enterprise Portal, and log on by using the syadmin ID and password. View the workspaces to see whether they contain data. |
If yes, go to decision 6. If no, go to decision 3. |
Decision 3: Have you created an agent instance? |
Start Manage Tivoli Monitoring Services:  
In the Manage Tivoli Enterprise Monitoring Services window, verify that you created and configured a monitoring agent instance for the Tivoli Storage Manager server. |
If yes, go to decision 4. If no, go to task A. |
Decision 4: Is the agent started? |
Start Manage Tivoli Enterprise Monitoring Services:
In the Manage Tivoli Enterprise Monitoring Services window, find the monitoring agent. Look in the Status column to see whether the monitoring agent is started. |
If yes, go to decision 5. If no, go to task B. |
Decision 5: Is the agent communicating with the Tivoli Storage Manager server? |
Start the Tivoli Enterprise Portal, and log on by using the sysadmin ID and password. Review the Agent Log workspace for the monitoring agent. Search for messages like TSM Login Succeeded, or TSM Login Failed. The TSM Login Failed message means that the agent is not connected to the Tivoli Storage Manager server. |
If yes, go to task D. If no, go to task C. |
Decision 6: Is the DB2® instance stopped? |
Verify whether the DB2 instance is started or stopped. |
If yes, go to task E. If no, go to decision 7. |
Decision 7: Is there data in DB2? |
To verify whether there is data in the tables of the WAREHOUS database, follow the steps in Verifying the WAREHOUS data for each report . Find the table that corresponds to the report that you are viewing. Issue the DB2 select statement from the DB2 command window to determine whether there is any data in the table and if the data is current. |
If yes, go to task F. If no, go to decision 8. |
Decision 8: Is history configuration configured? |
Start the Tivoli Enterprise Portal, and log on by using the syadmin ID and password. Click . Click and highlight the Tivoli Storage Manager node. In the Groups column, if there are no rows with the |
If yes, go to task G. If no, go to task H. |
 icon that depicts a running man, the history configuration is not configured.
 | Task | Task Explanation |
|---|---|
| Task A: Create an agent instance. |
To create an agent, see Creating and configuring the agent instance. |
| Task B: Start the agent. |
Start Manage Tivoli Monitoring Services:
In the Manage Tivoli Enterprise Monitoring Services window, double-click the monitoring agent to start it. |
| Task C: Reconfigure and start the agent. |
To configure the agent, see Creating and configuring the agent instance. |
| Task D: Trace the agent. Look for javacore files in the agent installation directory. |
Enable tracing by following the steps in:
Determine whether there are long running queries that can cause no data to be displayed in one or more workspaces by following the steps in Empty workspaces when agent queries run too long. If javacore files are on your operating system, it is an indication that there is a major error when you attempt to start the agent. You can look for files with the word javacore in the file name. Search for these files in the itm directory and its subdirectories. |
| Task E: Start the DB2 instance. |
Start the DB2 database by using the db2start command from the DB2 command window. |
| Task F: Run the datasource tool to configure the data source. |
To reconfigure the data source, see Configuring the WAREHOUS data source. |
| Task G: Reconfigure and start the Warehouse Proxy agent and the Summarization and Pruning agent. Ensure that you reenter the Admin and Database passwords. |
To reconfigure the Warehouse Proxy agent, see Manually configuring the Warehouse Proxy agent. To reconfigure the Summarization and pruning agent, see Manually configuring the Warehouse Summarization and Pruning agent. |
| Task H: Configure the history configuration. |
To configure history configuration, contact IBM® support. |