Importing CICS resource table views
You can import most table views that display a CICS® resource from a file that is being shared with you.
About this task
You can use several methods to import a view.
You can click the Open View Configurations icon ![]() in an open table view, which opens the CICS View Configurations page.
in an open table view, which opens the CICS View Configurations page.
You can use , and an import window is displayed showing all the import wizards. If you type view in the filter box, the CICS Views wizard is selected and is expanded to show Import Views. You can select the wizard and click Next to import the views. However, after you complete the import by using this wizard, the Preferences pane is not shown, so the views that you imported are not listed, and the option to cancel is not available.
The preferred method is to use, , and click Import to import shared views.
This procedure does not apply to the Resource Group Definitions view, Group List Definitions view, and a small number of older-style views, as listed in Changing specific resource views.
Procedure
- The Import Views pane shows a File Location field with two options to locate the shared views files.
- You can browse locally and select the file that contains the shared views that you want to import. Click Open to see the views that are listed in the Import Views pane.
- You can enter an HTTP or HTTPS URL into the field. After you enter a URL, CICS Explorer displays any available views in the Import Views pane.
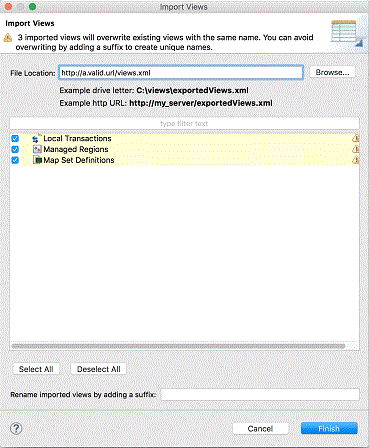 Note: Your views might have the same name as existing views within your CICS Explorer, indicated by the warning message in the Import Views pane and a warning icon
 next to each view that is affected. To prevent your existing views from being overwritten, you can add a suffix to the name of the views you want to import. The suffix option helps you to distinguish the view from others you might receive in the future. An example suffix would be to add the name and date of the sender Pete 20160705, or just the date or name.
What to do next
To open the new view, you can use the corresponding option on the CICS Operations or CICS Definitions menu.