Upgrading SQL Server databases

For SQL Server, initialize new databases and upgrade your existing schemas and data so that your databases work with the new version of IBM® Business Process Manager.
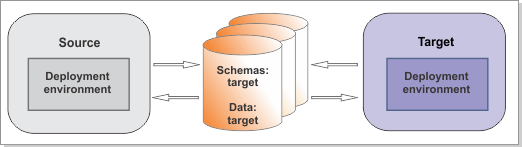
Figure 1. Sample environment after existing schemas and data are updated. The source environment is not running and the databases are not in use. The databases contain updated schemas and data. The target is not running but contains a deployment environment.
The details of the diagram are provided in the figure caption.
Run the DBUpgrade command to modify your existing database schemas and data for use with IBM Business Process Manager V8.6.0. The DBUpgrade utility updates the following items to V8.6.0:
  • System Data toolkit
  • Heritage Process Portal process application
  • Hiring Sample tutorial process application
Important: Although the DBUpgrade utility installs the System Data toolkit V8.6.0, the utility does not automatically update existing dependencies. Therefore, test your applications after migration. If they are not compatible with the new version of IBM BPM, you can update the dependencies so that your applications continue to use the previous version.

Before you begin

Ensure that you have shut down the source environment before you proceed with the migration.

If you are migrating from V7.5.x and you get an OutOfMemory error indicating too many or too large data records, increase the heap size of the JVM for the DBUpgrade command. Open the DBUpgrade.bat file in install_root\bin and find -Xmx2048m in this file. This parameter indicates that the maximum JVM heap size is 2048 megabytes. Increase this value to update the heap size.

Verify that the users that are configured to access your SQL Server databases have the necessary privileges to upgrade the databases. The following database privileges are needed to modify existing SQL Server database schemas and data for use with IBM BPM V8.6.0.
  • The CONNECT and CREATETAB privileges are required on the database level.
  • The upgrade process accesses system tables. Grant the SELECT privilege to the user who performs the upgrade. These privileges are already granted to the public group by default; it is not necessary to grant them again unless they were revoked.
    INFORMATION_SCHEMA.COLUMNS.TABLES
    INFORMATION_SCHEMA.COLUMNS.COLUMNS
    sys.indexes
    sys.sysobjects
  • Do not grant the sysadmin server role to users. If a user has the sysadmin role, dbo will always be the default schema no matter what schema you assign. As a result, migration will use dbo to create new tables or update data.
For a list of supported database versions, refer to the system requirements.

Procedure

For each deployment environment that you are creating, complete the following steps:

  1. Copy the whole folder target_deployment_manager_profile\dbscripts\Upgrade\ to your database computer.
  2. If you did not create a new messaging engine database and instead you plan to reuse your previous messaging engine database and schema, you must manually drop the existing messaging engine tables for each one.
    Tip: The messaging engine table names use the SIB prefix.
  3. On the database computer, upgrade all schemas. To see which schemas are upgraded, go to the directory where you copied the Upgrade folder and see the upgradeSchemaScriptsHelp_de_name.txt file.

    Go to the directory where you copied the Upgrade folder and run the upgradeSchemaAll command. There is a different upgradeSchemaAll command for each deployment environment in the source.

    Important: If you are using Windows Authentication, you cannot run upgradeSchemaAll and must run the SQL scripts directly using an SQL session.
    upgradeSchemaAll_de_name.bat
    You are prompted to enter the user name and password for each database connection. This command initializes the new database components and upgrades the schemas of all the existing databases except for the Process Server and Performance Data Warehouse databases. Those two databases are upgraded later by the DBUpgrade command.

    Alternatively, if you want to run the SQL scripts manually, use an SQL session and run the scripts in the sequence listed in the Upgrade_folder\upgradeSchemaScriptsHelp_de_name.txt file and use the following parameters and commands.

    osql -e -b -U username -P password -i script_name -o log name
    where:
    • -e specifies that the command is to be echoed on prompt
    • -b specifies that the script is to exit when errors occur
    • -U specifies the user name
    • -P specifies the password
    • -i specifies the input file
    • -o specifies that all output is to be redirected to a file

    You might see warning messages when you run the scripts to upgrade the Business Space database telling you that the result of a query is an empty table or that no row was found for FETCH, UPDATE, or DELETE. These messages can safely be ignored.

    The result.log files are found in Upgrade_folder\cell_name or cell_name.de_name\database_type\database_name.schema_name.

  4. Copy the sample migration.properties file and rename it to target_migration.properties. Update the file with the configuration information for the target environment. Check all the target properties and edit them if required, following the instructions in the sample file. The sample file is in install_root\util\migration\resources\migration.properties.
    Specify target environment values for the following properties:
    • admin.username and admin.password: Use the cellAdmin user or the WebSphere primary administrative user name.
    • bpm.home: The installation root of your target product. Make sure that the file separators are forward slashes (/). Use the full path. Do not use the tilde character (˜) to stand for the home directory. For example:
      bpm.home=/opt/IBM/BPM
      bpm.home=C:/IBM/BPM
    • profile.name: The target deployment manager profile.
    • target.config.property.file: The full path of the configuration properties file that you used to create your target environment.
    You must specify the source cluster names, not target cluster names, for the following properties:
    • source.application.cluster.name
    • source.messaging.cluster.name
    • source.support.cluster.name
    • source.web.cluster.name
  5. To upgrade the databases to V8.6.0, run the DBUpgrade utility on the deployment manager computer in the target environment. The DBUpgrade command automatically upgrades the schema and data for Process Server and Performance Data Warehouse.
    Tip: By default, DBUpgrade upgrades both the schema and data for Process Server and Performance Data Warehouse databases. For instructions for running the schema update separately, see the DBUpgrade troubleshooting topic.
    Important: Ensure that your deployment manager and all the managed nodes in the source environment have been stopped before running this utility.
    install_root\bin\DBUpgrade.bat -propertiesFile target_migration_properties_file
    where:
    • target_migration_properties_file is the full path to the migration properties file in which you specified the configuration information for the target environment.
    For example:
    install_root\bin\DBUpgrade.bat -propertiesFile "C:\BPM V8.6.0\util\migration\resources\target_migration.properties"
    The command displays each database upgrade action as it runs. After all the upgrades are finished, you see a message similar to the following message:
    All upgrade steps have been completed successfully.

    The log location is listed in the output. If there are errors or exceptions, they appear in the log.

    If you are migrating from 7.5.x and you get an out-of-memory error indicating too many or too large data records, you can try to increase the heap size of the JVM for the DBUpgrade command. Open the DBUpgrade.bat file in install_root\bin and find -Xmx2048m in this file. It indicates that the maximum JVM heap size is 2048 megabytes. You can increase this value to update the heap size.

    For troubleshooting, the DBUpgrade command has new parameters in V8.5.7 CF2016.09. If necessary, you can run DBUpgrade -generateSQLOnly to generate the SQL files without running them. You can then edit the generated SQL files manually and run DBUpgrade -omitSQLGeneration to upgrade the database using the modified files.

What to do next

You might see warning messages similar to the following in the upgrade log: Couldn't load Resource META-INF*****. These messages can safely be ignored.