Troubleshooting
Problem
How do I use QFlow to detect and identify systems in your network that generate SMBv1 traffic?
Cause
SMBv1 traffic is associated with ransomware propagation and is generally considered obsolete.
Environment
Any QRadar® version that uses a QFlow Collector connected to a SPAN/TAP port. Using the application signatures file, you can create content and IP address based detection rules that assign custom application IDs to flows that QRadar does not automatically detect.
Resolving The Problem
To configure your QFlow to be able to specifically detect SMBv1 versus SMBv2 traffic, you need to modify signatures.xml with custom signature stanzas. This update allows users to identify flows detected by using a SMBv1 or SMBv2 protocol header in the Network Activity interface.
UPDATE: A flow can be associated with multiple signatures. When a flow is mapped to an application ID, this is done based on the signature order in the file. The first signature that applies in the file is assigned to the flow. In this procedure, administrators need to place the new stanzas at the top of the signatures XML file. This prevents the flow from generating multiple detections for IDs 1014 and 1021.
Procedure for QRadar 7.4.3 and newer
Steps for adding SMB applications through API:
- Log in to the QRadar GUI.
- Click the menu marked with 3 lines in the upper left and go to Interactive API for Developers.
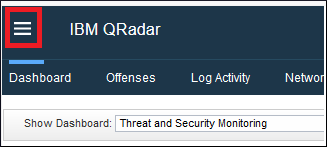
Alternatively, you can open https://<ConsoleIP>/api_doc . - Select API version 16.0
- Scroll down and expand staged_config/flow/applications/active applications.
- Click the Post tab at the top middle.
- Scroll down and in the first body field paste this snippet:
{ "level_one": "DataTransfer", "name": "DataTransfer.SMBv1_WindowsFileSharing", "level_two": "SMBv1_WindowsFileSharing", "id": 15001, } - Scroll down and click Try It Out!
Expected result: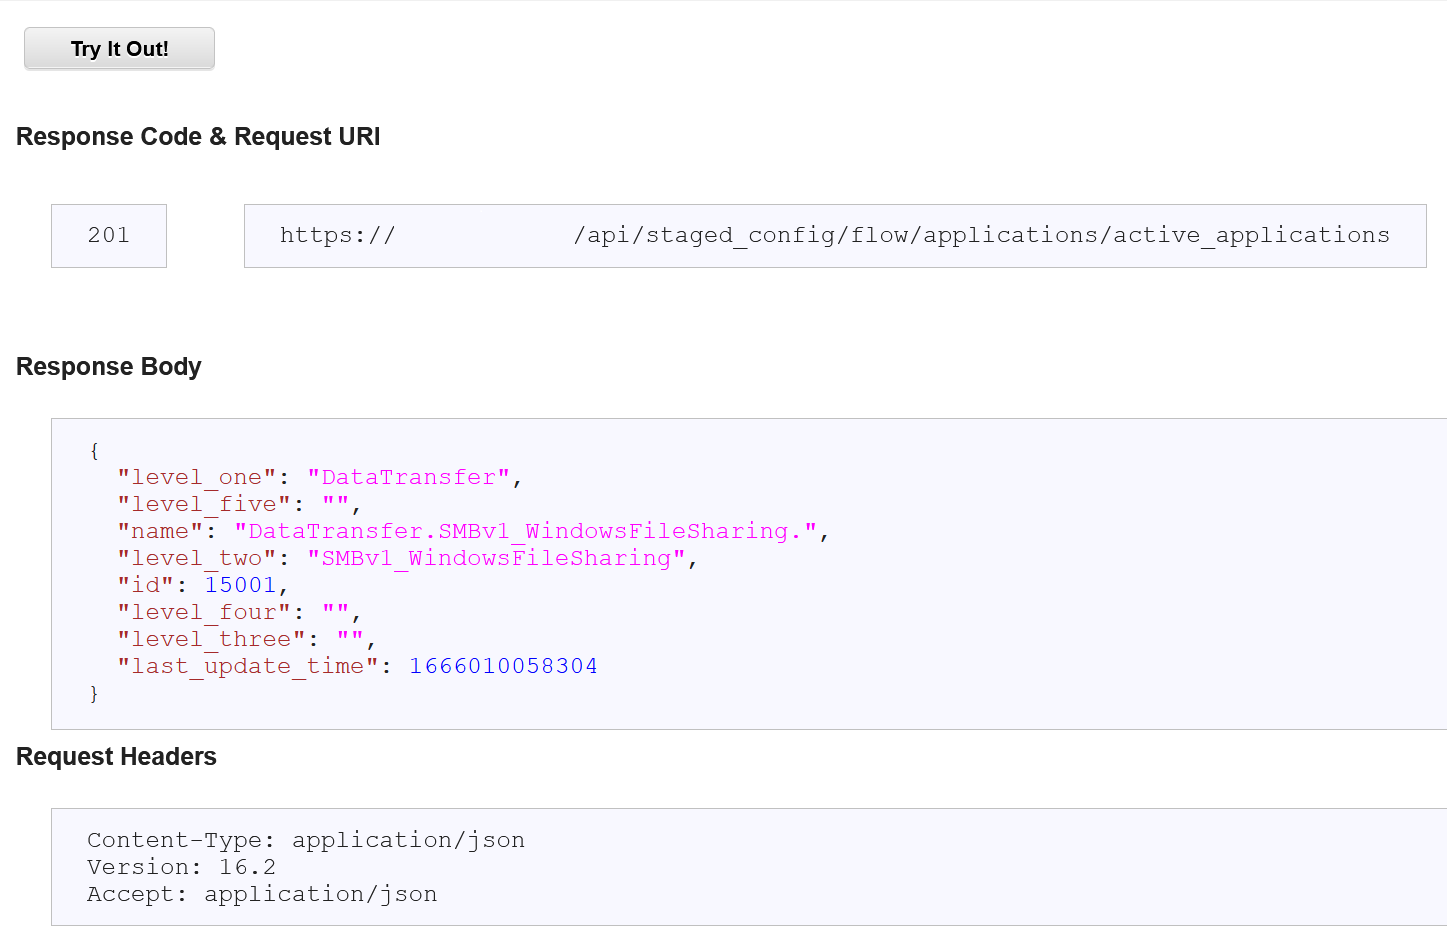
- If it is successful, then scroll up, remove what was in the first body, and paste this snippet:
{ "level_one": "DataTransfer", "name": "DataTransfer.SMBv2_WindowsFileSharing", "level_two": "SMBv2_WindowsFileSharing", "id": 15002, } - Scroll down and click Try It Out!
Expected result: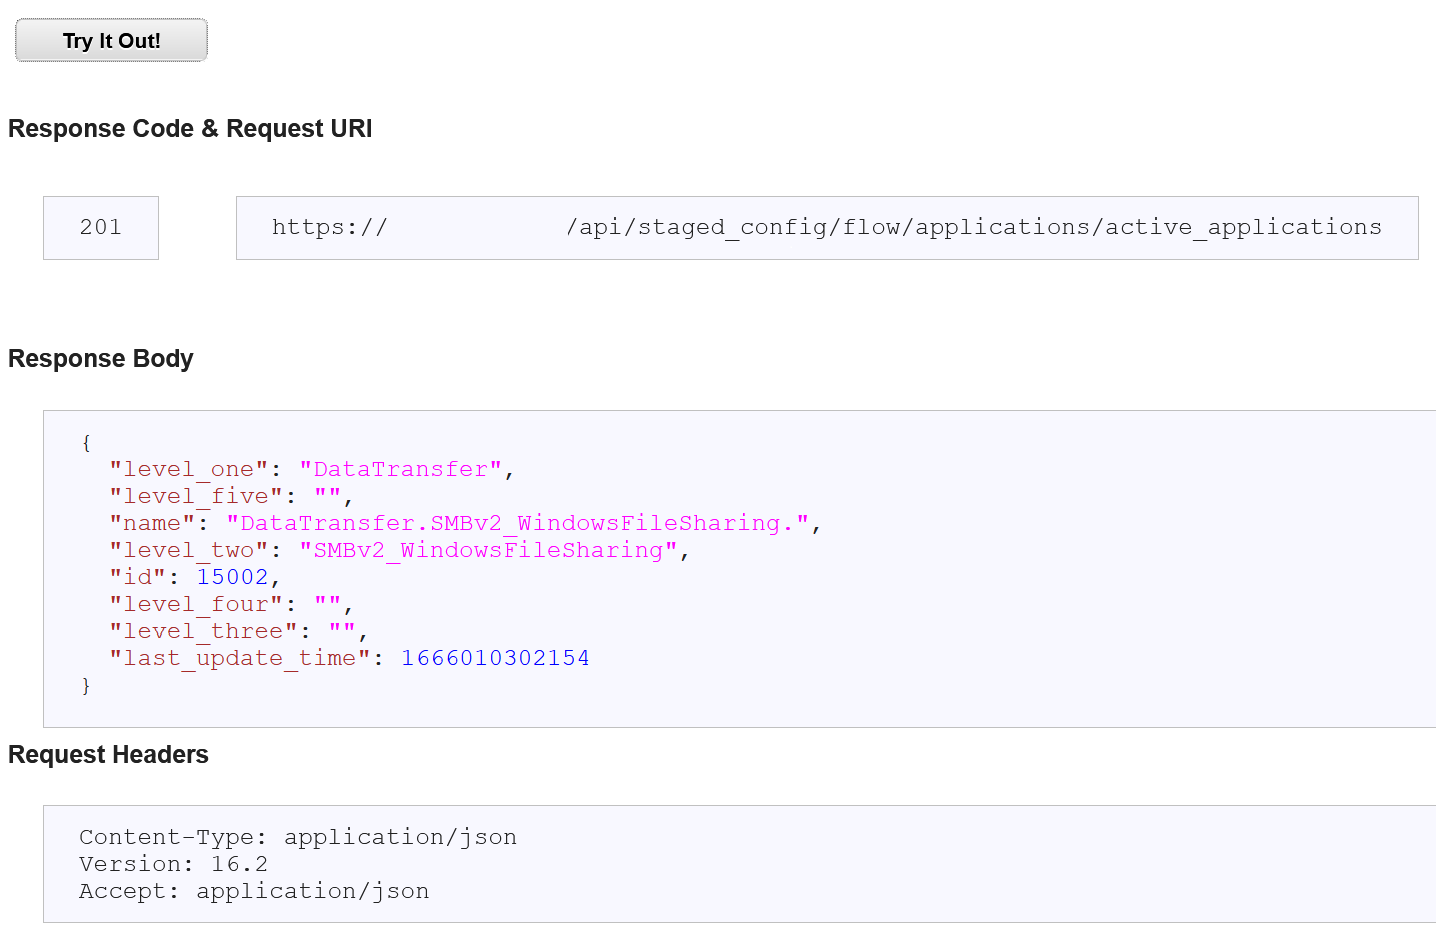
- Run this command to confirm whether the apps are added in the staging file:
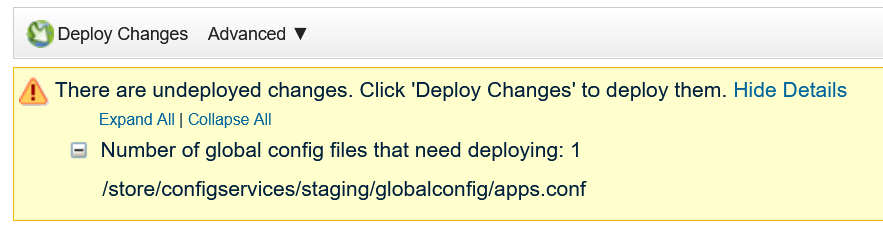
Expected output:cat /store/configservices/staging/globalconfig/apps.conf | grep SMB[root@qr743 ~]# cat /store/configservices/staging/globalconfig/apps.conf | grep SMB DataTransfer#SMBv1_WindowsFileSharing####15001 DataTransfer#SMBv2_WindowsFileSharing####15002 Protocols#SMB####536871063 [root@qr743 ~]# - Click Deploy Changes.
- When the deployment is completed successfully, check whether the apps are added:
cat /opt/qradar/conf/apps.conf | grep SMBExpected output:
[root@qr743 ~]# cat /opt/qradar/conf/apps.conf | grep SMB
DataTransfer#SMBv1_WindowsFileSharing####15001
DataTransfer#SMBv2_WindowsFileSharing####15002
Protocols#SMB####536871063
[root@qr743 ~]#
For more information, see: https://www.ibm.com/docs/en/qsip/7.4?topic=mappings-defining-new-applications
For QRadar versions 7.4.2 and older
This procedure allows QRadars Network Activity tab to identify SMBv1 and SMBv2 traffic from the Application column of the user interface.
- Use an SSH session to log in to the QRadar Console.
- Navigate to: /store/configservices/staging/globalconfig
cd /store/configservices/staging/globalconfig - To back up signatures.xml, type the following command:
cp -vp /store/configservices/staging/globalconfig/signatures.xml /store/configservices/staging/globalconfig/signatures.xml.bak - Open the file in any text editor or right-click and select Save as from your browser: QRadar_SMBv1_2_signatures.xml.
Important: This file contains four new signatures to detect SMBv1 and SMBv2 in flows. The contents of this file must be added to signatures.xml on your QRadar appliance; however, do not copy the first line of the XML 1.0 header from the file, as you require only the signature elements. The QRadar signatures.xml on the Console appliance already contains an XML 1.0 header line. - Copy the four signature stanzas from the XML file to customize your signatures.xml to notepad or equivalent text editor. The new stanzas appear as the first signatures in the file. This ensures that the new signatures for 15001 and 15002 are identified properly, since the file is read in order from start to end.
NOTE: There are four signatures, which account for SMBv1 and SMBv2 as well as SRC and DST for each protocol. If users decide to introduce more signature values, they need to ensure that the sigid element <sigid> uses the proper numeric range.
Reference for <sigid> reserved values:- Sigid values in the range of 1000 to 1999 are reserved for QRadar development team updates.- Sigid values in the range of 2000 to 2999 for support team updates and technical notes.- Sigid values in the range of 3000+ are reserved for customer use. - Using vi editor (or your Linux editor of choice), edit /store/configservices/staging/globalconfig/signatures.xml
- Copy the four custom signatures stanzas to signatures.xml
- To save your changes, type:
esc :wq - Navigate to the file /store/configservices/staging/globalconfig/apps.conf
For example,cd /store/configservices/staging/globalconfig/apps.conf - To backup apps.conf, type the following command:
cp -p /store/configservices/staging/globalconfig/apps.conf /store/configservices/staging/globalconfig/apps.conf.bak - Using vi editor open apps.conf and search for the line that starts with DataTransfer#lockd####60068.
NOTE: To locate this line, type this command at the vi prompt:/DataTransfer#lockd####60068 - Add two SMB Protocol lines between DataTransfer#lockd####60068 and DataTransfer#Microsoft-ds####60142.
For example, the text below displays the order of lines in your updated apps.conf file:DataTransfer#lockd####60068
DataTransfer#SMBv1_WindowsFileSharing####15001
DataTransfer#SMBv2_WindowsFileSharing####15002
DataTransfer#Microsoft-ds####60142 - To save the changes, type:
esc :wq - Log in to the Console as an administrator.
NOTE: A Deploy Full Configuration restarts services on all managed hosts in the deployment. It is typically recommended that you alert your users to this task as services as temporarily restarted, which interrupts event and flow collection. - On the Admin tab, click Advanced > Deploy Full Configuration.
Results: After the deploy completes, users in the Network Activity tab should be able to distinguish between SMBv1 and SMBv2 protocol flows.
IMPORTANT: Preserving your changes
Administrators who make changes to files within QRadar automatic updates, such as signatures.xml must verify the configuration settings when new auto updates are provided. To prevent the signatures.xml file from being overwritten, the Update Type needs to be set to Auto Integrate.
Procedure
- Click the Admin tab.
- Click the Auto Update icon.
- Click Change Settings.
- To merge your existing configuration files when an auto update runs, select Auto Integrate.

- Click Save.
Results
Any manual change made by administrators to the custom signatures in /store/configservices/staging/globalconfig/signatures.xml is preserved. During the installation, the signatures.xml file in the auto update is compared by using xdiff. If the XML is properly formatted, any changes from the auto update and /store/configservices/staging/globalconfig/signatures.xml are merged together, and it contains both <appid> and <sigid> values.
[{"Type":"MASTER","Line of Business":{"code":"LOB24","label":"Security Software"},"Business Unit":{"code":"BU059","label":"IBM Software w\/o TPS"},"Product":{"code":"SSBQAC","label":"IBM Security QRadar SIEM"},"ARM Category":[{"code":"a8m0z000000cwsuAAA","label":"Flow Source"}],"ARM Case Number":"","Platform":[{"code":"PF025","label":"Platform Independent"}],"Version":"All Versions"}]
Was this topic helpful?
Document Information
Modified date:
26 October 2022
UID
swg22004689