Troubleshooting
Problem
Customer would like to create a brand new blank DB2 database, and connect it to Controller as a new application repository database. How do they do it?
Symptom
.
Cause
IMPORTANT:
These instructions are suitable for creating one of the following types of Controller databases:
1. Controller application repository (the main database that contains the financial data/configuration)
2. FAP database
3. Data Mart database (for publishing to BI data marts).
** Do NOT use these instructions for creating a 'Content Store' database **
Specifically, you must not use Oracle-compatible mode for creating a Content Store database.
- For more information on creating ContentStore databases, see separate IBM Technote #1667225.
Diagnosing The Problem
TIP: For even more explanation about installing/configuration DB2 10.5, see document "Installing & Configuring IBM DB2 10.5 for use with Cognos Controller 10.2 - Support Proven Practice", which is available inside separate IBM Technote #1608353.
Resolving The Problem
NOTE:
The printscreens shown below are based on the following environment:
- DB2 10.5 server (which is first supported in Controller version 10.2) running on Windows
- All commands/processes being performed inside Data Studio (version 4.1.0.1)
- DB2 username (operating system) = fastnet
- database name = CCRDEMO
- Territory = GB (British), although this can be changed to match your location if necessary.
If you would like full step-by-step details (including printscreens) of the processes described below when using 'Data Studio' and DB2 9.7, then please instead read attached document "1570572 - How to create a brand new blank DB2 database for Controller.PDF".
The scripts below are given as examples only. In your exact environment, this script may need to be changed.
- In particular, make sure that the log configuration is correct for your needs.
- Consult your DB2 administrator for more details.
=================================================
(1) Before creating a Controller application repository (or FAP or Data Mart) database, you must ensure that your DB2 server is installed/configured correctly.
1. Launch a Windows command prompt (CMD)
2. Type: db2set
3. Check the values:

Most importantly (see see separate IBM Technote #1613531 for why), ensure that your DB2 server is configured to be in an Oracle-compatible mode
- In other words, ensure that it has the following settings:
DB2_DEFERRED_PREPARE_SEMANTICS=YES
DB2_COMPATIBILITY_VECTOR=ORA
=================================================
(2) Create a new DB2 database
1. From the Start Menu, launch "Data Studio":


- TIP: Click "Change Credentials" if necessary:

4. Click "Finish"
5. Paste/type a script similar to (change the database name to match your needs) the following:
CREATE DATABASE <DATABASE_NAME_LESS_THAN_8_CHARACTERS> ON 'D:\' USING CODESET UTF-8 TERRITORY GB COLLATE USING SYSTEM PAGESIZE 32768;

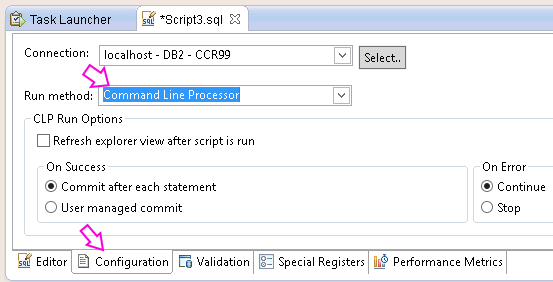
6. Click tab 'Configuration' and change to 'Command Line Processor':

7. Inside 'Validation', choose 'No validation':

8. Inside 'Editor' click "Run SQL':

TIP: You can check the progress by looking at the lower-right corner of the screen:

=================================================
(3) Grant permissions in the database to a database user account (see explanation below on DB2 security):
1. Click on the tab 'Connection'
2. Click on the button 'Select', and click 'New':

3. Create a connection to your new database:

4. Click 'Finish'
5. Inside 'Select Connection Profile', choose the new connection (e.g. "CCRDEMO') and click 'Finish'
6. Check that the chosen connection looks correct:

7. Click on the tab 'Editor'
8. Type in a script similar to the following:
- Naturally, modify the <controlleruser> to the DB2 user that the Controller application server will use to connect to the system (e.g. 'fastnet'). For example, if using DB2 Server on Windows then this will be a local Windows user account created on the DB2 server.
GRANT DBADM, CREATETAB, BINDADD, CONNECT, CREATE_NOT_FENCED_ROUTINE, IMPLICIT_SCHEMA, LOAD, CREATE_EXTERNAL_ROUTINE, QUIESCE_CONNECT ON DATABASE TO USER <controlleruser>;

9. Click 'Run SQL' button (see above).
=================================================
(4) Create two buffer pools:
1. Now type in a script similar to the following:
CREATE BUFFERPOOL BP16K IMMEDIATE SIZE 250 AUTOMATIC PAGESIZE 16 K ;
CREATE BUFFERPOOL BP32K IMMEDIATE SIZE 250 AUTOMATIC PAGESIZE 32 K ;
2. Again, now click 'Run SQL' button.
=================================================
(5) Create required tablespaces:
Exactly as before, type in a script similar to the following and click 'Run SQL' button:
CREATE REGULAR TABLESPACE CONTROLLER_TABLE PAGESIZE 32 K MANAGED BY AUTOMATIC STORAGE BUFFERPOOL BP32K DROPPED TABLE RECOVERY ON;
CREATE REGULAR TABLESPACE CONTROLLER_XDB PAGESIZE 16 K MANAGED BY AUTOMATIC STORAGE BUFFERPOOL BP16K DROPPED TABLE RECOVERY ON;
CREATE REGULAR TABLESPACE CONTROLLER_INDEX PAGESIZE 16 K MANAGED BY AUTOMATIC STORAGE BUFFERPOOL BP16K DROPPED TABLE RECOVERY ON;
CREATE LARGE TABLESPACE CONTROLLER_LOBS PAGESIZE 32 K MANAGED BY AUTOMATIC STORAGE BUFFERPOOL BP32K ;
CREATE USER TEMPORARY TABLESPACE CONTROLLER_TEMP PAGESIZE 32 K MANAGED BY AUTOMATIC STORAGE BUFFERPOOL BP32K ;
CREATE SYSTEM TEMPORARY TABLESPACE CONTROLLER_SYS PAGESIZE 32 K MANAGED BY AUTOMATIC STORAGE BUFFERPOOL BP32K ;
(6) Update the database configuration:
1. Click on the tab 'Connection'
2. Change to 'Command Line Processor'

3. Click on the tab 'Editor'
4. Type in a script similar to the following and click 'Run SQL' button:
- CONNECT TO <database>;
- UPDATE DB CFG USING logprimary 100 logsecond 20 logfilsiz 4096;
CONNECT TO <database>;
- update db cfg using auto_reval DEFERRED_FORCE;
update db cfg using decflt_rounding ROUND_HALF_UP;

==========================
NOTE: Earlier documentation suggested a logfilsiz of 1024
- However, recent feedback from customers suggests that 4096 is typically a better size.
==========================
5. IMPORTANT: Make sure that DB2 has 100% fully 'actioned' the above configurations BEFORE continuing (for reasons why, see separate IBM Technote #1614478). In general this means that you should now run the following script:
- connect terminate;
deactivate db <DATABASE>;
activate db <DATABASE>;

==========================
(7) Connect DB2 database to Controller:
The above steps created a blank DB2 database. Now you can connect it to the Controller application server, and start populating it (via the Database Conversion utility) and using it.
1. Logon to Controller application server as an administrator
2. Launch "Controller Configuration"
3. Open section "Database Connections"
4. Click "New" button
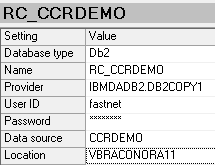
5. Inside "Database type" choose "Db2"
6. Inside the 'provider' section, typically type: IBMDADB2.DB2COPY1
7. Inside the "User ID" section, type in the DB2 user (for example the Windows user created on a Windows-based DB2 server), for example "fastnet"
8. Inside "Data Source" type in database name
9. Inside "Location" type in DB2 server name

11. Click "test" (tick)
12. Click "Run" (play button) to launch "Database Conversion Utility"
13. Ensure that the system is connected to the correct UDL file, and click "Connect"

14. Click "Create DB"
15. After this has finished (assuming that the value of 'Current Version' is less then the 'Upgrade to' version) click "Upgrade":

16. Close "Database Conversion Utility"
17. Open section "Report Server".
- Assuming that you are using Controller 10.1.1 or later, then now you will have to click the green 'tick' box before the 'repair' button will appear.

18. Click "Repair"
19. Open "Batch Services" section.
20. Obtain short period of downtime (no batch processes running) and restart any Batch Services that are currently set to "running" (typically only one)
Related Information
Was this topic helpful?
Document Information
Modified date:
15 June 2018
UID
swg21570572