Troubleshooting
Problem
This document provides instructions for collecting a Wireshark trace on a Microsoft Windows PC.
Resolving The Problem
Wireshark is a free, open source network protocol analyzer that is readily available online (at www.wireshark.org). When paired with WinPCap (www.winpcap.org, which is a freely distributed library for capturing Microsoft Windows packets), Wireshark is a network sniffer trace running on a PC that is experiencing communication problems. Other traces (such as the IBM i Access Client Solutions cwbcotrc) do not always provide the necessary detail to identify the source of a communications problem. In these cases, a Wireshark trace might be requested.
The following steps can be used to collect a Wireshark trace on a Windows PC. The following instructions are based on Wireshark Version 0.99.5 bundled with WinPCap Version 4.0. For more detailed instructions for using the Wireshark program, visit the Wireshark Web page. Older versions of this product were known as Ethereal.
Do the following to install Wireshark:
Do the following to collect a Wireshark trace:
The following steps can be used to collect a Wireshark trace on a Windows PC. The following instructions are based on Wireshark Version 0.99.5 bundled with WinPCap Version 4.0. For more detailed instructions for using the Wireshark program, visit the Wireshark Web page. Older versions of this product were known as Ethereal.
Do the following to install Wireshark:
| 1. | Obtain the latest version of the Wireshark installation program (for example, Wireshark-win64-2.0.2.exe) from the Wireshark website (www.wireshark.org). |
| 2. | Install the program: a. Launch the installation program (Wireshark-win64-2.0.2.exe). b. Click Next to begin the installation. c. Review the license agreement, and click I Agree. d. Accept the default component selection, and click Next. e. Select the options you want. Allow Wireshark to associate with sniffer traces. Click Next. f. If you want to specify a non-default installation directory, specify it, then click Next. g. On the final installation panel, insure that the Install WinPCap option is selected, and click Install. h. During the installation, the WinPCap installer launches. Click Next to begin the WinPCap installation. i. Click Next to begin the installation wizard. j. Review the license agreement, and click I Agree. k. Click Finish to complete the installation of WinPCap. l. Click Next on the installation complete message for Wireshark. m. If you are going to run Wireshark immediately, select the box to start it. Click Finish. |
Do the following to collect a Wireshark trace:
| 1. | Launch the Wireshark program. |
| 2. | Select the menu option Capture > Options... (or press Ctrl+K) to configure the options for collecting a trace. |
| 3. | Clear the Enable promiscuous mode on all interfaces option. This option prevents collecting data that is not sent directly to or from the PC. For Operations Console problems, leave this option checked unless directed to clear it by IBM support. |
| 4. | Click the Output tab, select the pcap-ng output format, Capture to a permanent file, and specify one. If the trace will or might be large, check the option to Create a new file automatically after... and select a value 50 - 100 megabytes. Also, check the option to Use a ring buffer with 5 or more files. The dialog box with these options looks like this: 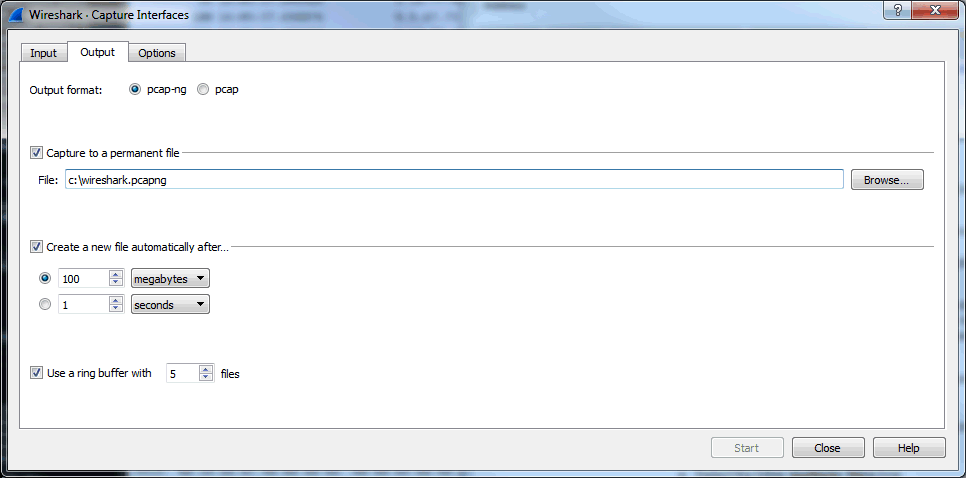 |
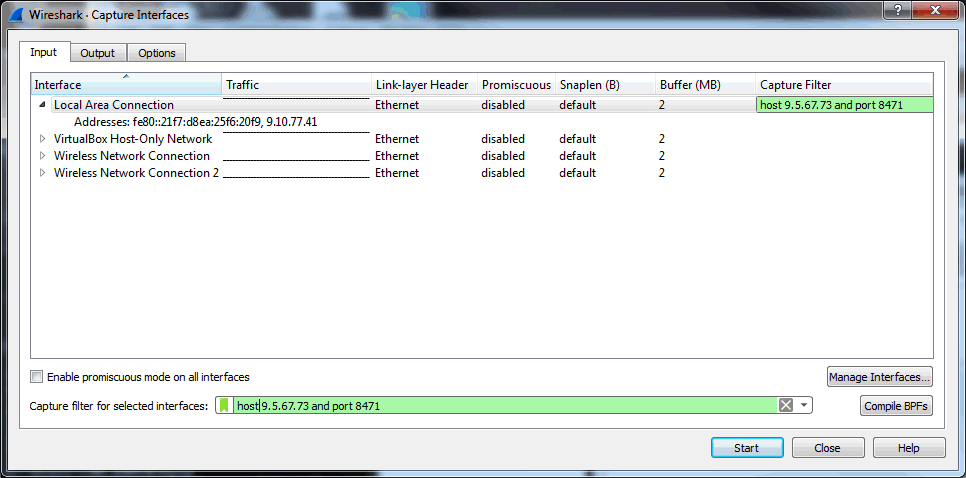
| 5. | Select the interface that the system uses to make the connection.
|
| 6. | Click Start. |
| 7. | Leave the trace running until the problem under investigation is re-created. |
| 8. | Select the menu option Capture > Stop (or press Ctrl+E) to end the collection of packets. |
| 9. | The trace file is available in the directory specified. If multiple files were selected, the name has extra time information included in the file name. Submit the Wireshark trace to IBM Support by using ECuRep: http://www.ecurep.ibm.com |
[{"Product":{"code":"SWG60","label":"IBM i"},"Business Unit":{"code":"BU058","label":"IBM Infrastructure w\/TPS"},"Component":"Access for Windows","Platform":[{"code":"PF012","label":"IBM i"}],"Version":"Version Independent","Edition":"","Line of Business":{"code":"LOB57","label":"Power"}}]
Historical Number
452214885
Was this topic helpful?
Document Information
Modified date:
24 June 2021
UID
nas8N1014338